How to start a computer if it won't boot. What to do if the computer does not turn on
It happens when a joyful user comes home, presses the power button of his faithful comrade, but he remains silent. The computer simply won't turn on. A person begins to panic and call friends who understand at least something about computers, and those, in a stupor from such a direct question, without explanation of the reasons and features, do not even know what to answer. And okay, if the equipment was turned on to launch the game, but if its launch was necessary for work purposes?

The computer just can't turn off and that's it. There is a reason for this, and more than one, so it is impossible to determine it without describing the features. But if you take a closer look at the signs of breakdown, then everything can be eliminated without difficulty. Such situations arise due to the most various reasons. Some of them, after the problem is over, will only cause hysterical laughter, while others will empty your wallet.
Lack of electricity
It happens when a person just comes into the apartment, or just wakes up and immediately turns on the computer. But he, the infection, does not turn on. Thinking about what is the cause of such a tragedy takes a lot of time, but in reality there may simply be no electricity (after all, the TV, lights and other devices were not turned on at that time).
It’s all easy to check, and you shouldn’t go to the Internet for advice in such situations. But it may also happen that all the equipment turns on, but the computer does not. There is a possibility that there is no electrical power in a particular outlet.
Electricians know why this happens, but you can check it yourself by plugging in a hair dryer or other equipment. If it does not work, then the problem is in the outlet. The power supply must be connected to another source, and the outlet itself must not be touched until the technician arrives. If the reason is not in the outlet, then move on.
Computer power
It may be that everything is fine with the outlet, but the power still does not reach the computer. First you need to check the integrity of the cable and carry out a simple manipulation: remove it and insert it. If the appearance of the cord shows that it is time for it to go into the trash, then it is better to do so and buy a new one. Even if the reason for the poor PC startup is not in it.
Also, there is a special button on the back of the system unit. It is rarely used, but accidentally catching it and then wondering why the computer is not working is quite realistic. It must be switched to the “On” position.

power unit
If there is no problem with the socket and cord, but the problem persists, then you need to follow the electricity. After the cable it goes to the power supply, which is where we go. People are used to saving on everything they can. In computers, power supplies come to the forefront of saving money. People don't fully understand how important this piece of technology is.
If it breaks and needs to be replaced with a new one, it’s not a big deal and will cost $35-50. The problems will be more serious if not only the power supply is broken, but also other parts such as the motherboard or video card.
It’s also not worth buying new parts right away; you need to check everything first. The easiest way to do this is if you have another, working power supply. If this is not the case, then you will need a voltage tester. There should be a voltage of 5V in the power connectors between the black and red wires, and 12V between the yellow and black wires. Deviation is possible only within 5-7 percent; if more, then the unit urgently needs to be changed. To avoid future problems with the inoperability of other elements of the system unit, it must be replaced and not repaired.
When the power supply becomes faulty, “sticking” may occur internal protection. You need to unplug the power cable for a few minutes and leave the PC unplugged. If after this, it still does not start, the reason must be looked for elsewhere.
The battery is dead
There is a small 3V lithium battery on the surface of the motherboard. It supports the memory system in which BIOS settings. It is very difficult to check this battery before buying a computer, because in order to see it, you need to disassemble the computer. Yes, and check the functionality appearance– quite difficult. And it may well turn out to be used. Or it could have been sitting in storage for several years.

When the battery runs out, the BIOS system settings are reset. A sign of such a malfunction may be a constant time failure. Also, if there are problems with the battery, when you turn on the computer, it will ask you to save the BIOS settings. IN in some cases, the equipment refuses to turn on at all. You also need to check its performance using a tester. If it turns out to be non-working, or you simply don’t have a tester at hand, then you can replace it. These batteries are sold in every computer store and are inexpensive.
Checking the processor and hard drive
If the cover of the system unit was removed to check the power supply and batteries, then at the same time you can look at the processor and hard drive. To find out if the processor is working, you need to remove the cooler from it, start the computer and put your hand on the heatsink. If it starts to heat up, it means it is working. But it's also worth taking a look to see if the cooler is working. If not, the computer will shut down to avoid overheating, and it will not always start.
The hard drive could also be a startup problem. You need to check if all the plugs are tightly connected to it.
Dust in the computer
If there is a lot of dust inside the system unit, then it is not surprising that the computer does not start. To fix the problem you need a regular vacuum cleaner. The entire cleaning process consists of several stages:
Viruses
The reason why your computer won't turn on could be a virus. They become real computer killers; viruses can cause harm in the most different situations. If a person uses the Internet and has a bad antivirus installed, or not installed at all, then world wide web Viruses will quickly come to your computer. The most the best method Pest Control is a quality antivirus. It must be official and should be updated periodically. There is no need to skimp on this software.
But there are situations when the PC turns on, but the operating system does not. How to run the antivirus in this case? You should try loading the last known good configuration. To do this, when you turn on the computer, press F8. After pressing the key, a menu will appear on the screen in which you need to select “Load last known known configuration”.

If you cannot start a successful configuration, you should try entering safe mode. You should also use F8 for this. When you press the key, a special menu appears on the screen in which you need to select the “Safe Mode” line. If you managed to start the OS, then you need to proceed as follows:
- Go to the Start menu;
- Select the “All programs” menu;
- Select “Standard”;
- Open the “Service” window;
- Click on “System Restore”;
BIOS Settings
Most users don't even know what this is. BIOS system. In fact, there is no need to get involved in this issue; it is better to immediately eliminate the problem. If the computer does not turn on due to incorrect BIOS settings, then you need to remove them, reset them or return them to factory settings. You can call this process whatever you like. If the PC still turns on, but only sometimes, then you need to go into the BIOS when starting the system. In order to enter it, you need to press the Del or F2 key (depending on each computer). Next, in the menu that opens ( blue) click on Load Optimized Files. If the computer does not turn on at all, then you need to reset the BIOS in another way.

First you need to remove the cover of the system unit and find the motherboard inside. On its surface there is a “Clear CMOS” jumper, which is what we need. It needs to be “settled” in adjacent contacts, or simply removed for a few minutes. After that, put it back and start the computer.

Motherboard
If the settings are reset, the computer is cleaned of dust and everything is in order with the power supply, but the equipment still does not turn on, then the most possible worst option. If the motherboard is broken, it will cost a lot of money. Especially if you want to buy a modern board, which will entail the purchase of a new processor, RAM and video card. As a result, you will have to update almost your entire computer. Well, it had to be done someday.
The process of replacing a motherboard is not easy; when replacing, you need to take into account the following factors:
- The new board must have the same processor socket;
- You need to check the number of RAM slots, they must be of the same type (DDR, DDR2, DDR3, etc.);
- Connection hard drive must be similar;
- The required number of slots for the required cards;
If all this is not taken into account, then new problem. Now the user will be tormented by the question of why the new motherboard does not start. Also, new equipment may have different system settings, and you will have to reinstall the operating system.

The logical question would be, why not send the motherboard for repair? This can only be done if the cost of repair services does not exceed 30% of the price of the entire board. Repairing this part of the computer is very complex process and there is no guarantee that it will perform well in the future.
If everything possible methods solutions to the problem have been used, but the equipment still does not turn on, then you should not be upset. You need to call a technician who will determine the cause of the problem and fix it.
The topic that I want to discuss in this article is very popular and talking about it in detail so that you understand how and what to do is not so simple. But still, I will try to describe possible ways What to do if Windows 7 does not boot on your laptop or computer. We will also find out why this could happen?! The task ahead of us is not an easy one, namely, to correct the current situation, but there is no need to be afraid. Just follow the clear instructions and everything will be great! Some points may apply to others as well. operating systems, but I will focus on Windows 7.
Dear reader, if you really want to solve the problem, then I strongly recommend reading the article in full, and then drawing some conclusions. I cannot talk about all the nuances in one paragraph.
Safe Mode and Last Known Good Configuration
This is a must try! Reboot the computer, press the F8 key continuously.
Attention! In Windows 8, entering Safe Mode is a little different, so it's best to follow the link below to find out all the details. In the list that appears, we are interested in the item called “Last Known Good Configuration (Advanced).” Select and press Enter.
About how to enter safe mode on different systems:
What to do if the information above did not help you? We repeat the steps described in the previous paragraph, but select “Safe Mode”.
Next, you can make a choice: fix the problem due to which Windows 7 does not boot manually, or try to do it in semi-automatic mode. Usually I do everything manually, for example, if Windows does not boot after installing the drivers, then I delete the drivers and try to boot. I think you understand that the manual method requires more knowledge on your part, so Windows offers you another option, which I will describe below.
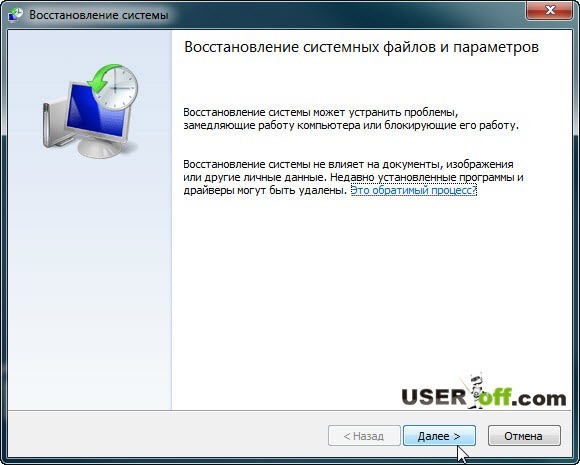
If everything loads, go to the Start menu, Control Panel, System and Security. In the “Support Center” tab, click on the inscription “Restore the computer to a previous state.” See the “Run System Restore” button? Great, then you've come to the right place.

Now click it and follow the instructions.
Next, you will need to select a restore point. In my case, I am asked to select a point on the 23rd, and now the calendar shows the 29th. Therefore, you need to click on “Search for affected programs” to find out what actions you will need to take after recovery.
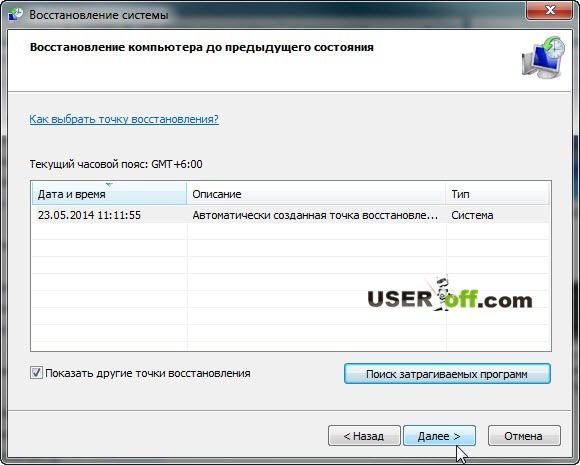
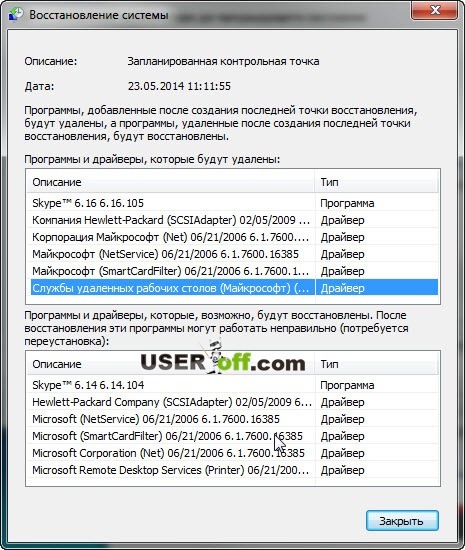
So, you have familiarized yourself with the affected software when restoring the system and now you can close this window. After closing the window, click "Next".
If you were unable to enter safe mode to restore Windows, then do not despair. Below we will look at another method.
Note: at the very beginning, when Windows 7 was just coming out, there was one strange glitch that you might have too. When you turn on the computer, the welcome screen follows and a black screen appears. As I remember, it seemed like there was still an arrow, but nothing else was visible. The cure was very simple - go into safe mode and restart the computer as usual. After that I was able to log into my account without any additional manipulations with Windows.
You may need to reinstall Windows
This option should be considered when you have tried to revive Windows, but all attempts have produced no results.
The very first thing that comes to mind for many, and for me too, is reinstalling Windows 7. But this method, you see, is very long, and if you are a busy person, then access to the computer should be almost constant. Reinstallation is suitable for those who have a lot of free time or do not have time to understand more quick methods, or for those who cannot be helped by any of the methods I have listed below for restoring the Windows operating system.
Dwell in detail on Windows installation I won’t, because I wrote about this on my blog:
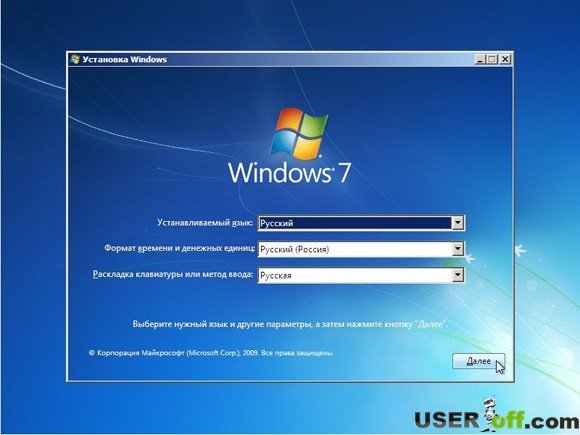
Here brief instructions: since you do not have access to the desktop, go to the BIOS, look for the Boot or Advanced BIOS Features tab, or search for it yourself. Then in it we find the line “1st Boot Device”, set the value to CD-ROM. What have we done? What we have done is that now when the computer boots, it will boot from the disk that is installed in your CDRom, and not from the hard drive. After turning it on, when the inscription “Press any key...” appears on a black background, press any button and get into the Windows installation wizard. Then follow the instructions on the screen.
You can read more about how to boot from disk in my article: “”.
I decided to talk about the installation at the very beginning, because if you were going to reinstall Windows, then perhaps this is some kind of sign to implement it))). But as I said at the very beginning, we will now try to bring your Windows back to life without reinstalling it.
System Restore
First of all, you can use the function that is in the installation disk “System Restore”. I will give an example of the Windows 7 system, but if you have a different system, then this is not a reason to think that you cannot do on your system. The names of the buttons may differ, but the principle remains the same.
So for this procedure we need installation disk with Windows or its image (can be downloaded on the Internet). If you are unable to download the image or do not have a disk, then write to me by email [email protected] or contact your friends who have already installed Windows themselves.
If you don’t have a working disk drive or don’t have one at all, then the article “” will help you create a bootable flash drive.
When you have a Windows distribution, insert it into the drive and restart the computer. If the BIOS is configured for installation, you will see the line:

When it appears, press any key.
If it is not there or Windows boots as usual, then you need to make manipulations in the BIOS. Namely, set loading priorities. Usually the hard drive is set in the BIOS settings, since that is where your Windows is installed.
In order for the computer to start booting from the disk that is in your drive, you need to go into the BIOS and specify CDRom as the first boot device. I have already talked about this above, if you have not read this point, then it’s time to do so.
So, you pressed any key, now a window will appear where you click “Next”.
In the next window you need to click “System Restore”.

A search will be performed for installed systems. If you have one system installed, then there will be one operating system in the list. Select it and click Next.

Often at this stage a message may appear in which you will be asked to restore the system. If this message will be displayed on your screen, then click “Fix and restart”. After that, try to log into your account.
If the message does not appear, then in the next window you select your system and click “Next”.
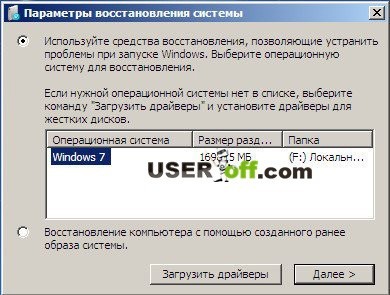
After this, a window will appear where you can select system recovery methods.

– automatic problem solving.
System Restore – you can use this method, but on the condition that this function was turned on.
Restoring a system image – if you have a Windows recovery image.
Command line– using certain commands you can revive Windows. This method will be discussed further.
Now click “Startup Repair”. Now you need to wait a bit for the utility to try to automatically find the problem and solve it.
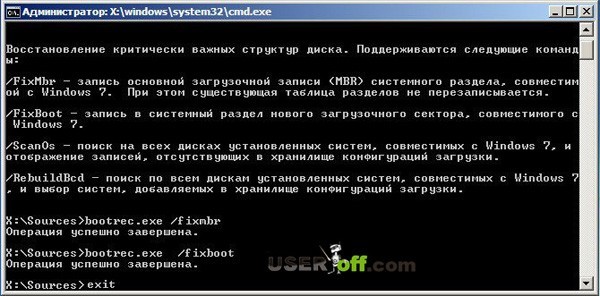
System Restore via Command Line
Then enter and press Enter.

A list of commands that can be used in this utility will appear; now you need to enter: Bootrec.exe /FixMbr and press Enter.

Now enter . exe / , then clicking on Enter. Next, exit the utility by typing exit and pressing Enter. Now you can try to log into your account, since restoration work finished.
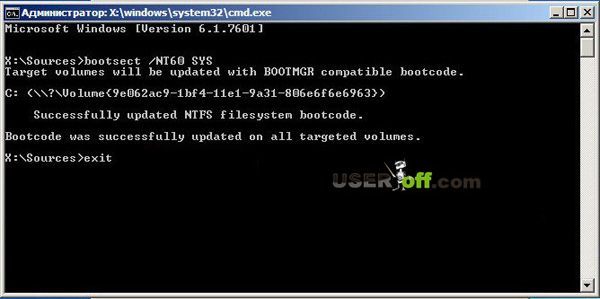
You can also try updating the boot code by entering the command bootsect /NT60 SYS. Then leave as a team Exit.
If the above commands did not help you, then go to the command line and enter Bootrec.exe /RebuildBcd. Using this command, you will scan your hard drive to find the systems installed on it.
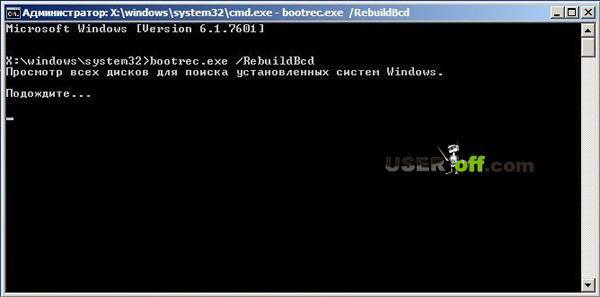
When the scan is finished, a list of installed operating systems on your hard drive will appear. To add it to the download list, click Y And Enter. After successful completion of the operation, enter Exit and press Enter.

So, we have dealt with the command line. In principle, this should help to get your system to boot.
Inactive hard drive partition
This situation does not occur often, but it is still necessary to talk about it, otherwise the article can be said to be truncated. Let me give you an example, after which you will understand what's what.
Let's say you have several operating systems installed on your computer. Windows systems, which are installed on different hard drives. If you assign incorrect attributes to hard drive partitions, you will have problems booting a particular version of Windows.
To check or fix this, you can use the Acronis Disk Director boot disk to change the partition attributes. So, download and burn boot disk Acronis Disk Director and boot from it. How to do this? Insert the disc into the drive, restart the computer, and it will begin booting from the disc in the drive. But before that, check your download priorities. There should be a CDRom, just like when installing Windows. We have already talked about this in this article above.
When the program loads, pay attention to the checkboxes that are on the hard drive partitions.

In the image above we see that the checkboxes are on the second partitions of the hard drive. You need to make sure that these checkboxes are on the first sections. We got to practice ;). You need to right-click on each first partition of your hard drive and select “Mark as active.”
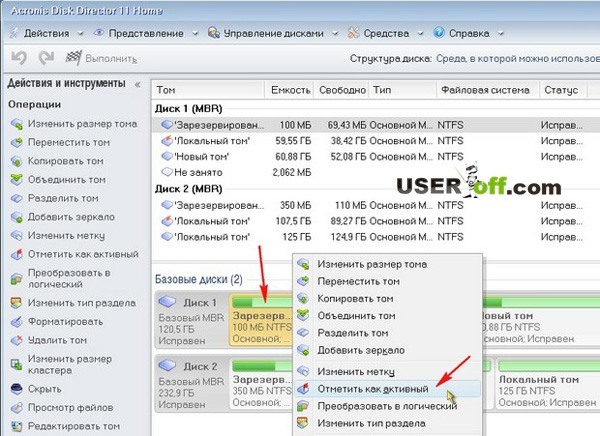
A message should appear where you click “OK”. This is what it looks like after the whole procedure:

Now all that remains is to click on the “Run” checkbox, wait for the operation to complete and restart the computer. Be sure to remove the disc from the drive.
Hardware problems, BIOS and viruses
Hard drive. If your system unit, or rather, the hard drive makes suspicious sounds: clicking or tapping, that is, there is a possibility that the hard drive needs to be replaced. To make sure of this, you need to open the cover of the system unit, turn on the computer and listen to work hard disk. Also check the wire connection to the hard drive. It is possible that the wires have become disconnected and the computer cannot see the hard drive.
If you suspect that the problem is with the hard drive, then you need to copy all important data to another medium. Otherwise, you may lose them completely.
BIOS. Go to the BIOS settings and set the hard drive to the first place so that booting starts from it. Above we looked at an example where we set up a CDROM; you do the same with a hard drive. Just don’t forget to save the changes in the BIOS by pressing the F10 key.
The second method – you won’t believe it, but it actually works! Just go into the BIOS and, without changing anything there, exit, saving the changes that in fact did not exist (by pressing the F10 button). I personally once fixed my friends’ laptop this way, and when they asked me how I did it, my answer was: “Magic and nothing more 😉.” So give it a try, maybe everything will be much easier than you think.
Viruses. Sometimes viruses prevent Windows from booting. If there are viruses on your computer, you need to scan the entire disk for viruses. Here are articles that will be useful to you: “” and “”.
Of course, if you check your hard drive for viruses, you will need to disconnect it and connect it to another computer, since in your case Windows will not load. Or you can use special boot programs with which you can scan your computer for viruses even if you cannot boot your Windows. Here are a couple of them: and.
Attention! There are cases when, after installing updates, Windows 7 stopped loading! Therefore, you may want to try uninstalling recent updates that were installed before the Windows boot problem occurred.
Important! If you see a specific error on your screen, I recommend using a Google or Yandex search. You can enter into the search not only the error code, but also the words that are used in it. Thus, you will save your time searching for the problem and its solution.
Important! If the system unit makes squeaks when turned on, then you need to use this squeak to determine the problem. Ask how? Here's an article on this topic: "".
That's all I wanted to say. The article turned out to be long, and I sincerely hope that at least one of the methods I described helped you.
Says a lot of unnecessary things, but there is useful information for you:
Hello friends! I have already written many articles about what to do if Windows 7 does not boot. But I haven’t written yet about what you need to do first if your computer refuses to start, or maybe I did :). Well, it’s okay, twice is better than never :).
This will be some advice on how to hit the first one ambulance system in case of failure. I usually write similar tips and describe in them how to restore Windows 7 if a specific error occurs. But today I will write how to try to cure the system from various errors and problems when loading.
If you turn on the computer, but it frankly does not turn on. Well, you know how it happens, a certain error appears, a blue screen appears, or the computer simply reboots itself, then you need to try to start the computer with the last successful configuration with working parameters.If we talk about what might cause Windows to stop booting, there are a lot of options. For example, a failure may occur after installing some program or driver. After cleaning your computer from viruses. After incorrect completion of work (when, for example, there was a power outage). I had a problem where I normally turned off my computer in the evening, but in the morning it wouldn’t start, and it seemed like I hadn’t installed anything, but then this happened.
In such cases, the first thing we do is try to start the computer with the last known successful configuration. If this does not help, then you need to look for other ways to solve the problem, for example, searching by error. But as my practice shows, it very often helps to bring the computer back to life. Moreover, all these actions can be done in a few minutes. Now more details.
How to start Windows 7 with Last Known Known Configuration?
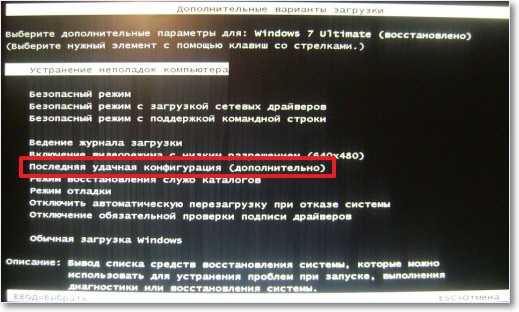
It's very simple. Reboot the computer and immediately actively press the key F8.
 A black window will appear with additional download options to choose from. Choose “Last Known Good Configuration (Advanced)” and press “Enter”.
Good day everyone. Today the topic of our computer conversation is devoted to the case when you turn on your computer, but it does not turn on. The moment, you see, is not a pleasant one. Moreover, yesterday you worked quietly, turned it off, and today nothing turns on.
There can be many reasons for this. Some of them can be eliminated on our own, others only with the help of a specialist. But before we run to the workshop, let's look at these reasons. Maybe you can fix something yourself.
What could be causing your computer to not turn on? First, let's define how it doesn't turn on: it doesn't turn on at all, it turns on but doesn't load, or it turns on but the monitor is blank.
These cases can be divided into two problems: problems with hardware and problems with the system. If the coolers are working, the computer beeps, the monitor starts running the BIOS and that’s it, then the problem is in the system itself. It’s a little simpler here, we reinstall and move on. Otherwise, you have a hardware problem.

Here are the top most common reasons for this:
- Power problem
- Power supply burnt out
- Monitor is faulty
- The battery is dead motherboard
- System unit contamination
- Problems with connecting components or cables
- Power button malfunction
- Motherboard failure

If your computer does not turn on, the first thing you need to do is check whether voltage is supplied to the computer. Here, first of all, we check the power supply itself. It has an on/off button. Maybe it was turned off.
In addition, the power supply can be checked by replacing it with a working one. We disconnect all cables from the motherboard and in their place we connect another power supply, a working one. If everything works with it, then the problem is in your power supply. If you do not have another power supply, then using any conductive material: a paper clip, etc. You will need to close the green and black contacts on the unit being tested. If the fan starts working, then the unit is ok.
Checking network cables
Next we check network cables. Perhaps one of them is poorly inserted, or it simply needs to be replaced. If your computer operates via a UPS, then you need to check that too. If the computer is connected through a surge protector, then the problem may be there. We also check its performance.
Checking the power buttons
We check the power buttons on the processor. Sometimes they get stuck. If everything is fine, then we look for the power connectors on the motherboard (the instructions for it have all the descriptions with pictures). We take out the plug and close the contacts with tweezers.
The computer will either turn on, then the problem is the button, or not.

Resetting BIOS settings
If your computer does not turn on, then try resetting the BIOS settings. This is done using a special jumper located next to the battery. Remove the battery for a couple of minutes. After this, the settings will be reset to factory settings. You can even replace the battery itself.
Also, do not forget to clean the board and all its components from dust. After that, turn on the computer again. If it doesn’t help, move on to checking all components
Checking computer components
First, we remove everything that is installed on it from the motherboard: processor, RAM modules, hard drive. We leave only the power supply, the motherboard itself, and the power/reset button wires connected to it. After that, turn on the computer. What should it be? If the power supply fan does not spin or it starts but turns off after a few seconds, then the motherboard is faulty. We replace it. If the fan rotates normally, then the problem is not with the motherboard.
The next steps are as follows: we insert each component one by one and turn on the computer. If the computer works after the inserted component, then this element is working. If it does not turn on, then it will be necessary to replace the faulty part. Memory modules must be tested through all slots for which they are intended. It may turn out that the problem is a malfunction of one of the slots.

The last thing we check is the hard drive. If the computer turns on but does not start, then see if the processor sees it. If it sees it, the problem is in the operating system; if not, it’s in the hard drive itself. It needs to be diagnosed. In addition, when you turn on the computer, listen carefully to see if the hard drive makes sounds and what kind of sounds they make. If it hums normally, then the disk is intact, but if it is silent or sounds something different, then most likely it is broken.
So, let's summarize what you need to do to check your computer:
- find out that the power supply is turned on
- check the serviceability of the outlet to which the PC is connected
- Check if the PC power cable is working properly
- clean your computer
- check the health of the power supply
- check the functionality of the PC power button
- find out the presence or absence of swollen capacitors on the motherboard
- Check the BIOS battery, replace if necessary
- check the health of the hard drive (you can put your hand on it and if it vibrates, then everything is fine with it)
- check memory modules through all slots for their connection
If none of the above helped, then you need to take the “sick” to a service workshop.
The trouble described in the title of the article sooner or later happens to every computer: one day it stops turning on. Sometimes this is preceded by some event, and sometimes absolutely nothing. In some cases, such failures are corrected very easily, while in others they are difficult to fix. In short, the range of problems that lead to a PC not turning on is very wide. Let's talk about them in more detail: what causes them, how to find the cause and deal with the problem yourself, without resorting to the help of specialists.
When someone says that their computer does not turn on, know that by this complaint the owner may mean the following:
- The PC really does not turn on: there is no response to pressing the power button at all.
- The PC turns on, but not completely: sometimes this is limited to the indicators on the system unit and keyboard turning on, sometimes to the sounds of the system speaker, sometimes when you press the power button, the fans start working, and then nothing happens. General detail one - the screen remains black.
- The PC turns on and immediately turns off or goes into an endless reboot until the picture appears on the screen.
- The PC turns on and works, but the operating system does not start on it.
The first 3 situations are of hardware origin, that is, they are associated with a malfunction or incorrect connection of the equipment. The latter is most often caused by operating system errors, which arose, for example, due to unsuccessful Windows updates 7 to Windows 10, as well as device driver failures. In the case of drivers Windows startup usually interrupted by a blue screen of death - BSOD.
In more in rare cases the inability to load the OS is also associated with hardware problems - usually RAM or a hard drive.
Reasons for true non-inclusion
Since failures to load operating systems are a separate big topic, we will not dwell on them in detail. Let's look at the reasons for the first three situations and, in addition to them, one more: turning on the computer not the first time, but after repeatedly pressing the power button. So…

The computer does not respond to the start button
- There is no power from the mains (the outlet or device through which the computer is connected to the power source - the UPS or surge protector - is not working). The only reason not related to a PC malfunction.
- The power supply does not produce the required voltages because it is faulty, insufficiently efficient, or not powered from the network due to a damaged electrical cord.
- Poor contact in device connectors, damage to power cables inside the system unit.
- Low battery voltage for BIOS chips.
- Short circuit in one of the devices.
- Malfunction of the switching circuit elements on the motherboard.
- The power button on the system unit is faulty.
- Blocking switching on by static charge.
The computer does not turn on completely (no initialization)
- The elements of the video subsystem are faulty (video card, monitor, video cable). The absence of an image on the monitor, even if everything except video is working, in the eyes of the user looks like the computer not turning on.
- The BIOS firmware has crashed (on some laptops, the BIOS crash is manifested by a complete lack of response to the power button).
- The board has a faulty or unsupported processor installed.
- The processor power supply system (VRM) is faulty.
- Faulty RAM or its power supplies.
- On old motherboards, the north bridge or bridge power supply has failed.
The computer turns off immediately after turning on or reboots cyclically early in the startup phase
- BIOS meeting.
- Overheat.
- RAM defects.
- Same reasons as for complete absence reactions to the button.
The computer turns on only after pressing the button multiple times
- If the machine is older than 5-7 years, the life of the electrolytic capacitors in the power supply, on the motherboard or devices connected to it is exhausted.
- The power button is faulty (the contacts are coming off).
- Elements of the circuit starting the board or powering high-load nodes are faulty.
Diagnosis at home
Home users typically do not have the equipment to make troubleshooting easier, so they are left with the use of their senses and spare, known-good parts.
Before starting a diagnosis, it is important to remember what preceded the problem and what could have caused it. For example, the computer suddenly turned off during a thunderstorm and will not turn on again. The reason is that the network controller is burned out by a high-voltage lightning charge through a twisted pair cable. If it stops turning on after some manipulations in the system unit - connecting a new device, cleaning it from dust, etc., the reason is most likely due to incorrect assembly or broken contacts of the devices.

If there is no obvious cause-and-effect relationship, for example, yesterday you turned off the computer as usual, but today it did not turn on, start checking with external contacts - the power supply cord, monitor and everything else that is located outside. IN similar cases This technique often helps: turn off the machine from the outlet or using the key on the power supply (i.e., disconnect from the power source) and hold down the power button on the system unit for 20-30 seconds. This will remove the static charge accumulated inside, which sometimes blocks starting.
Narrow it down possible problems the squeak of the system speaker helps: decoding sound signals easy to find on the Internet. But keep in mind that BIOSes different manufacturers“squeak” differently. If the computer does not beep at all, it either does not have a speaker, or due to a malfunction (usually the power supply or motherboard) it is not running the BIOS microcode.
In cases where you cannot decide where to “dig”, use the algorithm that we present below. After each diagnostic step, try turning on the computer.
- Inspect the system unit and all its connections from the outside. Disconnect unnecessary peripherals and everything connected to USB, except the keyboard and mouse.
- Remove the cover of the system unit and make sure the internal connections are secure. If there is any accumulation of dust, remove it. If the motherboard is older than 3-5 years, replace the BIOS battery (brand CR-2032, sold in kiosks).

- Without pressing the Power button on the system unit (with the power supply plugged in), if possible, check whether the motherboard is receiving standby power (for example, Asus has a standby LED indicator). Check by hand the temperature of large elements of the motherboard, video card and expansion cards. Normally they should be cold or slightly warm. If any part becomes noticeably hot, it is very likely that it is the source of the problem.
- Turn on the power of the system unit. Pay attention to how the fans behave. Normally, after spinning up, they should slow down a little. If you see exactly this picture, the reason that there is no image on the screen is 80% likely to be a problem in the video subsystem. If the coolers operate at the highest possible speed, the reason is a failed BIOS, a “broken” RAM, a non-working/unpowered processor or a north bridge (on old motherboards). If the coolers make several revolutions and stop or only have time to jerk once, the source of the problem is a short circuit on any of the devices or poor contact at their connections. Cycles of spin-ups and stops, one after another (rebooting the computer to early stage startup) are usually due to damaged BIOS. If the fans are not spinning at all, they are most likely not receiving power. This often happens when the power supply or motherboard is faulty.

- If there are no signs of a short circuit (if there are, further diagnostics should be continued only after it has been eliminated), turn off the computer's power and reset the BIOS settings to default.
If the above algorithm does not clarify the situation, it is more convenient to continue further diagnostics on a stand assembled on a table.
Assembling the stand
Before removing components from the case, do not forget to turn off the power to both the system unit and the monitor - turn off the surge protector or unplug the cords from the outlet. If the computer is powered by a UPS, simply unplugging it from the outlet is not enough, since the batteries still have a charge.
Next, prepare workplace. The table on which you will assemble the stand must be dry and clean. It is not necessary to use special antistatic mats; it is enough that there is nothing metal on the table. To prevent electronic components from being damaged by static from your body, it is advisable to wear an antistatic wrist strap. If it’s not there, it’s okay: just touch any unpainted part of the PC case with your hands.
When removing each part, inspect it for:
- chipped elements;
- integrity of contact groups (presence of broken and bent contacts, melted or darkened plastic pads from overheating);
- deformed and defective components (swollen capacitors, traces of leaked electrolyte, microcircuits with stains, and even more so burnout holes);
- darkening on PCB (with reverse side yellow or brown spots often appear on boards under very hot elements).
- scratches (if the scratch is above the tracks, look at it under a magnifying glass with maximum magnification to make sure that the tracks are intact).
Any of the listed defects may cause the PC to not work.
On machines that take too long to turn on, every once in a while or after multiple reboots, special attention Pay attention to the capacitors and the condition of the PCB underneath them. Thus, electrolytes that have outlived their useful life may look normal, indicating a malfunction only as a small dark spot on the back of the board.

If there is any suspicion of the unsuitability of electrolytic capacitors, they should be replaced with new ones, and not only obviously defective ones, but all those that are in the same circuit with them.
Having finished inspecting the devices, assemble a stand with minimal configuration on the table. For a test run, all you need is a motherboard with a processor and a cooler, one memory module, a power supply, a keyboard and a video card (if you are using a discrete one and the processor or board has built-in video, connect the monitor to the latter).
When assembling the stand, it doesn’t hurt to clean the contact combs of the RAM and expansion boards with a school eraser. This will remove oxide deposits from them, which worsens contact in the connectors.
- Turn on the power supply (if it is working properly, the board should start receiving standby voltage). Check the temperature of the components again with your hand. It should not be hot, as you remember, normally.
- If you are in doubt about the functionality of the power supply, replace it with a known good one (if available). If this is not the case, try running it separately from the system: disconnect the 24-pin connector from the motherboard and connect a load, for example, an optical drive or a regular light bulb with soldered wires, to one of the free connectors. On the block that connects to the motherboard, close the contacts opposite the green and one of the black wires. If the load shows signs of “life” and the fan in the unit itself starts spinning, you can consider it conditionally operational.
To avoid electrical injury, do not open the power supply, even if it is turned off. Capacitors in the high-voltage part of its circuit can retain a charge for quite a long time.
- Start the stand (remembering to return the working power supply to its place). This time not from the power button, but by closing the contacts to which its wires are connected on the board. If a picture appears on the screen (the computer is working), the cause of the problem is in devices that are not currently connected to the stand. If a monitor that is known to work does not turn on, the failure occurs due to the fault of one of the devices involved.
How to identify a problem node using indirect signs

- If your computer has several memory modules, try running the test bench with each one in turn, installing them in different slots. If one of the combinations works, update the BIOS firmware. After this, perhaps the rest of the memory will work.
- If none of the RAM modules made the stand turn on, try running it without memory at all. In this way you will check the conditional “liveness” of the BIOS. “Live” firmware will make itself known by the squeaking of the system speaker or the blinking of indicators on the keyboard or motherboard.
- Install a known-good and compatible processor on the bench. If the computer turns on normally, update the BIOS. Perhaps the processor that was installed before was simply not recognized by the system.
- If you are using a discrete video card, check it in different slots (if available), and also connect it through a different video output to a different monitor input.
- If everything described above does not help you identify the source of the problem, the culprit is most likely the key component - the motherboard.
What to do with the device that caused the failure? The choice is small: replace it with a new one or take it to a service center for repair.


