Which process is responsible for updating Windows 10. How to disable and restore automatic Windows 10 updates
Windows 10 automatically checks for updates and also installs them automatically. If in the early Windows versions you could configure update methods operating system, then in Windows 10 you simply observe how the system, regardless of the time, connection speed and computer load, downloads and installs updates when it is convenient for it. Should she be comfortable? Would it be more useful to return the right to the user to decide when he wants to install an update, and when he wants to restart the computer?
In today's article we'll talk about hidden ways to stop automatic installation updates in Windows 10.
Disable automatic update download for a specific connection
If you are connected to the Internet via a local network (the cable is inserted into your computer), do everything according to the instructions " " and the system will begin to offer you to download updates if they are available (that is, they will not download automatically).
If you are connected to the Internet via a wireless network (Wi Fi), do the following:
1. Go to the Start menu => Settings;

2 . Open "Network and Internet" => in the left column, select "Wi Fi" => in the right column, left-click on the connected network;

3 . In the “Limited connection” item next to “Set as metered connection”, left-click on the switch so that it turns to the “ON” position.

After you enable Metered Connection, Windows will notify you when updates are available and prompt you to download them. Simply put, we have achieved that Windows 10 offers an update and asks whether we want to download it or not.

Using Group Policy to disable automatic updates in Windows 10
This way you can disable automatic download updates regardless of the connection you are using. But there is also a minus: the ability to customize the system using group policy not implemented in the home version of Windows. Home users can skip this method, and consider other options from this article!
1 . In the search bar or in the Run menu (Run is called with the Win + R keys) write the command gpedit.msc and press Enter.

2 . On the left side, select Computer Configuration => Administrative Templates => Windows Components => Windows Update => with right side open "Automatic update settings" => put a dot in the "Enabled" field => now decide on the automatic update settings, whether you want Windows 10 to notify about the presence and download of an update, or so that it downloads and offers to install, or so that everything is automatically. We select the first "download and installation notification" and click "OK".

After saving the new settings and restarting the computer, go to Windows Update. There you will see the inscription “Some settings are controlled by your organization.” Now updates will occur depending on the choice in group policies, and if you want to return automatic downloading and installation, just go back to group policies, follow the path indicated above and in “Automatic update settings” select “Not configured”.

Disable automatic updates in Windows 10 by stopping the service
Another way to stop automatic downloading of updates completely is by disabling Windows Update using services:
1 . In the search bar or in the Run menu (Run is called with the Win + R keys) write services.msc and press Enter.

2 . Almost at the very bottom, find “Windows Update”, open this service double click left mouse button.

3 . Click "Stop", in the "startup type" field select "Disabled".

Now, when checking for updates, error 0x80070422 will appear, so nothing will be downloaded or installed. Using this method, you will disable all updates altogether, even if some security updates are released, you will not install them. You can return the ability to install back at any time by starting a stopped service.
If you want to return everything as it was: follow steps 1 and 2 from the instructions above, and in the third - click “Run”, select “startup type” “automatically”.
Disabling automatic restart in Windows updates
By default, Windows 10 automatically restarts your computer when it is idle to install updates. But not always and not every user is satisfied with this action; you can change it so that when installing updates you are asked convenient time to reboot. You can also set the time when you can restart your computer to install updates.
1 . Go to the Start menu => Settings.
2. Select "Update and Security" => in the left column "Windows Update" => in the right column open "Restart Options".

3. In the "Schedule time" section, select a time when you can restart your computer to install updates. Next to “Show more notifications”, left-click on the switch so that it turns to the “On” position. If in at the moment Some updates are installed and a reboot is required - you will not be able to make a change in the “Schedule time” item, restart your computer and try again.

If Windows 10 is trying to install an update for you that causes problems with the system, you can block it. This action is not provided in Windows Update, and to prevent the installation of certain updates and drivers, you need to download a tool from Microsoft:

3 . If you want to hide an update so that it will not be installed in the future, click hide updates and select the updates that you want to hide. That is, check the boxes next to unnecessary updates and click “Next”.

If in the future you need to install a hidden update, then re-run this utility and select "Show hidden updates", then display the updates and when next installation updates will be installed.
There is also a way to disable automatic updates through the registry, and it is only suitable for professional and enterprise versions of Windows 10, it does the same thing as in group policies, so I don’t know how much you will need it:
1. In the search bar or in the Run menu (Run is called by using the Win+R keys) enter regedit and press the Enter key;
2. Open in the left column HKEY_LOCAL_MACHINE\Software\Policies\Microsoft\Windows\WindowsUpdate\AU and you will most likely have to create the last two branches;
3. Create a DWORD value named "AUOptions" in the AU section and give it one of the following values:
00000002 (download and installation notification)
00000003 (Auto downloads and installation notification)
00000004 (Auto download and scheduled installation)
The result will be the same as in group policies, it’s just more difficult to do here - this method is for those who like to play with the registry.
Maybe you noticed in "Windows Update" in "Advanced options" the item "Delay updates"? If yes, then with this method you can postpone only some updates, security updates and some other important updates will be installed automatically.
That's all for today, if you have any additions or know other ways - write comments! Good luck to you :)
They became mandatory, i.e. they are downloaded and installed automatically as soon as they become available. Although the new mechanism is convenient from the point of view of ensuring the current state Windows devices 10, timely receipt of security patches, fixes and improvements, this function Not all users like it.
If you are using a computer under Windows control 10, then depending on the system edition, you have the opportunity to disable automatic update using the Local Group Policy Editor or the system registry.
In this guide, we'll show you how to block automatic updates from installing in Windows 10.
How to disable automatic updates using local group policies
If you're using Windows 10 Pro, you can use the Group Policy Editor to prevent updates from automatically downloading and installing.
- Enter gpedit.msc
- » and double-click on it.
- Select the "" option to disable this local policy.
- Click the "Apply" button.
- Click OK.

After completing these steps, Windows 10 will no longer download updates automatically. This way you can also save bandwidth when using limited connections. To install future updates you need to go to the application Settings > Update & Security > Windows Update.
If disabling the policy doesn't work, you can use the Group Policy Editor to prevent updates from automatically installing on your computer.
- Press combination Windows keys+ R to open the Run command window.
- Enter gpedit.msc and click OK to open the Local Group Policy Editor.
- Go to next path: Computer Configuration\Administrative Templates\Windows Components\Windows Update
- On the right side of the window, select “” and double-click on it.
- Select the option " Included" to enable this local policy.
- In the options section, you will find several options available:

Choose the option that best suits your needs. It is recommended to use option 2 - Download notification and automatic installation to disable automatic updates on a permanent basis.
- Click the "Apply" button.
- Click OK.
Settings > Update & Security > Windows Update.
You can rollback the changes at any time using the same sequence of actions, but in step 5 you need to select the “Not Configured” option. Then reboot your device to apply the changes.
How to disable automatic updates using the registry
In Windows 10 Pro and Windows 10 Home, you can turn off automatic updates using the registry.
Note: Incorrectly changing the registry can lead to serious problems. It is recommended to create a backup copy Windows registry before performing these steps. From the Registry Editor menu, select File > Export to save a backup.
- Press the Windows key + R to open the Run command window.
- Enter regedit
- Go to the following path: HKEY_LOCAL_MACHINE\SOFTWARE\Policies\Microsoft\Windows
- New > Section.
- Name the new section WindowsUpdate and press Enter.
- New > Section.
- Name the new section AU and press Enter.
- New > DWORD Value (32 bits).
- Name the new parameter and press Enter.
- Double-click on the created parameter and change the value from 0 to 1.
- Click OK.

After completing these steps, Windows 10 will not receive updates automatically. To force installation of future updates, you need to go to the application Settings > Update & Security > Windows Update.
Configuring Automatic Update Options
If disabling Service Policy doesn't work, you can use Registry Editor to prevent updates from automatically installing on your computer.
- Press the Windows key + R to open the Run command window.
- Enter regedit and click OK to open Registry Editor.
- Navigate to the following path: HKEY_LOCAL_MACHINE\SOFTWARE\Policies\Microsoft\Windows
- Right-click on the Windows partition and select New > Section.
- Name the new section WindowsUpdate and press Enter.
- Right-click on the created WindowsUpdate section and select New > Section.
- Name the new section AU and press Enter.
- Right-click on the created AU partition and select New > DWORD Value (32 bits).
- Name the new parameter AUOptions and press Enter.
- Double-click on the created parameter and set one of the following values:
- 2 - Notify before downloading and installing any updates.
- 3 - Automatically download updates and notify when they are ready for installation.
- 4 - Automatically download updates and install them according to the specified schedule.
- 5 - Allow local administrators to select the notification and installation configuration mode for automatic updates.
Similar to using the Group Policy Editor, you can select the option that best suits your needs. It is recommended to use option 2 - Download notification and automatic installation to disable automatic updates on a permanent basis.
- Click OK.
After completing these steps, Windows 10 will stop downloading updates automatically. When new updates become available, you will be notified and will have to install them manually by going to the app Settings > Update & Security > Windows Update.
You can rollback the changes at any time using the same sequence of actions, but in step 4 you need to delete the WindowsUpdate section using the right-click menu. Then reboot your device to apply the changes.
Conclusion
While we've provided instructions for turning off Windows 10 automatic updates, it's important to emphasize that skipping updates is not recommended. The reason is that updates are critical to keeping Windows 10 running properly and keeping your data safe.
However, there are scenarios where you may want to be able to manually apply updates or schedule installations over a specific period of time. For example, you want to ensure that a particular cumulative update works correctly before installing it on a workstation.
These instructions will only block monthly cumulative updates, which typically fix security vulnerabilities and improve Windows 10 performance.
If you want to stop automatic installation of feature updates such as the Windows 10 October 2018 Update for a period of time, you'll need to set up the option to delay installation of major updates. And starting with Windows 10 May 2019 Update, the system will no longer automatically install feature updates twice a year.
To disable Windows 10 updates, you can also use third party utilities StopUpdates10 or Kill-Update .
Found a typo? Highlight and press Ctrl + Enter
The Microsoft team working on the development of the Windows 10 operating system provides users with updates to fix bugs, make fixes and add new features.
You can permanently and completely disable Windows 10 Home (home version), pro updates on your computer/laptop , update assistant or if you have an enterprise version.
At the same time, it doesn’t matter what version of Windows 10 you currently have: 1709, 1703, 1607 or 1511 - 64 bit / 32 bit.
Automatic updates are installed by default, while on Windows 10 Home you cannot disable this service as standard, but there are still some ways.
If you are a Home Edition user, we can only block system updates - Microsoft has significantly limited the user's ability to apply its solutions in the Home Edition.
To do this, launch “Settings” and go to “Update and Security”. Then click “Windows Update” on the left, and then “Change activity period” at the bottom of the screen.

Now you can specify at what hours you actively work with your computer or laptop, which will allow you to limit this system function at this time, so that your computer or laptop will not slow down.
The first method is to disable Cent Update updateWindows 10Pro and enterprise
Users of more powerful versions, such as Professional or Enterprise, can use the Local Group Policy Editor to disable the loading of system add-ons.
If you manage multiple devices, you can make changes at the domain level, which allows us to change the settings of all computers at once.
In Windows 10 Pro, Enterprise and Education, you can disable automatic downloading of updates using the Local Group Policy Editor. To run them, press “Win + R” and enter in the window.
In the editor, go to “Computer Configuration”, then “Administrative Templates” (right), now “Windows Components” and select (double-click) “Windows Update”.

Now you need to find the “Set Automatic Updates” option and double click on it to start editing.

Then on the left select "Disabled" and select and click OK. That's it, now you have to download and install them manually. This solution is not recommended by Microsoft.
Method two to permanently disable automatic updating of Windows 10 through the registry - step by step
We can also disable the Windows Update service using Registry Editor for this purpose. Using magnifying glass or window, run regedit command.
We find a DWORD value called Start, which is located in the key: HKEY_LOCAL_MACHINE\SYSTEM\CurrentControlSet\services\wuauserv

We edit the DWORD value and enter the following in the Value field:
- 2 - Automatic launch of Windows Update Center
- 3 - Manual start
- 4 - Windows Update is disabled.
After placing the appropriate number, click OK and restart your computer.

After restarting the computer, automatic detection, download and installation latest updates for Windows and programs installed on it will be disabled.
Method three to disable Windows 10 constant updates via PowerShell - step by step
You can disable the Update service using PowerShell commands. PowerShell is almost the same as the command line and even better (an updated version of the command line).
Identical effects like the ones above can be achieved using PowerShell commands. To do this, first launch the PowerShell application with administrator rights by typing PowerShell.
In the window that opens, enter the command: stop-service wuauserv

After issuing the specified command, the Update service will be stopped. Additionally, you can also change the service startup type.
To get the service to start automatically, enter the command: set-service wuauserv -startup automatic

This command will change the service startup type to automatic. You can also manually start the Update service by running the command: set-service wuauserv -startup manual

The selected command will change the service startup type to manual. You can also completely disable service startup using the command: set-service wuauserv -startup disabled.

The specified service startup type is disabled.
Method four to disable downloading windows 10 updates using the Services tab
You can open the Service snap-in using Run by running the command: services.msc
In the window that opens we find a service called “Windows Update” (almost at the very end).
By double-clicking the mouse, call up the Windows Update properties window and change the startup type to “Disabled” (or manually) and click the “Stop” button.

From now on Windows service Update goes into standby mode.
Method five to disable completely forced Windows 10 update using the program

The better to use the program. You could say everyone. With its help, you can completely disable any damn updates: Security Center, pirated build checks, and pop-up ads.
But it is unlikely that you will be able to disable the update of the defender, store, nvidia video driver, p2p distribution, reboot, autostart or Skype.
The program is the fastest, simplest and effective way. All you need to do is download, install, select the disable tab, check the box and click “Apply now”.
How to speed up downloading updates
The service responsible for installing add-ons in Windows 10 is “Center....”. They are received from Microsoft servers and from users’ computers through p2p distribution who already have them - this speeds up the whole process.
Go to Settings and select the Update & Security option. In the "Center..." section you will see the settings. Click Advanced Options.
Then click “Select delivery method.” Enabling the "...from multiple locations" option causes them to download faster, but also send directly to other computers.
You can limit this process to your local network or allow downloading and uploading to the network.
Why you should update your operating system
New malicious codes are created every day. Viruses, worms, Trojan horses, and other pests spread quickly and exploit vulnerabilities in operating systems and applications.
There is still a race of cybercriminal programmers. Developers are developing add-ons to protect users from malware.
This is why installing them to improve security is so important, and why not installing them increases the risk of a successful attack.
But this is not the only reason why you should monitor the system. They also solve hardware and software problems, thereby improving the quality and comfort of working with the system.
Is it dangerous to disable Windows 10 system update?
The update service is responsible for providing improvements. If you disable it, they will not be downloaded or installed.
You can disable downloading without fear, especially if you are using a reliable antivirus.
Receiving a cumulative security update for ordinary users is usually of no use - corporations need it much more.
I always turned off their downloading on Windows 7, but I don’t do this on Windows 10, because in addition to the critical cumulative additions, the version of Windows 10 is also being improved, and I don’t want to miss this, since there are much more new functions then.
Can you go back to the state before the update?
This is only possible within 10 days from the installation date. Under System Settings, click Update & Security, and then on the left side of the window, click Recovery.
There, find the "Return to previous compilation" option. If no more than 10 days have passed since installation, you can begin recovery.
If necessary, you can also return the system to its original state (you can use a rollback).
Then, depending on the option you choose, your files can be kept or deleted - the system will be reinstalled. Good luck.
Hello again to our dear readers!
We continue to explore the possibilities (and especially get used to the new design!!) Microsoft Windows 10. IN lately The corporation especially often pleases us with regular updates of its product. The latest “anniversary” update is a clear confirmation of this. But not all people like new things. Maybe because of their penchant for constancy. Maybe because bad internet. Or maybe for some other reasons.
Therefore, the topic of today's article is...
I already wrote in the article why you shouldn’t completely disable the Windows Update service. Let us remind you once again that updates include not only “patches” that increase your security, but also anti-virus databases, drivers, applications and, in fact, the operating system itself.
The developers of Windows 10 in their “Privacy Statement” (https://privacy.microsoft.com/ru-ru/privacystatement) directly say that the operating Windows system 10 consists of software modules, some of which are installed on your computer, and the other part is installed on Microsoft servers. And that these parts must interact effectively with each other.
But what if we want to turn this whole thing off? If you have a weak computer (on which the home version of Windows 7 or 10 is installed), then after receiving updates it may happen that it will work slower than before, because now the program consumes more resources.
In this article, I will also show how received Windows 10 updates can be removed. It happens that the drivers motherboard, written for your outdated computer do not work well on the new operating system. I want to play old games. Poor or expensive Internet (the volume of “patches” received is large!).
In short, from words to action - turn it off!
How to disable Windows 10 updates and drivers (all editions)
The first of the noticeable and pleasant differences of the new interface Windows 10 (for example, from Windows 7) are changes to the Start button. Firstly, she appeared in her place again :). And many useful features“Control panels” (no need to search for it for a long time!) can now be called up right click on this Start button:
Second difference- to disable receiving updates and drivers - do not go to the “Control Panel” as before. There is no more update equipment there. She now lives in another place, here:

By clicking on the gear, we get into the window, select “Updates and Security”...

Go to “Advanced options”...

And we choose when and how to receive updates.

Click " Off". Another new feature from Windows 10– updates can now be received not only from the Internet, but also from one of your computers local network. For example, you have a network of Windows 10 devices at home. If at least one computer in your network has already been updated, the rest can receive the update through it. At the same time, the Internet is consumed more modestly, the network is not clogged, the Internet slows down less...
Isn't that interesting? Looks like they turned it off, hurray!!
No, that's not all. If we click the “Check for updates” button with the mouse, the system will again search for and install them. Simply put, so far we have only achieved that the search for updates is now launched only manually. To turn off the search permanently, go to the “Control Panel” (right-click on the “Start” menu)….
Open "System and Security"

then “Administration”...

And then "Services"

Scroll to the very bottom of the list and see “Windows Update Service”. It needs to be stopped and disabled.

Click on the line with the name of the service with the mouse, and the Update Center will open:

...switch to the “Disabled” mode, and then click the “Stop” button. Don't forget to click the "Apply" button.
Let's try to get updates again. If such a window appears, then congratulations, now you have done it.

An alternative way to disable Windows 10 updates and drivers (via Wi-Fi) for all editions of Windows 10
A less “cruel” method can be used by users connected to the Internet via Wi-Fi. As you may have already noticed (while you were opening and closing the settings windows), updates are not transferred if the Internet connection is set as metered, that is, when the user pays for the amount of gigabytes received and transferred.
Now we will indicate your Wi-Fi connection as “limited” and our “deceived” Windows will “think” that it is “expensive” for it to receive updates. Click on the gear again, again in “Settings”, but select “Networks and Internet”, go to “Wi-Fi”, then to “Advanced settings”.

Move the “Set as metered connection” switch to the “On” position. That's all. The search for updates via the Wi-Fi network has stopped.
How to remove Windows 10 updates?
The Windows 10 system now allows you not only to remove individual “patches” one at a time, as before, but also to carry out a complete “rollback” to the previous build. Let's look at everything in order. Go again to “Settings” - then “Updates and Security” - “Update Log”.

Click “Uninstall updates”. We get into the “Uninstall programs” snap-in...

...and we see, for example, that there is no update we are interested in. And somehow they became few... What is there to delete? This means that it is installed new build Windows 10. And, if your system still starts to work poorly, you can try rolling back to the previous build. To do this, we again return to the “Update Log” but open the “Recovery Options”:

In the window, select the item we need and try what happens. True, the rollback is limited in time. In six months it will no longer be possible to implement it. The decision needs to be made in the first days. In addition, a copy of the old Windows takes up additional disk space.
That's basically all.
What conclusions can be drawn?
Our brief overview showed that, despite the deep external changes, no less profound reworking of the update service, the user can still easily refuse to receive them. Although, we still receive a mild reproach for the refusal - now we need to manually disable the update service ourselves. And if anything happens - “It’s your own fault!”
At the same time, the Windows 10 update service itself has become more flexible, and its capabilities have significantly expanded compared to previous releases. It's up to you to decide whether to turn it off or not.
On this pleasant note I end the article.
They will definitely answer you.
Until next time!
How to disable Windows updates - this question is asked by users who need to prevent the installation of system updates on their computer. With default settings, the operating system automatically searches for, downloads and installs updates released for Windows.
The corporation releases update packages for the Windows operating system approximately once a month. From time to time, Microsoft makes unscheduled updates designed to solve emerging problems in the operation of the OS, or to close discovered security holes in Windows.
The main part of the updates concerns system security. When installing updates, system fixes are applied or some new features are added.
In addition to regular updates, so-called major updates are released in Windows 10, after which, in essence, the computer is installed new version Windows 10. Similar major updates are released once or twice a year.
Some users disable system updates by various reasons. The main reasons for refusing Windows updates:
- sometimes it happens that after installing updates, the normal operation of Windows and installed programs is disrupted;
- if the user has a limited Internet connection, downloading updates affects the amount of traffic consumed;
- lack of free space on the computer disk;
- after applying the update, the user is afraid of losing activation of the operating system;
How to disable automatic updates? You can solve the problem using system tools, or using third-party software. In this article we will look at 5 ways to disable updates on Windows 10 using the operating system.
Simply disabling Windows Update on Windows 10, as in Windows 7 or Windows 8, will no longer work. The maximum that can be done in this way is to pause updates for up to 35 days.
How to disable automatic updates in Windows 10 (1 method)
Windows 10 tools automatically detect, download and install updates on your computer.
On Win 10, you can disable updates in a way that disables the Windows Update service. This method works on all versions of Windows 10 and ensures that Windows updates are disabled forever.
Login to "Administration" from the Control Panel, or using more easy way: In the Windows Search box, type "administration" (without the quotes), and then open Administrative Tools.
In the “Administration” window, double-right-click on the “Services” shortcut.
In the Services window that opens, in the Services (Local) section, find the Windows Update service.

In the “Properties: Windows Update (Local Computer)” window, in the “General” tab, change the “Startup type” setting to “Disabled”.
In the “Status” setting, click on the “Stop” button to stop the Windows 10 update service.
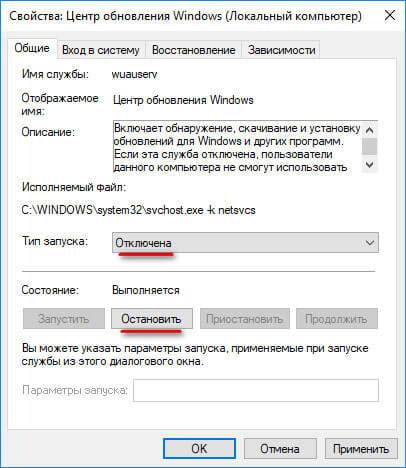
After this, Windows 10 updates will stop coming to your computer.
To enable automatic updates, in the Properties: Windows Update (Local Computer) window, select your preferred startup type: Automatic (Delayed Start), Automatic, or Manual.
How to disable Windows 10 updates using Local Group Policy Editor (method 2)
Now let's see how to disable Windows 10 updates in the Local Group Policy Editor.
Please note that this method is not suitable for Windows 10 Home (Windows 10 Home) and Windows 10 Single Language (Windows 10 Home for one language). This feature is present in older versions of the operating system: Windows 10 Pro (Windows 10 Professional) and Windows 10 Enterprise (Windows 10 Enterprise).
First you need to log into the Local Group Policy Editor. In the Windows Search box, type "gpedit.msc" (without the quotes), and then launch the editor.
Another way to enter the Local Group Policy Editor is in the following way: Press the “Win” + “R” keys, enter the expression “gpedit.msc” (without quotes) in the “Open” field, and then click on the “OK” button.
In the “Local Group Policy Editor” window, follow the path: “Computer Configuration” => “Administrative Templates” => “Windows Components” => “Windows Update”.
In the “Windows Update” section, find the “Set up automatic updates” item, right-click on it, and in context menu select "Edit".

In the Automatic Update Settings window, enable the Disabled setting, and then click OK.
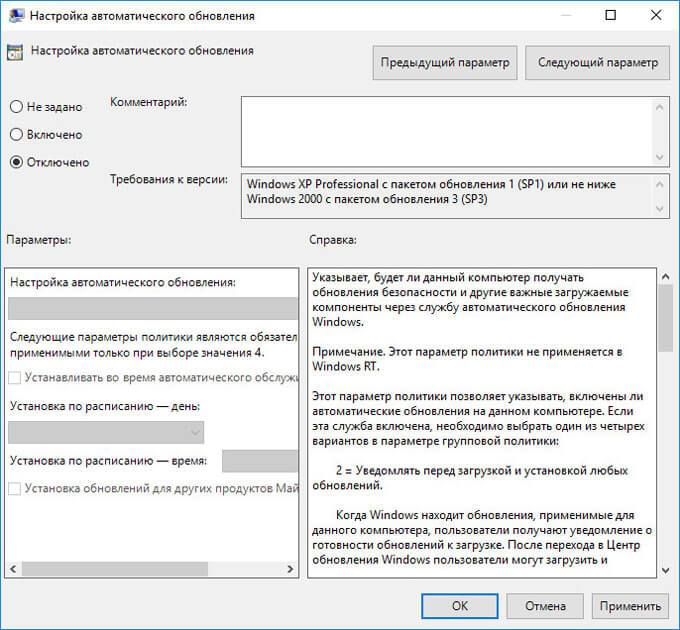
After this, the operating system will not search for, download or install automatic Windows 10 updates.
Disable Windows 10 update in Registry Editor (3rd method)
The third way to disable Windows 10 updates is to make changes to the Registry Editor. This method works in all versions of Windows 10.
In Windows Search, type "regedit" (without the quotes), and then run the command.
In the Registry Editor window, follow the path:
HKEY_LOCAL_MACHINE\SOFTWARE\Policies\Microsoft\WindowsWindowsUpdate\AU
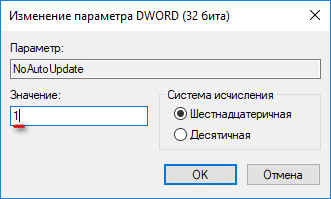
In the Registry Editor window, right-click on free space. From the context menu, select New and then DWORD Value (32-bit). Give the parameter a name: “NoAutoUpdate” (without quotes).

Right-click on the “NoAutoUpdate” parameter and select “Change...” in the context menu.
Enter the parameter “1” (without quotes) in the “Value” field and click the “OK” button.
To enable updating in Windows 10, you need to change the value of the parameter to “0” (without quotes), or simply delete the “NoAutoUpdate” parameter from the registry.
Enable metered connection in Windows 10 (4th method)
This method allows you to configure a metered connection in the Windows operating system if the network is accessed via Wi-Fi.
Follow these sequential steps:
- Enter system settings.
- From the Settings window, go to Network & Internet.
- Go to the “Wi-Fi” setting, click on the “Manage known networks” link.
- Select your Wi-Fi network, click on the “Properties” button.
- In the “Set as metered connection” parameter, move the slider to the “Enabled” position.
After this, the Windows 10 operating system will limit the search for and receipt of updates. With this method, some updates will be installed into the operating system. Major updates such as OS version updates will be disabled.
Disabling access to Windows Update (method 5)
In new versions of Windows 10, after the user disables it, after some time the Update Center service on the computer is forced to turn on. Therefore, we need to block Windows Update's access to Microsoft update servers.
First, disable the Windows Update service (see method 1).
- Follow the path:
- Right click. Select New => Partition. Give the section a name “Internet Communication Management” (hereinafter without quotes).
- Click on the created section “Internet Communication Management”, create a new section inside with the name “Internet Communication”.
- Enter the “Internet Communication” section, right-click on the free space.
- From the context menu, select New => DWORD Value (32 bits).
- Name the created parameter “DisableWindowsUpdateAccess”.
- Double-click with the left mouse button on the “DisableWindowsUpdateAccess” parameter. In the “Change DWORD Value (32-bit)” window, select “1” in the “Value” field.
In the Registry Editor, do the following:
- Enter the section:
- Create a "DWORD (32-bit) Value", name it "NoWindowsUpdate" with a value of "1".
Create a new parameter in the Registry Editor window:
- Follow the path:
- Create a "DWORD Value (32-bit)", name the parameter "DisableWindowsUpdateAccess" with a value of "1".
Close the Registry Editor window and restart your computer. When checking for updates, Windows Update will show error "0x8024002e".
To enable access to Windows Update servers, remove previously created settings from the registry.
Turn off automatic updates from the command line
To stop and then disable the Automatic Updates service, use the command line:
- Run command line on behalf of the administrator.
- Run the following commands sequentially:
To start and enable the Automatic Updates service, run the following commands:
Net start wuauserv sc config wuauserv start= auto
Disable checking for updates in Windows 10
If all else fails, turn off checking for updates in Windows 10. If automatic checking does not work, it means that updates will not be downloaded to your computer.
To disable checking for updates, follow these steps:
- Run Command Prompt as Administrator. In the command line interpreter window, enter the command and then press the Enter key:
- Go to the path: C:\Windows\System32, find the file “UsoClient.exe”.
- Right-click on the “UsoClient.exe” file and select “Properties” from the context menu.
- In the "Properties: UsoClient" window, open the "Security" tab.
- Under the “Groups or Users” section, click on the “Edit” button.
- In the “Permissions for the “UsoClient” group” window, remove all permissions for each group or user one by one. Don't forget to click on the "OK" button.

After this, restart your computer.
To restore the permissions of the "UsoClient.exe" file, run Command Prompt as an administrator, and then run the command:
Icacls c:\windows\system32\usoclient.exe" /reset
Restart your computer.
If necessary, you can manually check for and install updates from Windows Update.
Conclusions of the article
If necessary, the user can disable automatic updating of Windows 10 permanently using operating system tools: by disabling the Windows Update service, in the Local Group Policy Editor, or in the Registry Editor.


