How to make virtual reality glasses. How to make virtual reality glasses for a smartphone with your own hands
Many smartphone users have heard, but due to their high cost, they could not afford such a purchase. However, quite quickly people realized that all the sensors that function in glasses virtual reality, are also found in ordinary smartphones, thanks to which you can easily make excellent VR glasses from them with your own hands, you just need to attach a very ordinary case and a few lenses.
In fact, all the designs of glasses that you can find on the Internet are made on the basis of drawings (from English “cardboard”), and the only difference is in the source materials. Some people are happy with cardboard of any thickness found at home, others go to the office supply store for thinner ones, and some craftsmen have distinguished themselves by making their VR devices from metal, polycarbonate, foam plastic and other foam materials.
The lucky owners of 3D printers immediately began printing the template. Using this pattern, it’s easy to understand how to make virtual reality glasses with your own hands, and we will help you with this by giving some tips.
Using a regular knife, a pair magnifying glasses and cardboard you can make with your own hands from an ordinary smartphone similar to it. However, many people don’t know how to make virtual reality glasses from a smartphone, which is why they buy expensive models or order cardboard kits, like Google Cardboard.
The design of homemade glasses has several advantages over a custom-made case, because the lenses in it can be moved along an axis that is located relative to the screen. Thanks to this, virtual reality glasses can be finely adjusted to the vision characteristics of any user. 
To make 3D glasses for a smartphone with your own hands, you need to:
- Measure the diameter of the lenses you will need. To do this, you need to place your smartphone on a stable, flat surface and turn on the virtual reality application on it. Look at the screen through the lenses while adjusting the distance. This way you will not only understand what lenses you need, but also decide on the focal length.
- Next, try to either design a cardboard box yourself, which will serve as the body, or download a scan from the Internet. The main thing is that the bottom of the body is not as long as its top, because do not forget about the hole for the nose. Make ledges for your smartphone to rest on. Also, don’t forget about the cutouts for buttons on the sides of the phone.
- Paint the insides of the body black. Thanks to paint of this color, you can avoid various glares and reflections that will interfere with concentrating on viewing.
Another option for making glasses for a smartphone with your own hands:
1). For thicker cardboard, it is better to take a stationery knife; it is more convenient for them to work directly on top of the sheet. If you want to assemble the glasses manually by inserting the keys, then you need to cut out the cardboard along with them, as in the picture. If your homemade glasses virtual reality will be subsequently glued together, then there is no need to leave such a reserve.
2). Next, you will need 2 lenses, preferably biconvex. Google recommends taking lenses with a diameter of 25 mm. The focal length of the lenses should be 45 mm. Craftsmen even take lenses from hardware stores, and some video bloggers on Youtube, when making 3D glasses for a smartphone with their own hands, use improvised means instead of lenses.
So, for example, you can cut from a regular plastic bottle 4 identical circles, glue them together 2 pieces with a blowtorch, leaving a small distance at the top. Then water from the tap is drawn into the syringe, the space between the biconvex “lenses” made of plastic is filled with it, then the remaining gap is also sealed, and in your hands you find yourself with almost completed home-assembled virtual reality glasses.
3). Some smartphone models support magnetic switching, which allows you to control the device without removing it from the box. To implement such an idea you will need simple system magnets: neodymium ring and ceramic disk with a diameter of about 19 mm and a thickness of about 3 mm. But even without them, all control will be simple and convenient; it is enough to make a hole for your finger in the design of homemade virtual reality glasses on the bottom or side.
4). When almost everything is ready, the only thing left to solve is the problem of attaching the smartphone to the glasses. To do this, you can use a rubber ring and 2 Velcro strips (approximately 20x30 mm) to secure the cover.

DIY virtual reality glasses for smartphones: frequently asked questions
— Is it really possible to do it yourself? virtual glasses for a smartphone, which will be convenient?
For regular use, of course, it is better to purchase inexpensive but comfortable glasses with a factory mount, for example, or more expensive and high-quality ones, etc. Do-it-yourself VR glasses for a smartphone are more likely to be suitable as a device for the first acquaintance with virtuality.
— How to make virtual reality glasses from a smartphone if you have never done anything like this?
This is where the widely circulated on the Internet comes to the rescue. Google drawing Cardboard and our article. Even if you don’t succeed the first time, don’t be discouraged, because the materials are practically free, and homemade virtual reality glasses for a smartphone can be modified at any time. For example, follow the example of those who made them from ceiling tiles - light and invisible, they can easily withstand the weight of a smartphone.
— How to make virtual reality glasses for a phone that does not have an accelerometer?
Unfortunately, such glasses will not be able to support operation correctly.

So, we can say that making VR glasses for a smartphone with your own hands is quite simple; the whole question is the ease of use of such a device. Indeed, in addition to glasses, quite a lot of devices for more deep dive into virtuality, with which viewing photos and videos becomes a whole adventure, and games do not allow you to relax for a second, keeping you in suspense.
For example, virtual reality in controller gloves allows you to touch objects as if in reality, and some VR chairs almost instantly react to the movements of your head, turning your body in the same direction. The future is very close, you just need to feel it.
Perhaps this video will help you:
Copied from the website website Subscribe to our Telegram
Three-dimensional images have always attracted people with their unusualness and closeness to natural perception. When going to the cinema, many people prefer to go to a session with 3D technology, as this allows them to immerse themselves in the atmosphere of the film as much as possible.
How to make virtual reality glasses with your own hands
Kit for Google builds Cardboard. Everything except lenses can be made by hand
Today there are many technologies for creating three-dimensional perception, but most devices are different high cost. Is it possible to make VR glasses at home, and what is needed for this? In principle, quite a bit: ordinary office supplies that are easy to buy in a nearby store. The situation with lenses is more complicated, but this part can be found if desired - the easiest way is to order it from the Chinese on Aliexpress.
First of all, it is important to understand that virtual reality glasses for phones should be made with the utmost care, in strict accordance with the drawing. If there is the slightest deviation from the diagram or the use of incorrect materials when making virtual reality glasses from cardboard desired effect will not be achieved.
What materials are needed

Many people ask whether it is possible to make full-fledged virtual reality glasses out of paper? In principle, yes, if the paper is very thick. It is better to stock up on normal cardboard for such purposes if you are not making the device for a couple of weeks. To make the device look more or less aesthetically pleasing, use double-sided cardboard - regular matte on one side, glossy white on the other.
It is not difficult to make a virtual reality helmet with your own hands. To do this you will need the following materials:
- thick high quality cardboard
- sharp utility knife
- round lenses for a virtual reality device (it’s better to order on Aliexpress)
- Velcro or other fastenings for cardboard
It is better to cut out the parts with a stationery knife, since it is difficult to work with thick cardboard with scissors without creating torn edges.
Virtual glasses made of cardboard will last much longer if the material is dense and uniform. It is not recommended to make a helmet from corrugated cardboard, as over time it will begin to delaminate and quickly become unusable.
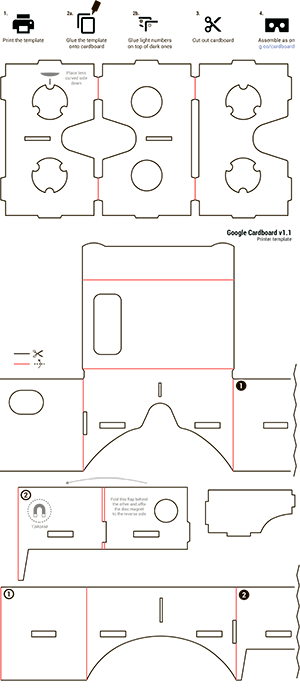
Google Cardboard Drawing
To make a fashionable device, you will need an exact drawing of virtual reality glasses, which can be downloaded on the Internet by entering cardboard, VR glasses or something like that into the search bar. In the same way, you can later find the desired smartphone application in the store for your platform.
Schemes for virtual reality glasses made of cardboard, drawings and drawings are presented in convenient form. All you need to do is download them to your computer, print all the details on a printer (on plain paper), and then transfer the resulting patterns onto cardboard. Following the diagram and using the drawing, you will receive a device correct sizes in the right proportions.
Assembling glasses
In order to make a virtual reality helmet, you should carefully cut out all the parts of homemade VR glasses from cardboard, bend them in the designated places and assemble the entire structure together, according to the attached instructions. Pre-prepared lenses should be inserted into special holes and fixed.
As a result, you should get a neat and compact box, similar in shape and size to the original device for viewing 3D media.
Phone setup
In order to enjoy full viewing of media files in the new device, you will need special software for your smartphone - for example, Google Cardboard, which can be downloaded from mobile Internet markets. Once you have installed the application, launch it by selecting necessary materials, secure the phone well in a homemade helmet and start watching.
Things to do with a helmet

After assembling the device, most users have a logical question: how and what to watch, is it possible to turn on games, etc.? Download special application for Android or iOS, you can watch movies with 3D support, as well as play certain games.
In order not to keep homemade helmet in your hands, you can attach a pair of comfortable straps to it for a secure fit on your head. Do not forget about securely fastening the smartphone in the device - the cardboard cover into which it is inserted should be equipped with double-sided Velcro for clothing, buttons or other fasteners.
Conclusion
If you have minimal manufacturing skills homemade devices, the question of how to make virtual reality glasses will not take you by surprise. Having a minimal set of stationery and materials on hand, you can make 3D glasses for your smartphone with your own hands, and this device is not much inferior in functionality to its expensive analogues.
Regarding external characteristics- everything is in your hands. Cover your homemade glasses beautiful paper, color the gadget in bright colors, turn it into a monster of new technologies, and surprise your friends and acquaintances.
I love the guys from Google. Well done they. Properly placed enlightened brains and good motivation can sometimes squeeze everything out of a person. brilliant ideas. Simple as 3 kopecks and at the same time absolutely stunning. An example of such a brilliant, stunning idea is undoubtedly the Google Cardboard virtual reality glasses.
Everything ingenious is simple - a piece of correctly folded cardboard, two cheap lenses, a smartphone with a large screen and a set of sensors - here you have virtual reality glasses. Considering that many people already have such a smartphone in their pocket, the price of the issue is only 150 rubles and 2 hours of free time for assembly and gluing.
It would seem somehow simple... But it works! And how! Games in 3D, movies in 3D, educational applications and virtual travel - please! With the simplicity, genius of the approach and the price of the issue, the Googlers have outshone all the developers of all sorts of Oculus Rifts and so on. The same virtual reality, only almost free. It may look unsightly, but it works. And appearance, if desired, it can be plastic-licked, just look at the famous Chinese website - there are a lot of analogue options, price tags from 700 rubles onwards, with different functionality, adjustments and holes for air...
Any smartphone running Android 4.1 Jelly Bean and higher, iOS 7 and higher or Windows Phone 7.0 and higher, with a screen diagonal of at least 4.5 inches. The smartphone must have the following sensors: gyroscope, accelerometer, magnetometer (digital compass). IMPORTANT! The gyroscope and accelerometer are required for most applications to work, otherwise you will only be able to watch 3D movies. It is impossible to evaluate virtual reality without a gyroscope and accelerometer.
I recommend that everyone who has such a smartphone try this thing. Believe me, it's great. For those who don’t want to bother with cardboard and scissors, I can recommend buying Google ready Cardboard on aliexpress.com. For those who are not looking for easy ways, you are welcome here, I will tell you how you can do such a thing quickly and without pitfalls.
There are currently 2 versions of Google Cardboard. I will tell you how to assemble the second version a little later, in a separate post, but now we will talk about the easiest to manufacture - the first version. Google, like a real good corporation, did not skimp and posted general access all information on this invention.
So, what do we need to make this wonderful device:
1. Sheet of hard cardboard. It is best to use micro-corrugated cardboard, which is widely used for making boxes, containers, packaging, etc. It looks like this:
 |
 |
 |
Personally, I used cardboard, from which a stationery box for papers is bent with cunning manipulations. This box is sold in office supply stores in the form of a flat cardboard sheet (it is suggested that you bend the box from it yourself). The cardboard is good, about 2 mm thick (I don’t recommend taking thicker), it cuts perfectly with a stationery knife and bends without much difficulty. Here's what it looks like:

However, you can use any packaging, even pizza. The box from motherboard, For example. The main thing is that the cardboard is dense and not thick (2-3 mm maximum), otherwise problems with dimensions will begin.
2. Cutting template points, printed on regular A4 stationery paper (3 sheets are needed). This template can be found on the Internet, or downloaded here:. This pdf file can be printed on any laser printer, the parts are cut out with scissors and glued onto a sheet of corrugated cardboard. Since the unassembled Google Cardboard is longer than an A4 sheet, the template is cut so that the cut parts need to be placed on top of each other when gluing. These parts are marked with a circle with a number. You need to superimpose a light (unfilled) circle on a filled one with the same number and make sure that the lines match.
3. Lenses in the amount of 2 pieces. This is the most difficult moment. Lens parameters are as follows: aspherical, diameter 25 mm, focal length 45 mm. The difficulty is precisely where to get such lenses. Let's consider the options:
- aliexpress.com - best option in price, but long in time. I ordered my second glasses there, they arrived in 19 days, this is a speed record, because usually everything takes a month or two or three. If this option suits you, look for “google cardboard lens” there
- Search for the same thing in the Russian segment of the Internet. The speed will be faster than China, but the price will be higher.
- Optical stores in your city. Yes, you can search there too. This is probably the most expensive option, I don’t know, I haven’t tried it. Optics salespeople will not understand if you say “aspherical lenses, diameter 25 mm, focal length 45 mm.” They need to speak differently. Since they measure everything in diopters, you will need to ask specifically for lenses with diopters. Now we will count them: there is a formula F=1/D, where F is the focal length in meters, and D is the optical power of the lens in diopters. Thus D = 1/F = 1/0.045 = 22.2222. In general, you need to ask for lenses “+22 diopters”. If any are found, then they can be turned there to the required diameter, or with a larger diameter, but then the template will need to be slightly changed.
- Stationery stores. In it we look for magnifying glasses of suitable size (i.e. magnifying glasses), the higher the multiplicity, the better. 10x lenses should be fine. This option the most unreliable, because it is difficult to find 2 identical magnifying glasses, especially so that they match the focal length. However, this option was the first one I tried.
- Various types of binoculars, children's toys, lenses, telescopes, peasant ragpickers in the markets, in general, we look where we can.
The first 3 options are ideologically correct, because they imply an exact match with the design proposed by Google. The remaining options provide inaccurate lenses, so they will require changes in the design of the glasses themselves. Shown more clearly in the figure:

From this picture it follows that the larger the focal length, the further you need to move the smartphone away from the lens. Thus, if you received non-original lenses, make changes to the design. This is exactly what I had to do the first time I bought lenses at an office supply store. It's not difficult, I'll describe the details in the next post, entirely dedicated to my first version of Google Cardboard.
What to do if the focal length of your lenses is unknown? Two ways: either make the design initially with adjusting the distance from the lens to the smartphone, as I did in my first version, or measure it. You can measure the focal length in a simple old-fashioned way: 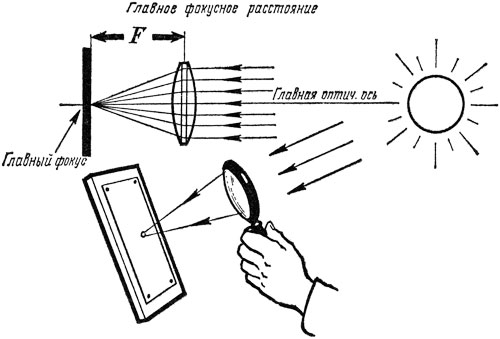
Did you burn it with glass as a child? Yep, same thing. We take a lens and focus the sun into a small point on the surface. The distance from the surface to the lens is equal to the focal distance. The surface must be perpendicular to the optical axis.
So, that's all about lenses for now.
4. Magnets. This item is optional to begin with. The design uses 2 magnets that work like a button. One magnet, round flat, ordinary, made of ferromagnet, is inserted inside the structure, the second, ring-shaped neodymium, is molded outside and held there by the magnetic field of the internal magnet:

In order to control virtual reality, this non-button is used. When we need to somehow influence the virtual world, we must move the external magnet down with our finger and return it back. The smartphone must have a magnetometer (there must be a built-in compass, roughly speaking) to catch the change magnetic field and perceive it as pressing a button.
I’ll say right away - crazy idea and Google itself understood this, so the second version of the glasses already has a mechanical button, but more on that in the corresponding post. For now, I will say that you can do without these magnets, especially since this idea works so-so - people complain that not all smartphones correctly detect changes in the magnetic field of this quasi-button, and some smartphones do not have a magnetometer at all.
In general, I leave this up to your discretion; I did not install magnets for myself. When my first version worked, I made a mechanical button.
5. Clothes Velcro. Well, everything is simple here - we go to the studio and buy Velcro fastener there, they sell it in the form of a tape, by the meter, the price is mere pennies.
6. A utility knife and double-sided tape.
The process has begun!
So, we bought/picked/assembled everything. Let's get started.
1. Print the template and paste it onto cardboard.
2. Cut out the parts and make the necessary slots
3. We collect. To make assembly easier, I attach a video:
Find out prices for VR headsets at this link
When we decided to write an article about how to make a virtual reality helmet with our own hands, we started collecting information. The imagination of folk craftsmen is, of course, amazing, but I don’t even really want to insert a phone into such monsters =)


Therefore, we decided to take a more civilized route and offer the option of assembling VR glasses from - accessible to everyone. What do we need?
Necessary:
- A piece of cardboard at least 22" (55.88cm) by 8.75" (22.23cm)
- Two strips of 3/4" (1.91 cm) wide Velcro tape
- Two biconvex lenses (focal length 45mm)
- Stationery knife
Optional:
- One 3/4"(1.91 cm) neodymium ring magnet
- One 3/4" ceramic disc magnet


Instructions
We start by downloading instructions from the official Google website for assembling a DIY helmet - instructions. In it in detail the assembly plan is written, but... In English. So you can just click on the images below and copy them to your computer, we won't be offended.


We print these 3 images on the printer, which will become stencils for cutting out parts of the helmet. It is important to note here that the third image is a continuation of the second. They show a part that needs to be cut out entirely.


Cutting will take quite a bit of time... Be prepared for this. But what we have ahead of us is immersion in the virtual world? It's worth it! Once everything is cut out, you can start assembling. Here we need not a lot of glue, pre-prepared Velcro, lenses, deft hands and a little luck.
A short digression about magnets. They are needed to make a control button. In some VR games and videos, you can use it for control. If there is a lot of enthusiasm, then you can mess with it. But, as it seems to us, there is no particular meaning in it. There is very little chance that it will work. Not every smartphone model has a magnetic control trailer. It is much more practical to use any of the bluetooth joysticks, for example like .
Actually, assembly.


First, we fold the front part of the helmet 3 times, installing the lenses in a special holder. Then we wrap this structure in a frame cut out according to Figures 2 and 3. Where to glue the Velcro that will secure the front cover with the phone inserted inside can be seen in the screenshots attached to our article.
If desired, you can attach any kind of straps to the helmet to keep the device on your head. But remember - this is cardboard! It will not withstand such loads for long. We would advise holding the helmet with your hands. After an hour or two painstaking work, in some cases seasoned with a pinch of swearing, we get a pretty good-looking device. Much nicer and more functional than those monsters that were shown at the beginning of the article.

Actually, the helmet is ready. Now all that remains is to download the Google Cardboard application, described in detail in the article on our website -. First of all, the program will ask the camera of your smartphone to read the QR code of the helmet in order to configure the phone to work with VR.

Next, you will already have full access to a variety of demos and 360 videos on YouTube, directly through the Cardboard application.
Have a successful and unforgettable immersion in the world of virtual reality, which is just beginning its journey and is aimed at great development. The portal administration is sure of this!
In case you still can’t assemble the helmet yourself or it’s simply not possible to find lenses, don’t be upset. A ready-made Google Cardboard can always be purchased on Yandex.Market for 300 rubles.
I'll tell you right away. I don’t understand anything about this yet, and my grandchildren haven’t taught me yet. But the fact that virtual reality glasses can be made from old glasses and a shoe box was immediately captivating. He dragged me to his place for further investigation.


This project will show you how to make VR views such as Google cardboard, but optimized for tablets. Apart from the tablet, the cost is very low. He uses two pairs of reading glasses from the dollar store (Dollar Tree), a plastic shoe box, and a pair of inexpensive prism lenses costing about $7. The result is a very efficient device thanks to high resolution display and a larger field of view of the smartphone.
Step 1: Some Background Information
I created this device in order to engage students in the classroom using VR technology for their education. Since I am an educator in Salinas, California, I am naming this Salinas VR viewer.
Google's Cardboard was inspired by this viewer, but it was made to address several major shortcomings of trying to force the viewer to a larger screen than a smartphone. It would seem that all that is needed is to scale to the view size, but there are several problems with this approach.
One of the main problems is that, like cardboard, such a viewer will only use a simple pair of convex lenses to view the display. However, this may not be effective because large size display means that images cannot be placed (optically) directly in front of each eye. If these have not been corrected, then the person should be able to move each eye towards the direction of the ears. My viewer solves this problem by using an inexpensive prism lens, shifting the image so that it is optically directly in front of the viewer's eyes.
Another problem with using simple round convex lenses is that they are simply too primitive to allow for a VR experience. Such lenses have very limited area To widen the viewing area is that the eyes must be placed very close to the lens and thereby limit any eye movements. This kind of restriction on how we move our eyes is not natural. It's hard to see how much fidelity a VR system can have if it forces a person to hold themselves rigidly, looking straight ahead in an effort to keep the image in focus. People should be allowed to move their eye and still see VR images. Fortunately, some lenses have evolved to be as optimal as possible for people to use, i.e. reading glasses. These glasses allow for a wide field of view (fov), and a very large viewing area. These glasses are also extremely inexpensive.
Step 2: Equipment:

1 scribe [I thought for a long time what this means, probably in Russian - scribe:) ]: made by you.
Made with #90 wire nails, and some plastic folded and stitched. This allows the scribe to mark and cut very beautifully with either a utility knife or sharp scissors.
2 Pairs 3.25 Magnification Wide Frame Reading Glasses: Dollar Tree
Price: 2.00 Dollars. This is quite profitable. Other stores like pharmacies have them hard to find and sell a lot more (+10.00 per pair).
1 pair 1.5 Prism Wedge lens pair: Berezin stereo photography products http://www.berezin.com/3d
Price $7.95 per pair.
1 Plastic Box: Amazon: Whitmor 6362-2691-4 clear vu collection of women's shoe box by Whitmor
Price: $11.99 You need 1 window, but you get a set of 4. You can make at least 6 viewers through 3 boxes, and use another box for other plastic parts other than the body (plastic body)
1 roll of glue dots (high strength):
Price: about 5 dollars. Without this amazing glue, it would be impossible for the viewer. Please note that you are not using it from the video. You use the scribe (see above) to pick up the point and place it where needed.
3 templates: PDF files that need to be printed.
Cut it out and stick it on the plastic, then you can scribe the spare part you need. They are in color, but you can use the color code on the screen and still have them printed in black and white.
Step 3: Cut and connect the reading glasses.


Using a Dremel with a cutting blade (diamond works great), cut off the handles and nose of both pairs of glasses. Then apply glue in dots along the edge of the glass and on the bridge of the nose and stick together. Ready!
Step 4: Scribe, cut, then staple the side supports.


Tape plastic through the template supports, and scribe using a ruler. Then we cut out the supports and fasten them along the marked line, then fold them as shown in the picture. Repeat for the second support.
Step 5: Cut out the prism supports, place in the sliding metal, attach the side supports.


Cut out the prism supports, staple them along the marked line, then slide two of them onto the metal strip, and fold the sides down on both ends so that it fits into the glasses support. Metal strips from sliding onto a file folder.
Step 6: Pour hot glue into the side supports to make them rigid.


Apply glue in dots on the corners of the glass on both sides and place the glass in the side supports. Then fill the side supports with hot glue to make them rigid.
Step 7: making the body. Cut and scribe a plastic shoe box.


Cut into a shoebox using a template. In a shoebox it's long enough to cut out each end to get two sleeves.
Step 8: Cut and bend the metal strip, place it in the casing and seal the sides.


Again using the file folder metal strips, cut them to size using the templates, bend them, and place them inside the bottom of the casing. Fold back the casing and secure the metal strips in place.
Step 9: Put the latches on the top of the case.


You can use any kind of schnapps or even staples to finish the frame. The ones I used are plastic latches that cost about $4 for 60 will fit, but you need special pliers that sell for about $20.00 (Walmart). Metal latches work well and you don't need an expensive tool to use them.
Step 10: Attaching the prism lens to the prism supports.


Remove the metal strip of glass and apply glue in dots on the prismatic supports. Make sure the prism lens position is from the thin side towards the nose, hold the two prism lenses together and push them onto the supports. Place the metal strip on the glasses there.
Step 11: Make a back support, and staple and glue to the body.


