Making virtual reality glasses with your own hands. Cardboard template for cardboard VR virtual reality glasses - how to make them yourself
Good afternoon (evening/night optional).
Today I will tell you how to make glasses virtual reality with your own hands, no phones(Traffic!):
PREFACE
On at the moment NO official standard for VR glasses/mask and the like. About Oculus, HTC, Samsung, Sony, etc. there is no point in talking and comparing. These are just devices with different functionality +/-, some gadgets. There is no point in arguing about what VR is, everyone sees it differently.
I’ve been wanting to play with this kind of thing for a long time, but phone glasses don’t appeal to me, they’re inconvenient, heavy and there are few applications, poor synchronization with the PC, phone battery, radio delay.
In the process of working on my experiment, 2 nuances that were important to me were highlighted:
1. Head tracking.
2. Display instead of a phone.
Based on these nuances, I started building the unit.
I’ll say right away that the thing is in itself and does not pretend to be of quality; anyone can repeat the production of this helmet based on the instructions received.
COMPONENTS
For the glasses I needed the following components:
MATERIAL PART
The first thing is a warning:

All responsibility, namely independent penetration into the body of the finished product with subsequent violation of its integrity and performance, lies with the person who committed this action.
Frame:
The body will have to be assembled separately for the matrix, due to the fact that the matrix is quite voluminous and a different focusing distance is required. Lens replacement required. The part that will be applied to the head and nose will be taken from this body.


Controller:

The main task is to synchronize the controller with the matrix, I knew that the controller and matrix would work, but whether I would get the required resolution is another question.
I’ll give you an excerpt from the datasheet: 
My display has an aspect ratio of 16:9 and a resolution that falls within the 1920x1440 range.
The problem is that the controller has the wrong resolution and needs to be flashed.
Initially, when connecting the display, instead of a picture, I received a set of stripes. (I even thought that the display itself was covered).
But after a while (when connected to a computer) it became clear that the display was displaying something, but it was clear that it had a problem with synchronization and resolution.
When installing the firmware, I went through more than a dozen and settled on this version:

Now, when connected to a computer, the display displays information that an HDMI connector is connected and offers a resolution of 1024x600. In this case, the display actively tries to receive a signal from VGA, and the message “Connect the VGA cable” appears.
I had to scratch my head again. This controller is a direct analogue of boards with a large number connectors, for example:

This means you need to wire up buttons to your controller so that you can customize the display and switch operating modes. I have attached a diagram for the connectors, the buttons hang on the 53rd leg of the chip:

Just in case, I am attaching a diagram of the RTD2660 chip:

After flashing the firmware and switching the controller to HDMI mode. The display began to start under WIndows 7, my surprise was great when, in addition to the native, native resolution of 1024x600, I was able to set the resolution to 720p and 1080p. At 720p it works great without being distorted, but at 1080p the fonts are no longer readable, but it holds it just the same, surprise, running games at 720p is more fun than at 1024x600 (not all games support low resolutions).

Matrix:
I was already playing with glasses on my phone, the resolution was 960X540. I launched Half-life 2, Portal, but I didn’t like the fact that it was a phone and the fact that I couldn’t look around the space with my head, I rotated the mouse + Wi-Fi delays, they just infuriated me and didn’t let me play. In general, the pixels are visible, but I still liked it.
A 7-inch 1024x600 matrix, part number 7300130906 E231732 NETRON-YFP08, was removed from the spare parts box. Based on the available matrix resolution, we can conclude that for each eye the resolution will be 512x600, which is slightly more than the phone screen resolution and, most importantly, there will be no delays.

The matrix connector has 50 pins and is fully compatible with the display controller. 
To achieve maximum contrast and image richness, you will have to remove the matte film from the matrix. Since the product will be closed, there is no risk of any glare.

Finalization of the matrix is carried out in 7 stages:
1. disassemble the matrix along the edge of the frame;

2. place the module on the lining (here you can tape the edges of the module to the lining so that water does not damage the part);
3. Place a damp cloth on top of the display, preferably the size of a matte film;

4. Gently soak the napkin with a small amount of water at about 25 degrees;
5. wait about 2 - 3 hours, it all depends on the quality of the coating. (the glue of matte films is sensitive to water);
6. carefully pry up the edge and slowly, without jerking, remove the matte layer;

7. check.


If you want to collect glasses on a 2K display, then I will give you a link:
For this price on Ali you can buy a ready-made device with FullHD ->
Therefore, I did not spend money on the concept and decided to use what I had for testing.
Arduino and gyroscope:
The most important part Getting the effect of presence in a game, application or video is the ability to control your head, which means we will write head tracking.
Excerpt from the official source for Arduino Leonardo:
Unlike all previous boards, the ATmega32u4 has built-in support for a USB connection, this allows you to set how Leonardo will be visible when connected to a computer, it can be a keyboard, mouse, virtual serial / COM port.
This is exactly what I need.
The simplest and most common gyroscope was chosen - GY521, which has an accelerometer on board:
1. Accelerometer ranges: ±2, ±4, ±8, ±16g
2. Gyroscope ranges: ± 250, 500, 1000, 2000 °/s
3. Voltage range: 3.3V - 5V (the module include a low drop-out voltage regulator)
Gyroscope connection:

#include
Based on the sketch, we can conclude that head tracking is essentially a gyro-mouse.
CONCEPT
It all came down to the division into stages:
1. trying on head tracking;
2. writing tracker firmware;
3. ordering the required controller for the display;
4. setting up and launching the display with the controller;
5. fitting and general assembly.
This is what debugging a head tracker with a gyroscope looked like:


Video of the head tracker in action:
Running the display with a controller:


To run the display, I need the Tridef 3D program, which allows you to run games and applications with Side by Side images, which I used as a test.
The reason for use is quite clear, these glasses will not be recognized as Oculus DK1/DK2 glasses and in order for the device to be recognized as VR glasses of at least the first revisions of the oculus, it is necessary to completely change the display controller software, which I cannot afford yet, so it will be necessary either to partially prototype it, or to create again a concept board based on gyroscopes like those that are used in oculuses -
But due to the fact that I decided not to spend a lot on this project and I’m not going to make money from it either, we’ll leave that for other people. (I know who makes sets with oculus firmware based on similar glasses for smart phones, but I won’t advertise them, the post is not about them)
Frame
Having played enough with a standard body, I decided to try the matrix on it and was very disappointed, the matrix turned out to be too large for the focal length, I saw everything but did not see the whole picture, it did not add up into one.
The assembly of the body began from scratch.
Having broken off all the protruding parts, as well as the fastening of the head strap, I got the following set:


Actually, like many prototypes, I chose corrugated cardboard, as the most flexible, easily accessible material:


Testing
During testing, the glasses performed extremely well; playing at 720p resolution is a pleasure. The gyroscope works great and follows head movements, the mouse does not float along the coordinates, I passed the cable through my head behind me, 3 meters was more than enough.
Nuance:
The glasses stick out quite a lot, although the mass is not very large, you have to get used to turning your head.


Disadvantages of such a system:
1. You need a smaller matrix in order to reduce the length of the body.
2. You need high-quality lenses (for mine, I took them from magnifying glasses at the nearest print shop).
In general, for myself, as an undemanding person, it will do.
Once I’ve played enough with it all, I’ll make an 8D projector from this matrix and controller. (Keep an eye on the reviews)
Thank you for your attention and patience, I will be happy to answer your comments.
Today I will tell you how to make an HTC Vive from virtual reality glasses for smartphone cardboard with your own hands, spending only 7 thousand rubles, while the original virtual glasses HTC Vive costs about 70 thousand rubles. The big advantage of these expensive virtual reality glasses is the presence of remote controls, but this is not a problem, since today they can be replaced with another device. For example, the same LeapMotion sensor, with which your hands will replace remote controls.
So, in order to make a helmet for 7 thousand rubles, the following devices will be needed:
You can use your own smartphone, you can buy a LeapMotion sensor for about 5 thousand rubles, and virtual glasses with good effect diving will cost you around 2,000 – 3,000 rubles. Thus, you will make your own HTC Vive, which will cost 10 times less than the original one.
From software we will need:

First you need to install the Vridge RiftCat program on your PC and the corresponding application on your smartphone. This program will help you connect your computer to your smartphone and emulate connected HTC Vive VR glasses. To do this, connect the phone to the PC with a USB cable, go to the settings on the smartphone, and activate the USB modem mode. After which the computer and smartphone will enter the common local network. You can, of course, not connect your smartphone to your PC using a USB cable, but simply use Wi-Fi. Why did I choose a USB connection? So, you can achieve best quality images transferred from a PC to a smartphone, the picture quality will be relatively worse via Wi-Fi. Now open RiftCat on your smartphone and connect to RiftCat on your PC.

Next, you need the LeapMotion sensor, which has already been mentioned, we also connect it using a USB cable to the PC and install the Leap Motion VR Orion Driver and Leap Motion Desktop Software mentioned above.
You will also need to install the Steam program on your PC and create an account for yourself. In Steam, go to the “Library” tab and go to the “Tools” section, find SteamVR in the list and install.
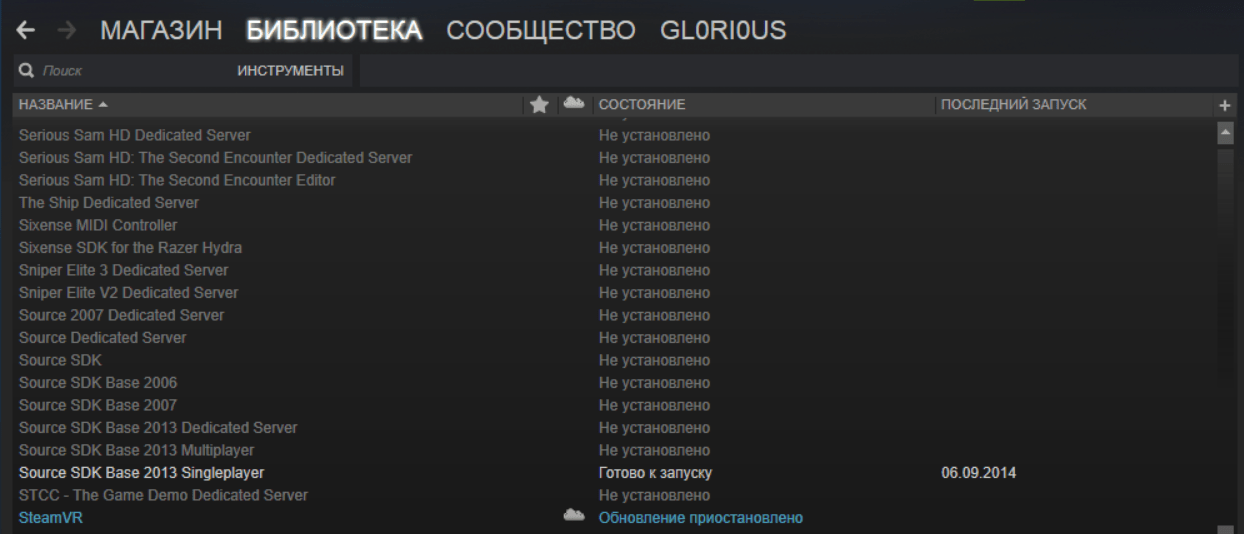
And at the end we install Leap Motion Steam VR Driver.
After connecting all our devices and installing all the necessary programs, in the Vridge RiftCat program on the PC, click Play SteamVR Games, at this moment a window will appear, the emulator will start, and then it will automatically start Steam program VR and if everything is configured correctly, the icons for glasses and remote controls in SteamVR will glow green. Then you can click on the title of the SteamVR window and perform “Room Setting” by selecting a small room, and the distance from the floor can be specified as 180cm. Here we have everything connected and working. Now on Steam we launch any VR game compatible with virtual glasses HTC reality Vive. In order to start playing, you need remote controls, but in our case, as I already said, my hands will replace them. Next, we insert the smartphone into the virtual reality glasses and glue the LeapMotion sensor to the front of the glasses.

Having launched the game, my hands began to emit remote controls. Bending index fingers, you will emit a trigger pull. There is a minimal time delay, that is, on the computer the action will occur a little later than you actually bend your fingers, but this is not scary. Also, unlike remote controls virtual glasses HTC Vive, your hands must be in front of you, within view of the touch camera. By spreading your hands to the sides, the camera will lose sight of them, and the remote controls will disappear in the game, so we recommend keeping your hands in the field of view of the touch camera. You can shoot in games by bending your index fingers. Aiming in games with your hands, of course, is not very convenient, but in principle you can quickly get used to it. We recommend that you familiarize yourself with the available gestures on this site.
I believe that this technology is suitable for those who want to get acquainted with virtual reality glasses on a computer without spending 70 thousand rubles. Of course, this scheme requires a fairly powerful computer, with Intel processor Core i5 and a video card of at least Nvidia GeForce 750. I do not recommend trying to connect the glasses to a laptop, unless you have gaming laptop. In general, virtual glasses will not work with a laptop at all, and with some, even if you manage to connect them, you still won’t be able to play comfortably.
Buy LeapMotion sensor and virtual reality glasses for your smartphone at in this case, I think it’s possible to get acquainted with the games and the operating technology itself. Of course, you can get used to playing without remotes, but the effect will be completely different. You will not get in this version the emotions that you could get with virtual HTC glasses Vive. The very inconvenient thing is that with the sensor you only need to keep your hands in the field of view of the touch camera, while with the HTC Vive remotes, you can wave it as you please. If you want to play fully and save money, then I advise you to buy RazerHydra remotes instead of the LeapMotion sensor, which are well tracked in space, just like real remotes from HTC Vive. Using RazerHydra you can play as comfortably as using HTC Vive remotes.

So, in this article I told you about how to create an inferior, of course, but good replacement for expensive virtual HTC glasses Vive, saving 10 times. Buy yourself a LeapMotion touch camera or RazerHydra remotes, virtual reality glasses for your smartphone, install the necessary programs on your PC and enjoy virtual reality games for HTC Vive virtual reality glasses with us! Order everything you need on BESTVR!
There was an interesting story with Google Cardboard In general, Google developed them for the exhibition as a mockery of the ever-increasing trend of virtual reality, but the idea spread to the masses and now 3D glasses for smartphones are one of the trends.
In the android market and store iOS applications You will find many games and entertainment applications for Google Cardboard, they are both in the paid section and in the free programs.
How to make 3D glasses for a smartphone
Making your own Google Cardboard is very simple, download the drawing from the link below, insert two lenses and assemble these homemade 3D glasses using your smartphone as a screen.
Download Google drawing Cardboard Can .
The only problem may be the lenses; you need biconvex magnifying glasses with a diameter of 40 mm, magnification 3x, focal length 80 mm. But they can be ordered online.
Look at the animation on how to properly assemble 3D glasses from cardboard.
As you can see, no problem.
By the way, people make a lot of money on these 3D glasses!
During the Geek Picnic 2015 festival, these cardboard boxes were sold for “only 990 rubles”!

The funny thing is that this Google Cardboard set can be ordered from China for $3!!!

But visitors loved the cardboard 3D glasses!

And many who do not know their true price bought them, and took more than one copy, but also took them with them to give a gift to their loved ones.
Work 3D Google glasses Cardboard with almost any Android smartphone or iPhone. For Android, the only limitation is that the OS must have a version of at least 4.1.
Regular Cardboard app for Android is a set of mini-utilities that demonstrate the capabilities of 3D glasses. All applications are displayed in the form of a ribbon of icons, which can be navigated by turning your head left and right. The very first thing you should do is launch the Tutorial program - a very short and simple video teaching how to work with 3D glasses.
In addition to the instructions, the package includes the following applications:
Earth: you can fly in 3D Google maps Earth.
Tour Guide: Visit Versailles with a local guide.
YouTube: Watch popular YouTube videos on a virtual screen.
Exhibit: Explore cultural artifacts from every corner of the planet.
Photo Sphere: View your own or other uploaded spherical photos.
Street Vue: Drive around Paris on a summer day.
Windy Day: Interactive cartoon from Spotlight Stories
Also pay attention to the VR Cinema program.
VR Cinema for Cardboard - Virtual reality cinema for Cardboard
Thanks to this application you can watch movies on your VR display. The application splits any MP4 video. The screen is divided into two halves with the same picture on both sides. It's not real 3D, but the feeling is comparable! Videos are downloaded from the memory of your gadget or from Google Disk. VR Cinema allows you to watch videos captured on your gadget's camera. The app also has a VR camera feature that uses front camera. It's a funny effect, but I didn't appreciate it. The application has not yet been finalized and you can feel it. In future versions, the developer promises to introduce control using a magnetic ring, the ability to transfer video online and will increase the number of processed formats.
If you cannot get lenses or they are offered to you at a price above $3, then order right away Google ready Cardboard worth $3.2!
All you need to do is fold these 3D glasses from the disassembled state, insert your smartphone into them and you can enjoy 3D reality!
Buy Google Cardboard Can
This video tutorial will show you how to make cardboard 3D virtual reality glasses. To do this we need a phone, two lenses, a pen, a ruler and carton(thick cardboard). It is recommended to use lenses 5-7x, diameter 25 mm. The article consists of two parts. The first contains the basic steps for creating glasses, the second contains recommendations for improving the product and a description of applications for 3D games.
Buy ready-made cardboard glasses you can in this Chinese store.
From cardboard you need to cut out all the parts that will be needed to create the glasses. To do this, it is very convenient to use the diagram, which you can download from the link. It will make everything much easier to do. You can download this drawing for printing on a printer.

Now, according to this diagram, you need to draw out all the details on cardboard and cut them out using scissors. Next you need to collect it all, which is, in principle, not difficult to do. In all places where there are bends, you need to bend the cardboard and connect everything using hot glue. Next you need to insert two lenses.
If you made the hole a little smaller than the lenses themselves, then you can simply place them very tightly and they will not fall out, but just in case better a couple drops of hot glue.
Now we need to download an application called cardboard to our phone. There's a lot in it different games for 3D glasses and videos. You can download the demo version from the Play Store.
Let's finish the 3D glasses. We insert the cardboard with lenses and we are all ready!
Go to the cardboard program. There are two sections here. There are many different games and videos here. We launch the one we like and insert it into our 3D glasses and enjoy virtual reality.
Since the phone has a built-in accelerometer, we can move our heads and the picture will also move.
There are many applications for these 3D glasses on the play market. Make these glasses or buy ready-made ones. In general, this cannot be explained, it’s very cool! Until you try it yourself, you won’t understand what it all looks like.
How to make a reality simulator for a personal computer
Next, we will show you how to make a reality simulator for a personal computer, these are virtual reality glasses like the Oculus Rift. To do this, we need straight hands and a well-functioning head and motivation to create homemade products. If you do not have any of these qualities, but have money, then it is better to immediately buy ready-made virtual glasses.
We will need a virtual reality helmet, which you could make using the video tutorial above. The current version adds larger lenses, head mounts, and Velcro to help the phone hold better. In general, this craft is assembled more carefully.
Where can I find lenses? You can take from the magnifying glass which contains two lenses that are perfect for these virtual glasses.
We will need a more powerful computer and a telephone with good characteristics so that all programs work stably and do not freeze.
You need to download a program called droidpad to your computer or phone. This application will help us use our phone as a virtual joystick. Namely, use the phone’s accelerometer itself. This application supports two types of connecting your computer to your phone: using USB and WiFi. We don't need it using usbi, because the phone will be inserted into the virtual glasses. Therefore, we will use the wi-fi method. It is desirable that the Internet speed be good and stable.
Now we have the most difficult work ahead of us. We need to calibrate the accelerometer of the iPod phone to our computer. After installing this program, the phone will be used by default as a virtual phone in games. Certainly not all games will be supported. Instructions for calibrating a phone with a computer are available on the 4PDA website.
After we have calibrated according to the phone's instructions for the computer, you can go into any game and test your magic glasses. The mechanism of this application is that using the phone's accelerometer, when you turn it, the screen rotates. It turns out to be a replacement for a computer mouse. Additionally, we need a program called cardboard. This program is needed to make the phone screen split in half. There is a special function, be sure to find it and configure it correctly so that everything works for you. Check that the phone screen is correctly divided not only on the desktop, but also in other programs.
Finally, download the latest program called Splashtop. This is a program so that we can view the computer screen through the phone. How to set up the program, instructions are also available on the 4PDA website.
After we have downloaded the program to the computer and phone, we need to launch the droidpad program to control the accelerometer, the cardboard program to divide the screen in half. These two programs must be running in the background. You need to open the Splashtop program and check if everything works. Launch the game on your computer and enjoy.
There is one caveat - the higher the pixel density on the phone, the clearer the picture will be. Besides games, of course, you can watch movies.
Everything voluminous is becoming fashionable, and many people want to have it in their home for creativity.
I'll tell you right away. I don’t understand anything about this yet, and my grandchildren haven’t taught me yet. But the fact that virtual reality glasses can be made from old glasses and a shoe box was immediately captivating. He dragged me to his place for further investigation.


This project will show you how to make VR views such as Google cardboard, but optimized for tablets. Apart from the tablet, the cost is very low. He uses two pairs of reading glasses from the dollar store (Dollar Tree), a plastic shoebox, and a pair of inexpensive prism lenses costing about $7. The result is a very efficient device thanks to high resolution display and a larger field of view of the smartphone.
Step 1: Some Background Information
I created this device in order to engage students in the classroom using VR technology for their education. Since I am a teacher in Salinas, California, I am naming this Salinas VR viewer.
Google's Cardboard was inspired by this viewer, but it was made to address several major shortcomings of trying to force the viewer to a larger screen than a smartphone. It would seem that all that is needed is to scale to the view size, but there are several problems with this approach.
One of the main problems is that, like cardboard, such a viewer will only use a simple pair of convex lenses to view the display. However, this may not be effective because large size display means that images cannot be placed (optically) directly in front of each eye. If these have not been corrected, then the person should be able to move each eye towards the direction of the ears. My viewer solves this problem by using an inexpensive prism lens, shifting the image so that it is optically directly in front of the viewer's eyes.
Another problem with using simple round convex lenses is that they are simply too primitive to allow for a VR experience. Such lenses have very limited area to widen the viewing area is that the eyes must be placed very close to the lens and thereby limit any eye movements. This kind of restriction on how we move our eyes is not natural. It's hard to see how much fidelity a VR system can have if it forces a person to hold themselves rigidly, looking straight ahead in an effort to keep the image in focus. People should be allowed to move their eye and still see VR images. Fortunately, some lenses have evolved to be as optimal as possible for people to use, i.e. reading glasses. These glasses allow for a wide field of view (fov), and a very large viewing area. These glasses are also extremely inexpensive.
Step 2: Equipment:

1 scribe [I thought for a long time what this means, probably in Russian - scribe:) ]: made by you.
Made with #90 wire nails, and some plastic folded and stitched. This allows the scribe to mark and cut very beautifully with either a utility knife or sharp scissors.
2 Pairs 3.25 Magnification Wide Frame Reading Glasses: Dollar Tree
Price: 2.00 Dollars. This is quite profitable. Other stores like pharmacies have them hard to find and sell a lot more (+10.00 per pair).
1 pair 1.5 Prism Wedge lens pair: Berezin stereo photography products http://www.berezin.com/3d
Price $7.95 per pair.
1 Plastic Box: Amazon: Whitmor 6362-2691-4 clear vu collection of women's shoe box by Whitmor
Price: $11.99 You need 1 window, but you get a set of 4. You can make at least 6 viewers through 3 boxes, and use another box for other plastic parts other than the body (plastic body)
1 roll of glue dots (high strength):
Price: about 5 dollars. Without this amazing glue, it would be impossible for the viewer. Please note that you are not using it from the video. You use the scribe (see above) to pick up the point and place it where needed.
3 templates: PDF files that need to be printed.
Cut it out and stick it on the plastic, then you can scribe the spare part you need. They are in color, but you can use the color code on the screen and still have them printed in black and white.
Step 3: Cut and connect the reading glasses.


Using a Dremel with a cutting blade (diamond works great), cut off the handles and nose of both pairs of glasses. Then apply glue in dots along the edge of the glass and on the bridge of the nose and stick together. Ready!
Step 4: Scribe, cut, then staple the side supports.


Tape plastic through the template supports, and scribe using a ruler. Then we cut out the supports and fasten them along the marked line, then fold them as shown in the picture. Repeat for the second support.
Step 5: Cut out the prism supports, place in the sliding metal, attach the side supports.


Cut out the prism supports, staple them along the marked line, then slide two of them onto the metal strip, and fold the sides down on both ends so that it fits into the glasses support. Metal strips from sliding onto a file folder.
Step 6: Pour hot glue into the side supports to make them rigid.


Apply glue in dots on the corners of the glass on both sides and place the glass in the side supports. Then fill the side supports with hot glue to make them rigid.
Step 7: making the body. Cut and scribe a plastic shoe box.


Cut into a shoebox using a template. In a shoebox it's long enough to cut out each end to get two sleeves.
Step 8: Cut and bend the metal strip, place it in the casing and seal the sides.


Again using the file folder metal strips, cut them to size using the templates, bend them, and place them inside the bottom of the casing. Fold back the casing and secure the metal strips in place.
Step 9: Put the latches on the top of the case.


You can use any type of schnapps or even staples to finish the frame. The ones I used are plastic latches that cost about $4 for 60 will fit, but you need special pliers that sell for about $20.00 (Walmart). Metal latches work well and you don't need an expensive tool to use them.
Step 10: Attaching the prism lens to the prism supports.


Remove the metal strip of glass and apply glue in dots on the prismatic supports. Make sure the prism lens position is from the thin side towards the nose, hold the two prism lenses together and push them onto the supports. Place the metal strip on the glasses there.
Step 11: Make a back support, and staple and glue to the body.


