Installing a network scanner in Windows 7. How to turn a regular scanner into a network scanner
Instructions for SMALL stickers!!!
Step 1. First, check the surface: it should be clean, dry, smooth. To do this, carefully wipe the surface to be glued with a dry, clean cloth. Check that there are no threads or lint remaining that could damage the adhesive surface of the sticker. Before applying the sticker, we recommend washing plastic, glass and metal surfaces with detergent, then wipe dry.
Step 2. Open the sticker. Mounting film is glued over the application. Carefully press all the elements of the sticker onto the mounting film - the mounting film is intended for transferring the sticker, but not for permanent storage, so it is permissible for the decorating film to move away from the mounting film.
Step 3. Separate the backing from the mounting film and pull it down. Be careful that all elements remain on the mounting film. If some small elements remain on the substrate, they should be immediately pressed against the mounting film. After removing every 10-15 cm of the backing, smooth the sticker to the surface with a squeegee or plastic card, using movements from top to bottom. Once the backing is completely removed, smooth the entire surface of the sticker with a squeegee or plastic card. Make sure there are no air bubbles under the application. If the bubbles cannot be smoothed out, then they can be pierced with a thin needle and then smoothed out this place with a squeegee or plastic card.
Step 4. Carefully begin removing the mounting film. Pull it to the right or left side, and not on yourself, make sure that the application remains on the surface and not on the mounting film. If unevenness occurs on the sticker, you can press it to the surface by heating the sticker with a hairdryer.
Attention!
The stickers are intended for one-time gluing.
Instructions for BIG stickers!!!
First, you need to wash and clean the area where the sticker will be located from chemical contaminants.
1.The temperature in the place where you are going to glue the sticker (indoors or outdoors) must be at least 5 degrees Celsius. Small stickers (for example, on the hood), on flat surfaces, can be glued at lower temperatures.
2. First, decide on the place where you are going to stick the vinyl sticker. Determine where the top corners of the sticker will be so that the sticker adheres evenly to the car. It is advisable to mark the points on the car and on the sticker with something waterproof so that when gluing you can align the marks and avoid uneven gluing.
3. Without peeling off any backing, place the sticker on the car and see how it lays down and fits the surface. Try everything on so that there are no overlaps later.
4. Remove the sticker. Separate the bottom protective paper layer from the image with the mounting film.
5. Pre-treat the entire surface, in the places where the sticker is glued to the car, and the sticker itself (from the adhesive side) with water from a sprayer. This will make it possible, after you attach the sticker to the car, to move it, adjusting the placement and easily expel all air bubbles from under the film. DO NOT WET THE PAPER BACKING OF THE STICKER WITH WATER, OTHERWISE THERE WILL BE PROBLEMS WITH SEPARATION OF THE STICKER FROM THE BACKING!
6. After placing the sticker on the car, roll it evenly with a rubber spatula or something with acute angle, from the middle to the edges. Make sure that the sticker does not bulge and there are no wrinkles.
Important! If your surface is not smooth, with transitions, do not try to roll the entire sticker at once. Roll it up central part a sticker that goes over a flat area, leaving the edges unrolled. You will roll the rest later, from the middle of the sticker to the edges, stretching and heating the sticker with a hairdryer, preventing bubbles and folds from forming.
Important! When rolling, if a wrinkle has formed, you can carefully tear off the rolled part back and roll it again, heat the sticker with a heat gun and smooth out the wrinkle.
It often happens that in addition to a remote printer, you also need a remote printer to work. remote scanner. And if you configure the printer in local network is not difficult, but with a scanner everything is much more complicated. The fact is that Windows OS does not provide tools for providing public access scanner. This is done at the level of its drivers. Therefore, to open access via a local network, you need to use third-party programs.
The Blind Scanner utility is great for this, it works exclusively with scanners, making them visible to all computers on the network. The program is installed on each computer in client mode, and on the computer to which the scanner is connected - in server mode.
After installation, the program will automatically start the server service and will work minimized to the tray. By opening the program window, you can see the operating mode of the service, its status (active or not), as well as the scanners connected to the computer.
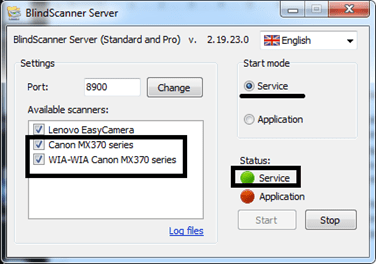
The utility is active and accessible over the network. Now it needs to be installed on all computers from which the scanner will be accessed, in client mode.
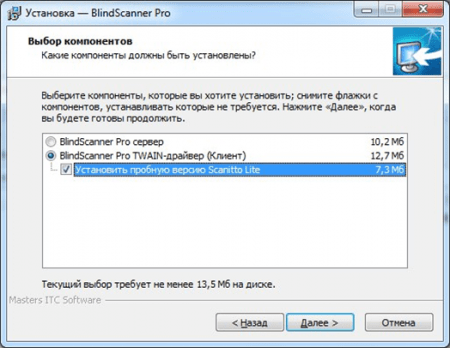
After the installation is complete, the “Scannito lite” program will launch, in which you need to select BlindScanner Pro.

A scanning window will open in which you need to search for the program server. To do this, you need to open the settings (as in the screenshot) and enter the local address of the computer to which the scanner is connected.

After this, a connection attempt will be made. If everything is entered correctly, then after a couple of seconds you will be able to see the scanner itself in the field.

We select the scanner model in the drop-down menu, after which you need to set the settings: resolution, color mode, paper size and contrast and brightness settings.
Now you can start scanning. Upon completion, the result will be displayed in the preview window, after which you can save it to any directory. Just like a printer, only one computer can access the scanner; the second must wait for the first to finish working.
This is the easiest and at the same time reliable way to share access to the scanner. It can be used both in the office and on a home network when it is not possible to move the scanner from place to place. Also, any program that supports scanning, for example, ABBYY FineReader, can act as a client.
When working in an enterprise, quite often you may encounter the fact that one office is equipped with only one printer, scanner or MFP. This is done by management for reasons of economy, but can cause inconvenience to employees.
If a local network is configured between office computers, then the issue of printing documents is resolved by providing access to the printer for all users, while it is not possible to share the scanner over the network using standard Windows tools. It’s good if there is a competent system administrator on staff who can cope with such a task. Otherwise, it will be easy to implement it yourself. This especially makes sense when employees' workplaces are located close to each other. Although, unlike setting up the printer Windows system does not provide such an opportunity to recognize text from the scanner of another computer; there are enough programs from third-party developers whose work you can use.
First of all, you should familiarize yourself with the information about the installed device in the technical data sheet or on the manufacturer’s website. The fact is that some manufacturers of multifunctional devices and scanners of all types are developing their own software for network scanning, which allows you to configure both a barcode scanner and an MFP over a network. In this case, you just need to install such a program from a disk or download it from the Internet. If the manufacturer has not provided anything like this, then you can download the RemoteScan program, preferably latest version, from the developer’s website (http: //www. remote-scan. com/) or from any other place. Don’t worry about the difficulties of setting up ports and other “scary things” because setting up a scanner from Epson, Canon, Samsung and other companies thanks to this program will be no more difficult than making tea.
RemoteScan installation consists of two stages - server and client installation. First, you need to install the server program on the computer to which the scanner is connected. After this, you just need to add the existing scanner in the settings. In some cases, you will also need to allow access in the firewall to port 6077. Since many computers need to connect a network scanner, the RemoteScan client part must be installed on all of them. The client program is installed automatically and does not require special settings.
Immediately after installation and restarting your computer, you can start scanning documents over your local network. Thanks to such simple manipulations, you can make the economical no longer inconvenient.
In this article I want to tell you how to turn a simple scanner into a network scanner. The Remotescan program will help us with this.
Let's say your office has one printer with a built-in scanner and copier (MFP), and about 10 users use this device. Any document flow is accompanied by scanning documents, translating them into electronic view. And so the poor accountant, connected to a computer with an MFP, constantly jumps and is distracted from his work, because he is constantly asked to scan a document and put it in the exchange folder. Agree, the accountant’s nerves will begin to fail within a month, and the management, when asked to buy another MFP, will say that there is no money. Is this a familiar situation? In order to save the nerves of the user to whom the MFP is connected, the Remotescan program was developed.
In this article I will not go into details of installing and configuring the MFP itself; let’s say you have already done this. Now let's move on to installing and configuring the Remotescan program.
Remotescan installation
First we need to download this program. By the way, it is paid, but if you download it, it will turn into free, and even the crack will be in the archive. Magic!!!
This program is installed in two ways; where the scanner itself is connected, we must select the “server” installation option during installation.
Unzip to any location convenient for you and go to this folder. There you will see two files,

For now we are interested in the file called “setup.exe”, let’s run it:

Choose English language and click the “Next” button.

Here we click on the “Next” button, the following window will appear:

We agree to the license agreement and click the “Next” button.

Click the “Next” button again and the following window will appear:

And here it gets more interesting, we need to select the installation type, server or client.
- Client – if you install the program on the computer with which you want to use the scanner in the future, then select this item.
- Server – if you install the program on the computer to which the scanner is physically connected (by wire), then select this item.
You and I install it on the computer to which the scanner is connected and therefore select the second installation type “install Server Software”. Click the “Next” button.
Attention.
You can choose both options, but if you are not a confident computer user, you may experience difficulties in the future when specifying the server.

We select where the program will be installed, you can leave it as default, click the “Next” button:

Here you are asked: “Do you want to start the remotescan server after installation”, check the “Yes” box and click on the “Next” button:


Click on the “Install” button. During the installation process you will see this window:

This will create an allowing rule on your firewall, check the box indicated by the arrow and click on the “Allow access” button.

The installation is complete, now click on the “finish” button.
- Installation of the cracker.
We go to our folder that we unzipped:
And run the file “RemoteScan_client_rusificator”, everything is simple here, first click on the “Accept” button, and then “Extract”.
- Then we restart the computer.
After you restart your computer, the RemoteScan program will launch automatically, and the program icon will appear next to the clock.
- Setting up RemoteScan
Click on this icon that appears in the tray next to the clock with the right mouse button, you will see context menu, in which we select the topmost item (choose a scanner / select a scanner). Select your scanner from the list; you can see its name on the top cover of the device. This completes the server setup. You have worked on this computer, continue to work, and continue to scan as you did before.
- Installing the client part
Let's move to another computer and start installing the client part. I will not repeat the installation process; we do the same as when installing the server part, only in this window:
You need to select the “install Client Software” checkbox. This completes the installation process of the client part.
- Using Remotescan
No shortcuts will appear either in the tray or on the desktop, so you don’t have to look. Just open the program in which you are scanning, and there should be a “select scanner” field in any case, and an item called “remotescan(TM)(TWAIN)” should appear there, I’ll show you how it looks using the example of the program “ FineReader".
So, I launch the program in which I usually scan some documents.

In the window that appears, in the upper left corner there is a “File” button; if you click on it, a context menu will appear, in which there is an item “Select scanner”, click on this item and the following window appears:

In this window we see this line that interests us: “remotescan(TM)(TWAIN)”.
It happens like this =)
That's probably all! Thank you all for your attention, don’t forget to actively comment on my posts and add yourself as a friend on VKontakte =)
Hi all! Today I encountered this problem: how to make a scanner over a network in Windows? The printer is easy to add, because... Windows has a built-in print server, but no scanning.
How to set up a scanner over a local network?
After a little searching, I found a program that makes a scanning server and, accordingly, can share a usb printer over the network!
 Now see how it works:
1. Install this program on the computer to which the scanner is connected. Install as a server.
2. Now on a computer that does not have a scanner, install the program in Client mode.
3. To scan a document, select RemoteScan as the device.
1. Install as a server
I won’t explain to you how to install, everything is simple further, further, but most importantly, install as is and when installing, check the server box.

When starting, select the scanner through which scanning will be performed. We select the scanner so that the program can share the scanner over the network.

All. The server is minimized to tray and will start when the computer starts. There is no need to turn it off. If necessary, you can change the scanner in the tray if you have several of them.
2. Install the scanner as a client
Now we install the scanner on the computer where you will scan.
The installation is similar, only during installation you need to select the Client checkbox.

After installation, if the firewall asks, again select which networks you will use it on.
All. Now how to scan.
3. How to scan over a network via USB
Now select the program to scan. If you don't have it, you can download it in my article about. I took the second one, which can scan several pdf pages into one file.
Select RemoveScan as scanner

And we scan as usual) This is how you can scan over the network via a USB scanner!
Many people may need to connect the printer to virtual machine, I am attaching a video based on this)
PS: If anyone has conflicts with this program on their computers, then try the BlindScanner program - it’s an analogue.


