DIY house for two cats. Do-it-yourself cat house - from improvised means to complex structures
Many people are concerned about how to make a house for a cat, where should you start? First of all, you need to decide on the design. In order for your pet to like the cat corner and for him to actively use it, you need to take a closer look at the habits of your four-legged friend.
You need to pay attention to where he spends the most time, where it is more convenient for him to rest, maybe he prefers to lie on the floor or climb higher.

Thus, when choosing a cat house model, it is best to focus on the pet’s habits, however, there are general nuances that must also be taken into account.

House for cats
One of the features that should be taken into account when creating a corner for your furry pet is its gender. Thus, cats give preference to houses, the design of which includes 2 entrances, as well as pipes or similar structures.

At the same time, a large hole does not allow them to feel safe, for this reason it is best to make the entrance hole small, the main thing is that the cat can pass through it.

You also need to take into account that cats with kittens prefer houses on the floor, and free females love heights.

Corner for cats
Cats love heights and good visibility, which is provided by comfortable platforms, the dimensions of which should be large enough for the cat to lie down fully stretched out without falling.

Cat Corner Ideas
Of course, you can buy a ready-made, beautiful cat house in the store, however, what could be better than a cozy nest for your beloved pet, made with your own hands.

Before you start creating a cat house, you need to decide on its model, and for this you need to consider several ideas.

Cardboard house
The easiest option is to make a cat house out of a box. For this you will need cardboard and a piece of fabric. For cardboard construction, it is best to use boxes of a suitable size. Textiles will be needed for the interior decoration of the house to make the cat as comfortable as possible in it. And when decorating the facade, you can show your imagination.

So, first the top and bottom of one of the boxes are cut out, then the outer part of the frame is covered with paint. After this, holes are cut out in the house that will serve as windows and an entrance.


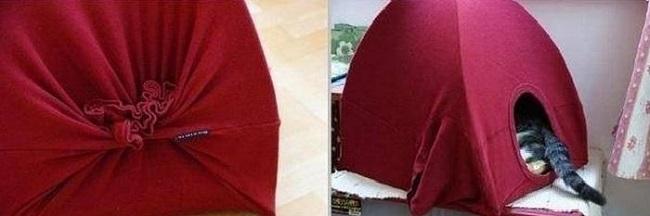
Tent
The tent is very convenient for both owners and cats, as it is not difficult to move from one place to another. In addition, you can easily make this secluded cat place yourself. For work you will need: cardboard, thick wire and an unnecessary T-shirt.

First, a drawing of a cat house is made, then an arc-shaped frame consisting of 2 parts is constructed from wire. Then cardboard is attached to them on all sides and a T-shirt is put on, so that its sleeves are fixed at the back, and the neck serves as the entrance. If you know how to sew, you can use a cover instead of a T-shirt.

Bed
If your pet prefers to sleep on pillows, then a soft, cozy bed is ideal for him. However, this option is only suitable for those who know how to sew. When making a cat bed, you can use any textile.

The size of the cat house depends on the size of the animal.

First of all, you need to sew the covers for the pillow, arms and back, then they are put on the padding polyester and sewn together.

Corrugated
The Japanese model of a house made of corrugated cardboard is quite interesting. Such a house can have any shape, but cats love the spherical one the most. In addition, the texture of the facade will also be a scratching post.

First, rings are cut out of cardboard; their size depends on the configuration of the house and the size of the pet. Next, all elements are glued together with PVA glue. A soft pillow is placed inside for comfort.

When a cat lives next to you for many years, it gradually turns into a full-fledged member of the family who needs to create the same comfortable conditions. That is why many owners of furry pets strive to create the most convenient and beautiful design for comfortable rest and entertainment for their pet.
When a cat appears in the house, you need to allocate a place for it. Many owners can’t get by with a simple bed from the store. They want to make an original house with their own hands. This task may seem daunting. But if you understand all the details of production, then the structure can be made without difficulty! You can also build a house that matches the color of the interior style. And in regular stores it’s difficult to find something like this. Everything will be discussed in more detail later in the article.
There are a number of rules that will help you prepare for work on arranging a hut for a cat.
First, learn the most basic ones:
- Before you start building a house for an animal, think about what materials you will use. It is better to use fabric made from natural fibers and natural wood in such work. These materials are the safest for cats. But in any store they are expensive. And Chinese analogues, as a rule, consist of synthetics and plastic.
- You need to clearly understand what kind of house you want to make. To do this, draw it on a piece of paper in advance. Such a sketch will help you not to forget anything. You will also properly plan the purchase of materials and prepare the means at hand.
- This is a fun activity for parents with children. After all, participation in the creative process always brings joy.
Houses for cats step by step: main recipes
Making a cat house with your own hands is more fun with your children. Just give preference to safe materials. So, the simplest and cheapest option for arranging a hut is the following:
- You need to take a large corrugated cardboard box. It is better that the box has dimensions of at least 35 by 50 cm in width and up to 50 cm in height.
- Now you need to prepare the available tools: scissors, glue, a stationery knife, fine sandpaper, tape, pencil, colored paper, upholstery material and more.
- For the internal frame (laying on the floor), you can use foam rubber. But if it is not available, an unnecessary blouse or a piece of an old blanket will do. For the exterior decoration of the house, you can use colored paper. But it is more relevant to use boucle fabric or fur.
- Now let's start preparing the box itself. To do this, remove the stickers from it, glue the places where there are cracks with tape, cut off the burrs, and sand the roughness with sandpaper.
- Draw a hole on the end of the box. To do this, place a saucer with a diameter of at least 20 cm on it and circle it around the edges. Then we cut out a hole using a stationery knife. Gently sand the edges with sandpaper.
- Once again we seal all the joints with tape or glue. The house should be durable so that the cat feels comfortable and calm in it. Dry the product before starting exterior finishing.
- Now we cover the house with colored paper or textiles. For the second option, silicone quick-drying glue is suitable. In this case, you cannot use a furniture stapler, as the cat may be injured from the inside of the staples.
- To match the size of the floor in the house, sew a small pad made of foam rubber and upholstery fabric.
Now the house is ready for use. And you can let your pet into this cozy nest. It can be supplemented with glued toys, hanging threads, and sparkles.
Popular options
The cat building may have a non-standard shape. You can make it from available materials. It may also not have a scratching post at all. Let's consider several of these options:
- Wigwam. The structure is made of metal rods in the shape of a tent. Then it is covered on all sides (except one) with fabric. Foam rubber and bedding are laid on the floor of such a house.
- Ottoman house. A standard square ottoman usually consists of a wooden or MDF structure. Therefore, we remove the fabric from the bottom of the pouf and cut out a hole with a jigsaw. Then the wooden part can be covered with latex paint, and a soft lining can be placed inside.
- Hammock house. Any cat is interested in new places. Making a hammock for her to relax is very simple. To do this, you can use: a small coffee table, an armchair or a chair. But these pieces of furniture must have 4 legs. So, at the level between the floor and the tabletop/seat, the canvas is stretched. On its sides two fabric strips should be sewn to each. Then the canvas is attached to the legs using ties. And voila!
- Triangle house. This is the simplest type of pet hut. To make it you will need 3 small pieces of OSB. They can be cut from a thin board, 6 ml thick. The pieces should be equal in size and rectangular in shape. Then we place the first piece on the floor, and on top of it we make a dome from the remaining two. We fix the parts together using nails or screws. Additionally, you can use metal triangles. Using a glue gun or a furniture stapler, we frame the outside of the house with fabric. We put a soft lining inside.
- Shelf house. From available materials (osb boards, boards, laminate or chipboard) you can prepare shelves of various levels. But its main task will be to become a place for the cat to relax. So, you will need to cover the resulting piece of furniture with fabric and place it on the floor.
Houses with scratching post
Every cat needs to sharpen its claws. If your pet is indoors and it is not possible for him to go outside regularly, then he will have to do this at home. Without the claw grinding procedure, the owner will have to trim them.
And if there is no scratching post in the house, the pet will begin to sharpen its claws on the furniture.
Therefore, it is better to make a house for a cat with a scratching post, which will fully perform its intended function.
Materials
First decide on the construction site. Then you need to measure the allotted “angle” in height and width. Now prepare the materials most convenient for sharpening the animal’s claws. This:
- carpet;
- tapestry;
- jute rope;
- tree.
Carpet is a fairly durable and soft material. The cat will sit comfortably on it and also comfortably sharpen its claws on it.
In addition, you will need:
- plywood sheets;
- wooden beams;
- plastic pipes as support pillars;
- self-tapping screws;
- corners;
- screwdriver;
- jigsaw
But these tools may not be found in the house. Therefore, it is worth taking care of their availability in advance.
What and where to buy?
To build a hut with a scratching post for an animal, buy a whole sheet of plywood at once - 1.5 by 1.5 cm. Then cut it into pieces: 0.50 by 0.75 cm.
For the support (post), you can use a regular beam, which will need to be divided into several parts. Choose timber up to 2.5 m long.
It is advisable to choose plywood sheets with a thickness of at least 10 mm. Since the cat will often jump on them in the future. And this material must be strong.
Advice
You shouldn't buy the most expensive carpet. Give preference to the cheap option. You can also ask the seller to sell you scraps of this material.
Jute rope can be found in every hardware store or market. The difficulty is that it is sold in bulk. You'll have to buy a whole skein or look for a store that sells rope by the meter. But the price of a cut product is much higher. Take a rope at least 1 cm thick.
Safety fastening elements are purchased for the building: corners and triangles for better fixation of structures.
Manufacturing process
When the design of the hut is completed and all materials are at hand, you can begin to work. The basic frame can be one-, two-, or even three-tiered. The number of platforms also depends on the number of cats in the house. So, if two pets live in an apartment, then each of them should have its own seat.
So let's get started:
- A wooden beam is attached to the plywood base.
- You can put a plastic pipe of suitable size on it (so that the pipe fits tightly to the walls of the beam and does not twist).
- If we make several platforms, then at some distance from each other on a single base we fix 1-2 more beams.
- Each of them has its own platform (at different heights). We fix them on top with self-tapping screws and metal corners on the sides.
- The first shelf must be fixed not only to its beam, but also be connected to the second. Therefore, a hole for the second beam is prepared in advance in the plywood. He will have to go on the board. The second shelf is attached to the third in the same way.
- Now you can begin framing the plywood surfaces with carpet. Here you can use a stapler or use regular nails and a hammer. If you decorate the house with ordinary fabric, then soon the building will need its replacement. Most likely the animal will want to sharpen its claws on the fabric too.
- Tie all the pillars from beginning to end with rope. Try to keep their rings tightly adjacent to each other.
Now the scratching post structure for your pet is ready! Additionally, you can decorate it with colored felt, threads with buttons, sparkles, and foil.
Scratching post options
In addition to the most common scratching posts for cats, you can make simple but original analogues. So, it is permissible to make a scratching post in the form of a picture. To do this you will need a simple piece of plywood (rectangular) and carpet.
The carpet is fixed to the board using nails and a hammer. The corners of the fabric should be hidden on the back. They even attach a mini hanger. Then the finished painting is hung on the wall in the corridor or room. It should hang at the height of the pet. This refers to the cat's height at the withers, and not from the floor to the tips of his ears.

If you have a cat, then you probably dreamed of a beautiful and comfortable house for her. Most often, houses and beds for pets are bought in special stores, but such things are not cheap. You will have to save money for a whole month, or even two, to purchase an appropriate house for your cat. But at this time you need to buy her food and litter for the toilet. Someone else gets their pet vaccinated monthly. And this also costs a lot of money.
A home for your cat is a place where it can sleep for a long time or hide from its owners. Representatives of the cat family generally like to hide in dark places.
Their favorite places are boxes, cabinets, a compartment inside the sofa or somewhere under an armchair. You, like no one else, should know what troubles your pet’s sleep brings, for example, in a closet. Clothes are constantly covered in wool and in puffs. Before putting the item on, you have to clean it or iron it. That’s why I really want my beloved cat to have his own private place to relax.
Types of housing for cats
Which house is best to choose for your beloved pet? A place to sleep and rest can be of several types:

Having studied the Internet, you can find many videos from which you can learn how and from what you can create a future house for your pet. Very often, from such videos, owners learn how to get something truly beautiful for little money. Every home owner has such unnecessary things as some foam rubber, cardboard boxes, small pieces of some fabric or old jackets or fur coats.
It is from these materials that you can create an excellent home for your cat.
How to sew a house for your beloved cat (patterns and step-by-step algorithm)
To create a house we need pieces of upholstery from a sofa or thick velor fabric, for the filler we will use foam rubber. You may ask why this particular fabric? It is denser, and if your pet decides to scratch its claws in its house, the house will remain intact. In addition, such a fabric will be easier to clean from your animal’s hair.
Now let’s study in more detail the creation of our future masterpiece, and photographs will help us with this.
- Preparatory stage . We will need two types of fabric about two meters long and wide 60 cm. If you don't have one piece of fabric that long, you can sew several pieces of material together to make a total of 200×60 cm. each fabric. The inside of the house should be made of thick fabric, and the outside should be of your choice, as long as it pleases the eye. For the filler, foam rubber one and a half centimeters thick, also 200x60cm in size, is suitable. If it is not available, you can purchase it at any industrial store. Price about 300 rubles per sheet size 1x2 m. This will be quite enough. And you must admit, 300 rubles is not 2 thousand, like the price of houses in stores.
- Making a pattern . For the template you will need cardboard; if this is not available, a regular newspaper will do. Template dimensions 40×55 cm. (40 cm width of our house, 30 cm height + 25 cm roof). Cut out the template as shown in the photo and apply it to the fabric. When tracing the template, leave a couple of centimeters for the seam. Thus, we cut out 10 parts (5 from each material). You should succeed 8 wall parts 40x30x25 and two bottom parts 40×40.
- We do the same with foam rubber, only without 2 cm for indentation. We get 5 parts. 4 walls 40x30x25 and 1 bottom 40x40.
- Fastening the fabric . We fold 2 pieces of different fabric to each other, put foam rubber between them and secure with needles. We fasten along the entire perimeter of the foam. Thus, we proceed with all 4 walls. In the last fourth wall, we make a hole - the entrance. To do this, apply a plate, as seen in the photo, and draw a circle.
- Sewing fabrics . We use a sewing machine; if you don’t have one, you can carefully sew it with a needle with a good seam.
- Circle - entrance
. We trim our circle for the entrance. You can use a zigzag stitch on a machine, or try to sew it beautifully with a needle by hand.
Seam in the pattern
- Preparing the entry hole . To do this, in the already stitched circle, carefully cut a hole in a circle.
- Future bottom. We sew together the parts of the future bottom using the same method, so that the foam rubber is inside.
- Preparing the frame
. We sew all the parts together as shown in the photo. To ensure that the beautiful fabric you choose is on the outside, sew pieces with thick fabric or upholstery together. We start sewing the parts from the entrance wall with the hole, then all the rest according to the same principle.
The frame is almost ready
- Bottom. We attach the bottom and stitch around the perimeter.
Trying the frame to the bottom
- Finish. We turn the product right side out and invite the cat to evaluate our work.
The chief expert is already sitting inside
Cats love to watch what's going on in the house. . A great option to place her house somewhere higher , for example, on a closet or bedside table . Sometimes waking up , the cat will feel in control of its territory .
Conclusion
All your cats will be “delighted” with such a house
Thus, we created a house for our beloved pet with our own hands. This is a very convenient house for an animal, and is far from the only option that can be created by simply adding a little imagination. Congratulate your pet on his housewarming and treat him to something tasty. The cat should instantly appreciate its new shelter and thank you.
A cat is a rather capricious animal, and it is not so easy to please it. She hates drafts, cannot stand sharp extraneous sounds, smells, and is wary of any changes in the house. Therefore, if you decide to make a house for a cat with your own hands, be sure to take into account all its whims. Otherwise, she will simply ignore the new home.
Types of animal houses

There are many ideas for making cat houses. It all depends on the amount of free space in the room and your taste.
You can build:
- cardboard house
- soft foam construction covered with fabric
- cat housing made of plywood, fiberboard, chipboard or hardboard
- a product made from old furniture boards, boards and wooden blocks

You will also need to choose the shape of the home.
When making a home for your pet, do not forget about the overall interior of the room. If you choose the right fabric for decoration and the shape of the house, it will become a true decoration of the room and fit perfectly into the interior.
Required materials

An original house can even be made from improvised means or materials left over after renovating an apartment.
If you allocate some money for the “construction” of the house and purchase several wooden slats or plywood, as well as soft and durable fabric for covering, you will be able to make an original design structure that you will not be ashamed to show to guests.
So, you may need:
- cardboard: if you think that the structure from it will turn out to be too flimsy, then you are deeply mistaken; to obtain a durable structure, it is enough to glue it in several layers
- plywood, fiberboard, chipboard or hardboard: with the help of these durable materials you can even build a multi-story house or a palace house
- wooden slats: they can be used as spacers when creating structures covered with fabric or upholstered in plywood
- PVC pipes and fittings for their connection: they can easily replace wooden slats, and the structure made from them will be no less durable
- carpet, felt or foam rubber: they can be useful not only for arranging a bed, but also covering the side walls
- durable fabric or fur for making a bed
- any type of cat toys for hanging
- wooden block for scratching post
- hemp or jute twine for her tightness
Do not use highly electrified fabrics for upholstery. They will scare the animal.
Cardboard house
Of course, you don’t have to worry too much about it and you can make a house out of a cardboard box, cutting out holes in it for doors and windows and throwing bedding at the bottom. By gluing several boxes together, you can get a home with several rooms and even a multi-story house.
But such a structure will quickly become unusable - after all, it can be quickly torn and even “eaten” during the game.

Still, it is better to make a more durable structure with walls made of sheets of cardboard glued together in several layers. Moreover, with high-quality finishing, it will look no worse than a store-bought product.
Craftsmen from Japan were the first to come up with the idea of making homes for cats in the form of beehives from corrugated cardboard. Today such structures are available for sale. But we will do them ourselves, listening to the wishes of our pet.
First, let's decide what shape and size the cat's home will be. If a domestic cat is still young and full of energy, it would be more logical to create a multi-story structure for them with shelves for climbing or attach a real tree with many strong branches next to the house.
For a lump cat who loves to doze almost around the clock, a soft and comfortable one-story structure with a scratching post attached to it is more suitable. The principle of assembling the house will be the same in any case.

We will describe how to make a simple house for our pet’s cat in the form of a round yurt or a rectangle made of corrugated cardboard glued together in layers.
1 Cut the cardboard into rings or strips and connect them in a stack with PVA glue.
2 To ensure the stability of the structure, cut the bottom from plywood, fiberboard or chipboard and glue it to the finished house.
3 Using corrugated cardboard, you can make not only a house, but also a couch, sofa or bed for your cat to rest. Some cat owners even manage to construct scratching posts from corrugated cardboard. But their lifespan is short. Plus, debris will always form around it - even thick paper will tear too quickly under the pressure of a cat's claws.
4 The animal will definitely like a dwelling made of multilayer cardboard. After all, a solid base will be quite warm, and the walls will be ideally protected from drafts.
If you decide to paint your pet's home, use permanent dyes for these purposes. After all, gouache or watercolor are unsafe - after licking the toxic composition from the animal’s fur, it can become seriously ill.
Multi-story plywood structure
If you can keep your pet occupied by arranging for him a play complex with ladder shelves, labyrinths, several hanging toys and a scratching post, perhaps he will leave your things alone and will not take them to the corners even in your absence.

To make it, in addition to plywood, you will need furniture corners, sandpaper for cleaning cut areas, glue, screws and furniture corners. It is better to first upholster the house with foam rubber, and then with a dense, not too easily soiled fabric.
A piece of carpet will also come in handy - this material is quite durable and will last longer.
Production of a gaming complex in stages

A durable house will be made from plywood, fiberboard, chipboard. You can donate several boards for it - the structure will only benefit from this.
So, step-by-step instructions for making it:
1 First, draw a detailed diagram indicating the size of each part. Even if it is quite simple, you should not ignore this stage. It will be a shame if, when joining individual parts, they do not fit in size.
2 Plywood, if desired, can be bent and products of complex shapes can be made from it. To do this, frequent blind cuts are made in it. A similar method is used when bending chipboard and MDF. In the future, to strengthen the structure, the resulting grooves can be filled with glue. Curvilinear parts from this material are cut out with a jigsaw.
3 You can replace wooden blocks with PVC water pipes. To connect them, fittings are used (corners, tees, etc.), which are attached with glue. The pipes must first be degreased with solvent or alcohol, joined to the fittings and marked with a pencil where the glue will be applied. Fixing the elements motionless is required for 5-6 minutes.
4 To “build” a plywood house with 4 walls, a floor and a roof in which a cat will rest, you will need 6 square or rectangular parts. Such a dwelling is located at the very top of the structure so that the cat can have a greater viewing angle. And the temperature closer to the ceiling is always higher, and there are much fewer drafts.
5 Cats don’t really like closed boxes, so provide not one, but a couple of openings in the house. Be sure to sand the cut areas so that the animal does not get hurt.
6 The remaining details of the gaming complex are selected at your discretion, depending on the inclinations of the animal. To fasten pipes or bars in rectangular or round wooden pieces, you will need to drill holes of a suitable diameter.
7 Cover not only the sides of the structure with carpet or foam rubber, but also the inside surface of the house so that the animal feels comfortable in it.
8 To make the structure durable, use metal corners to connect the parts.
9 Apply a layer of glue to wooden blocks or PVC pipes and wrap them tightly with hemp or jute twine, tapping it well against the surface of the block with a hammer. It will be more convenient for the cat to climb them to any floor.
10 You can attach a miniature springboard to the house, along which the cat will climb up. Don’t forget to build an observation deck - animals love to climb up to be able to have a good view of the room.
11 Make sure the house is securely fastened to the wall or floor. If it collapses one day, the animal will be wary of it and is unlikely to agree to live in it.
The smell of freshly cut boards or glue-soaked plywood can repel a cat. They must be well aired before assembly.
Attaching a tree to the house
The cat really likes to climb tree branches. Do not deny her this pleasure; build a device for her from any available means - PVC pipes or wooden blocks covered with jute rope or covered with carpet.
You can even bring part of a real tree with large knots from the forest.

1 To prevent the animal from dragging the bark all over the house, it must first be cleaned.
2 Carefully sand each of the branches so that the animal cannot get hurt.
3 To make climbing easier, attach several viewing platforms to large branches where your cat can comfortably lie down and watch those around him. They can be attached using bolts.
4 You can hang a hammock on one of the branches. Stretch its ends well so that the animal can climb into it comfortably.
You should not use leather or leatherette for upholstering a lounger - cats do not like slippery surfaces that absorb heat.
Making a scratching post
Scolding a cat for sharpening its claws is pointless. Indeed, in the wild, when animals climb rocks and trees, they wear off automatically. In an apartment they don’t have this opportunity, and their overgrown claws get in the way.
You can protect furniture and door frames from damage by attaching a wall-mounted, floor-mounted or hanging scratching post to your house.

Let's describe how to make a house with a scratching post:
1 The most convenient design is a column or rectangle with a height of 9-10 cm. Its width should also be sufficient - from 8-10 cm. At the top of such a structure you can arrange a comfortable lounger.
2 The scratching post is attached using furniture corners to a cross-shaped, rectangular stand, which, in turn, is screwed to the floor.
3 To cover it, you can take thick jute twine 0.5-1 cm thick, carpet or thick burlap. Synthetic rope should not be used - if an animal gets caught on its fibers, it can damage its claw. The twine is tightly glued to the surface, while being tapped with a hammer.
4 As a scratching post, you can use a rug attached to the wall, a carefully sanded log, or even a piece of wood brought from the forest. Before installation, all small knots must be removed and sanded well.
5 Hang a couple of your favorite toys next to it - they will help attract the animal's attention.
Housing built into furniture
You can set up a bedroom for a cat in one of the compartments of a bedside table, closet or chest of drawers. After all, even the most sociable animal needs a place for periodic solitude in which it will feel safe.
After all, even if a pet loves to lie on the sofa, when it sees a stranger, it will most likely look for a secluded place.

It’s definitely not worth allocating space for a house in the hallway. It is better to arrange it in one of the distant rooms, preferably in the one in which the cat is most often. If you are a breeder and your animal is not sterilized, you can also set up a maternity hospital for your cat using ordinary furniture.
To do this, you just need to make a hole in the side wall of the bedside table or closet and build a soft bed from a small children's mattress or an old blanket. If your cat likes to take a nap on an elevated surface, set up a spot for her on one of the bookshelves.
To make it convenient for her to climb up there, place a small ladder nearby, covered with hemp or jute twine.
Even an old chest of drawers can be turned into a cat play set. To do this, you just need to remove the drawers, cover the free space with soft fabric and hang curtains so that the cat can rest quietly in privacy.
A home for two cats should consist of a couple of rooms or have two floors so that each of the pets has their own space.
House on the wall
Most apartment owners can hardly boast of a lot of free space. It’s not always possible to place even the necessary furniture, let alone play complexes for cats.
But it turns out there is a way out. A house for her, or at least a sun lounger, can simply be screwed to the wall. Such a home is also convenient if there are children aged 2-5 years or so in the house.

The principle of assembling the structure is similar to that described above. It can be built from plywood, fiberboard sheets, chipboard or wooden boards. But you shouldn’t use boards from old polished furniture for assembly - the animal is unlikely to like moving from shelf to shelf on a slippery surface.
We choose arbitrary dimensions of the house arranged on the wall. To prevent the animal from damaging the wallpaper or paint, you can first attach a wooden board to the wall, and only then hang the shelves.
The scratching post, just like the other elements of the structure, can also be attached to the wall. Combine a similar play complex with a bedroom by attaching a lounger or small hammock to one of the shelves.
Tent made from an old T-shirt
The sizes can be arbitrary. The most important thing is that the animal does not feel too cramped in it. A similar structure with a wire frame can be easily moved and placed in another place.

1 Make the bottom of the tent from a piece of thick cardboard or plywood. To prevent the cardboard base from bending, glue or tape 2-3 sheets together.
2 To make the frame you will need two pieces of thick wire. They will need to be bent into arcs.
3 We connect them together so that the ends are located in the same plane. Secure the upper part of the frame, in the area of the crosshairs, with tape.
4 To attach the frame to the bottom of the house, we make four holes in the corners of the cardboard or plywood blank. It is necessary to retreat 3.5 cm from the edges.
5 After pushing the wire into the holes, its ends must be bent on the back side of the bottom and secured with tape.
6 The entrance hole of the house will be the neck of the T-shirt. We turn up the lower part and sleeves. You can simply sew it on by hand, but since the T-shirt will need to be washed periodically, it is better to secure the bottom with pins under the bottom of the house.
7 A soft tent for a pet can also be sewn from felt, knitted or other types of fabric. Make a pattern from newspaper, attaching it to a wire frame. When cutting, be sure to leave seam allowances.
Soft bed
For sleeping, cats most often choose soft pillows, the backs of sofas and other places that are comfortable from their point of view. But it is in these places that the largest amount of wool is always collected. You can solve the problem with the help of a small soft bed.
It is better to use natural fabric that will not electrify - linen, cotton, wool. The filler can be batting or padding polyester.

You will need to cut out a pillow-lounger, sides (we will later fill them with soft filling) and handles for carrying. Make a small depression in one of the sides - it will be more convenient for the cat to enter and exit through it.
To give our design its shape, attach a sheet of cardboard to the bottom.
A hanging bed can be attached to a radiator - after all, cats are constantly trying to find a warmer place. To make the frame of such a product you will need very strong wire.
The cover is sewn from two pieces of fabric. Wrap the hanging parts of the frame with fabric or twine. If the fabric bottom of the bed sag a little, it’s okay - if the shape of its bed resembles a hammock, the animal will only be happy about it.
You can even create a cozy place for your pet from an old stool by upholstering its sides first with chipboard or plywood, and then with thick fabric or carpet. Prepare a shelf in it that will serve as a sleeping place.
DIY cat house. Game complex
PHOTO GALLERY
8.1 Total Score
Conclusion
Feedback from our readers is very important to us. Leave your rating in the comments with reasons for your choice. Your opinion will be useful to other users.
Ease of implementation
Appearance
Convenience
Originality
|Having looked at how to make a house for a cat with your own hands from a sweater, T-shirt, foam rubber. Make a sofa, a bed, or a scratching post for your beloved pet.
How to make a bed with your own hands?
It’s better to start simple, make a sleeping place for your beloved pet from an unnecessary sweater. See how this can be done. You will need:
- sweater;
- padding polyester;
- needle with a large eye;
- scissors;
- threads
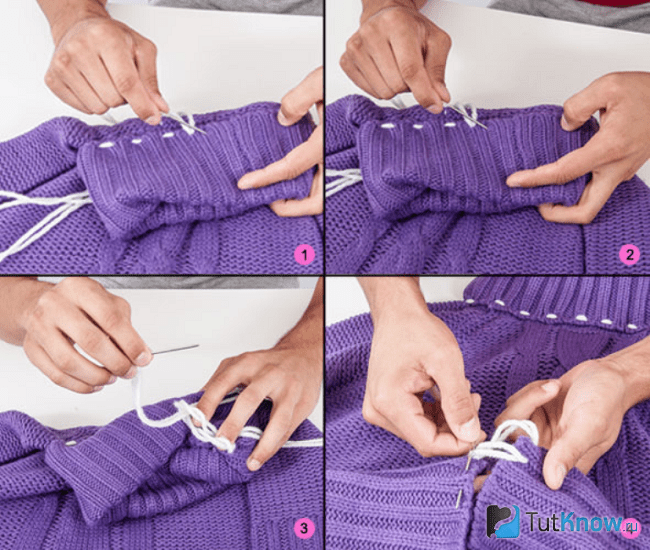
Stuff the sleeves and top of the sweater with padding polyester. Sew the sleeves together to create a round edge piece. Make stitches under the breastbone as well to continue this circle.
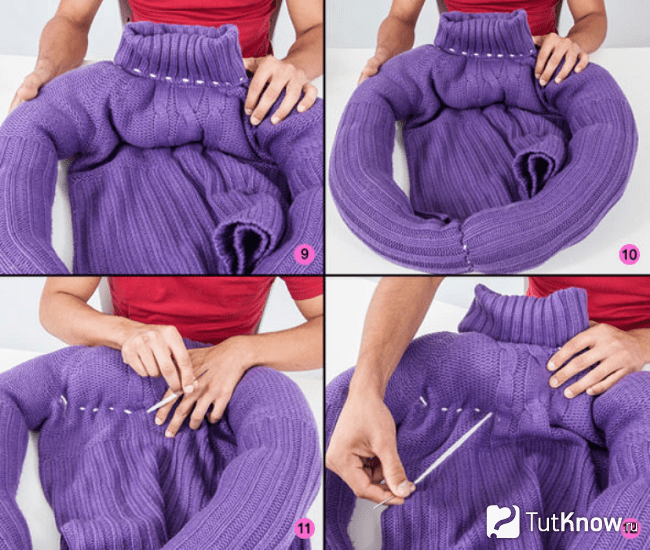
Sew the sleeves to the sides of the sweater. To make it easier for your cat to sleep, you can put a little padding polyester between the shelf and the back of this knitted item. Only then sew the bottom of the sweater to the bottom of the sewn sleeves.
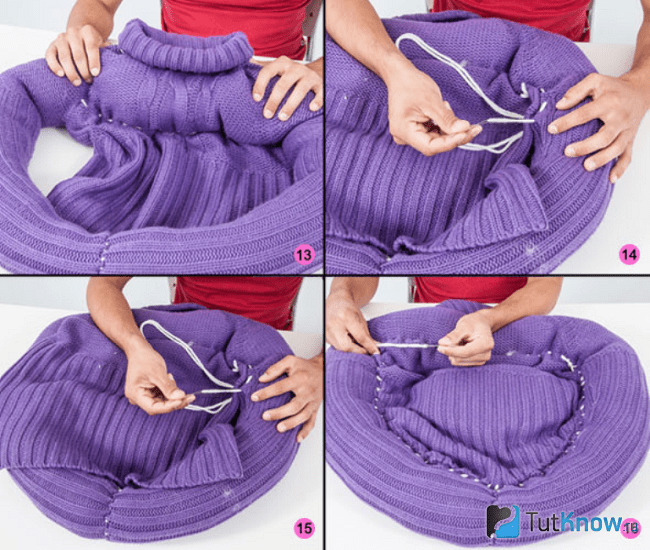
Here's how to make a pet bed and look how great it turned out.
If you don't want the collar of the sweater to be visible, then tuck it in, then sew along the edge of the neckline.

See what this design will look like if you tuck the collar inside. Step-by-step photographs allow you to see the manufacturing process in detail.

It is important to make a cat bed so that your pet can feel comfortable and free in it.
If you want to sew a sleeping place for an animal, then take:
- a small pillow filled with synthetic material;
- scissors;
- thick fabric;
- sewing machine
On the unfolded fabric on the right and left, place the prepared strips of filler, which will soon become sides. Topstitch them to indicate.
On the free part of the fabric, between these two strips, place the oval piece from the pillow. Sew sides 1 and 2 to form sides, giving the workpiece a rounded shape.
To fit the bottom, cut out the fabric with a seam allowance and stitch it inward to the bottom of the sides. Here's how to make a cat bed.

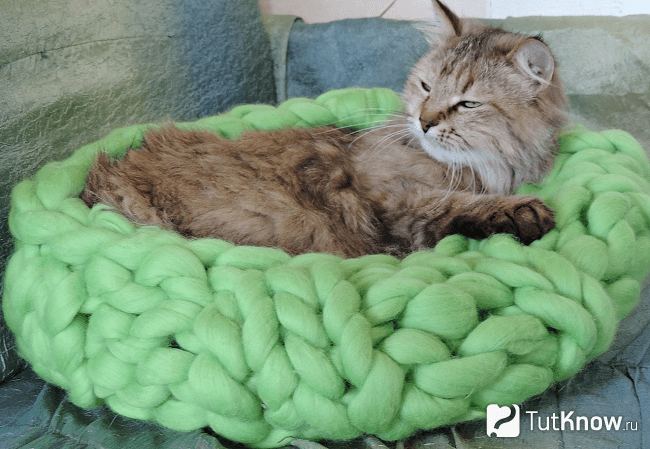
If you know how to knit, then create a sleeping place for your beloved pet from thick roving.
You can do it even simpler, quickly make a hammock-type cat bed. For this you will need:
- thick fabric;
- 4 straps and fastening fasteners for them;
- needle with strong thread.

If you have a wicker mat, thread pieces of wire into it from four sides at the corners and tie them to the table legs. She will definitely like this cat bed.

You can fix 2 straps on the 1st and 2nd sides of the fabric rectangle and tie them to a vertical support. This is how you can quickly make a hammock for your pet.

In winter, they will happily bask near a warm radiator, so you can make them these beds.

Of course, you can make real beds and sofas for your pets. Pets will surely like such sleeping places and will look wonderful in the apartment.
How to make a sofa, a bed for a cat?
First, you need to measure your cat so that the future bed will fit her properly. Now place the following materials next to you:
- thick foam;
- furniture fabric;
- glue.
You can immediately glue these foam pieces together, then cover them with fabric and glue it down. Or you can first cover each piece with fabric, then glue the resulting parts together to make a sofa.
There is another option: sew a cover to the size of the bed, then you can put it on the bed and, if necessary, remove it to wash it. Sew a zipper or Velcro on the bottom side.
Don't forget that new natural fabrics shrink a little after washing. Therefore, it is better to wash the fabric first and then sew a cover for the sofa.
Here's how to make a bed for a cat. For this original creation you will need:
- unnecessary table;
- decorative elements made of wood;
- sandpaper;
- baseboard;
- foam;
- textile;
- braid;
- dye;
- saw.
Use scraps of wooden baseboard to make a headboard for your bed. Then paint the entire structure in the desired color. Mark a piece of foam to size on the bed. Sew a cover for it from fabric, sew decorative braid at the corners of the sides. This is such a wonderful cat bed in the form of a bed.

If you have a jigsaw and plywood, then draw the details of the future bed on a wooden blank and glue them together with wood glue. If you have several pets, then make them a bed consisting of several tiers. The photo on the right is a bed for three cats, on which they can easily fit.

If you have a wicker basket at home, attach its bottom to the wall and place a towel or small pillow inside.

If you know how to use rattan, then make a rectangular house like this in the form of a chest with a window and an arched door. Place a pillow on top so your pet can lie down here.

See how to make a couch in the form of a spacious bed with your own hands using a suitcase. If you have 2 cats, then remove the lid from the bottom. At the bottom of each of these bases you need to attach legs. To do this, you need to screw in a self-tapping screw from the inside so that its tip comes out, here it will stick into the upper part of the leg, connecting this element to the bed.

If the pet is alone, then leave the suitcase lid in place, securing it so that it does not close at the wrong time. Place a soft, flat pillow on the bottom, tying it with straps.

And if you have a round suitcase, then it is enough to attach three legs to it, placing them at the same distance from each other.

In this case, the legs can be very different, which are available. If there are only door handles, use them. Drill 4 holes in the bottom corners of the suitcase with a drill, insert the upper metal parts of the threaded handles here, and tighten with screws.

Here's how you can arrange the lid of a suitcase and its bottom to save space and create 2 cat beds. You need to attach high legs to the top lid to give the lower animal more room. We attach small legs to the suitcase itself.

How to sew a house for a cat with your own hands?
It will be warm and cozy. This home looks great. To make it, take:
- sheet synthetic filler;
- cardboard;
- stapler;
- ruler;
- pencil;
- textile;
- scissors;
- sewing machine
- Cut 5 blanks from a cardboard box. Four of them will be of the same shape, made in the shape of an equilateral triangle. Their sizes should be based on the size of the cat. You can make triangles with sides of 45 cm. A hole is cut in one of them in the middle so that the cat can freely get out and go inside the house. Fifth detail? This is also a square with a side of 45 cm.
- Each of these parts must be covered with synthetic sheet insulation and secured with a stapler.
- Place the triangle on the fabric folded in half, cut two such blanks from the fabric with extra space for seams. Sew the part on one side, insert insulated cardboard here, fold the sides of the triangle inward, sew the edge on a machine or sew it by hand.
- In the same way, decorate all the triangular sides of the house. Where the entrance will be, you need to tuck the edges of the canvas over the cardboard hole and also sew it up with a thread and a needle.
- Cut the bottom out of cardboard, attach synthetic insulation to it, and cover it with fabric. All that remains is to sew all four triangles together to create a roof and sides at the same time, then sew the bottom at the bottom of these elements. This is best done on the hands, using a hidden seam.

This type of cat house also consists of four walls and roof elements; the master class will tell you step by step how to make it.

Here's what you'll need:
- newspaper;
- marker;
- scissors;
- textile;
- foam;
- braid;
- optional? cardboard.

- Using the same template, cut out four blanks from foam rubber, 1 cm smaller than the fabric ones on all sides. If you want to give the house rigidity, then you will also need cardboard parts identical in size to the foam ones.
- For each side you will need 2 identical pieces of fabric, fold them with their right sides facing each other and stitch them on the top and sides. Turn the workpiece out through the bottom hole, insert parts made of foam rubber and, if desired, cardboard parts.
- In the wall where the entrance will be, make a hole for it using a wide braid that stretches well or bias tape.
- Also make the bottom layered by placing foam rubber between two pieces of fabric. Connect the roof wall pieces together, then sew them to the bottom of the cat house.
If you want to make it in 15 minutes, then prepare:
- pliers;
- small T-shirt;
- cardboard square with sides 40 cm;
- pins;
- hangers made of strong wire;
- scotch.

You can decorate a cardboard rectangle a little and make it stronger by covering it with paper tape. Make holes in the corners, but not very close to the edge, so that pieces of wire can pass through here.

Here's how to make a cat house next. Using tape, connect two wires in the center crosswise, thread their ends into the holes, and bend them on the other side using pliers.


Cover the pieces of wire on the reverse side with tape.

Place a T-shirt on top so that the neck becomes the entry hole.

Fold the bottom of this garment, as well as the sleeves, inward, fasten it here with pins, but you can also hem it with a thread and a needle. If you want to finish this work as quickly as possible, you don’t have pins at hand and you don’t have time to sew, then just tie a couple of knots on the back of the T-shirt.
This tent is easy to clean. You simply remove the piece of clothing, when it’s time to wash it, pull the clean one back onto the frame. Your favorite animal will happily relax in such a house.
It is better to lay something soft on the cardboard, for example, a terry towel. Then the cat will be even more comfortable in its new home.

If cardboard and tape are not available, you have a small rectangular pillow, then make holes in it in the corners. Insert the wire here, then also pull the T-shirt.

Some pet lovers make a cat house out of an old TV. To do this, the kinescope and other parts are removed from it. The outside of the building needs to be painted, a small mattress laid inside, and a wonderful home for your pet is ready for housewarming.

Here's how else you can make a house for a cat with your own hands: photos will help with this. Take:
- foam;
- compass;
- thread and needle;
- thick fabric;
- artificial fur.

On paper, draw patterns of the following parts:
- oval bottom;
- a rounded part consisting of four wedges, which will become both walls and roof;
- rectangle with a semicircular cutout in the center.

The following diagram will simplify the task of precise cutting.

Now the parts need to be connected in the correct order, secure the roof with clothespins, and sew with a thread and a needle. It is better to fix the knot so that it does not slip through the foam. To do this, make a double thread, insert a needle into the foam rubber, make one turn and insert its tip into the resulting loop, tighten.

Using the same pattern, you need to cut out a piece of fabric and fur from each part, but for the bottom it is done differently. An oval mattress made of fabric, fur and foam rubber is sewn to size for it.

Sheathe all the blanks with the materials presented, and the cat’s home is ready. You can sew 2 buttons on the top of the house, and in the same place, sew loops on both sides of the lid to secure it to the bed.
House scratching post for cats
After you have mastered so much useful material, you will be able to make a whole complex for your beloved cat.

To make this you will need:
- plywood or MDF;
- glue gun;
- nails;
- furniture fabric;
- plastic pipe;
- bar;
- 7 slats;
- rope;
- pencil;
- tools.

Find the middle of the board and mark it. Place the end of the rope here, with a pencil attached to the reverse side. Draw a circle.
Now on it, a little to the right, you need to draw another one, but of a smaller diameter; to the left of this we draw three small circles.
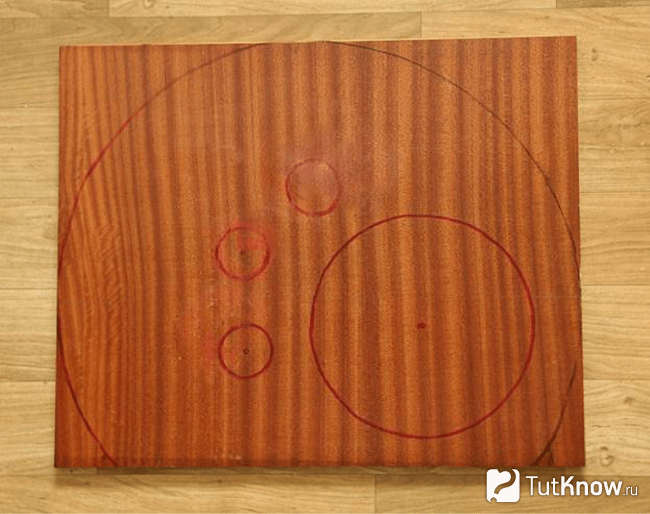
The following diagram contains the required dimensions for these recesses.
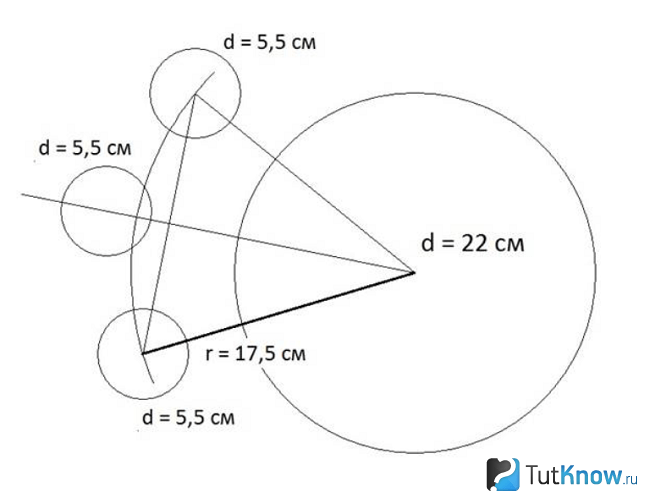
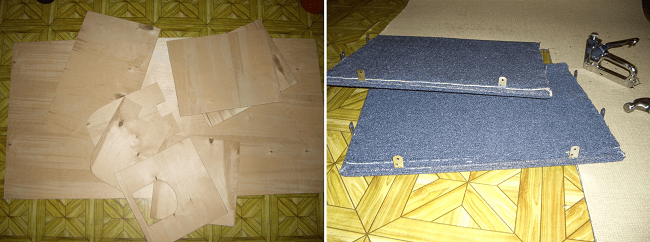
After cutting out all these holes with a jigsaw, mark the places where you will attach the slats. Drill holes on this part and on the second one, which will become the back wall, it is solid.

You have already prepared the slats; their sharp edges need to be trimmed off. Now place each strip between the back and front walls, thread the self-tapping screws into the holes made with a drill, and tighten them. In this way, fasten the entire structure.

According to the size of the back and front walls, you need to cut out parts from furniture or other dense fabric. Don't forget to cut notches for the front wall blank. As you may have guessed, they resemble a cat's paw. Using a glue gun, secure the material to the wooden parts of the house.

The base of the structure will be made from the same wooden material that you chose at the beginning. Attach the house to this part, draw where you need to glue the foam rubber, and what size it is. Also mark where the pipe will be located, because this is a scratching post house.

Glue the foam rubber, and use glue to attach a rectangle of furniture fabric on top, cut to fit the size of the base.

Now cut the canvas to the size of the roof of the house, attach it to the wooden slats using a furniture stapler. Attach the floor to the base using self-tapping screws.

To make the fleecy fabric look beautiful, use nail scissors to remove its elements from under the staples.

The back wall can be left the same on the inside as it was, but the side wall inside also needs to be covered with fabric.

This is what kind of scratching post house you will get at this stage.

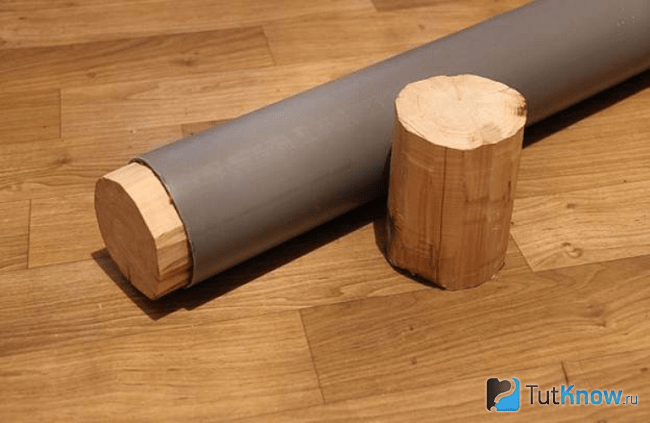
Now you need to take 2 rounded bars or give a rectangular one this shape. Insert these blanks on sides 1 and 2 inside the pipe. Its diameter is 11 and its height is 60 cm.
There will be a bed at the top of the house; you need to cut out a semicircular wooden base with a jigsaw. You will need two such parts, the first one you will close the pipe.
Place foam rubber of the same shape on top, glue the fabric onto it, bring its edges to the sides of the bed, gluing them here.

Using self-tapping screws, screw the pipe from below to the base, and cover this area with a strip of fabric.
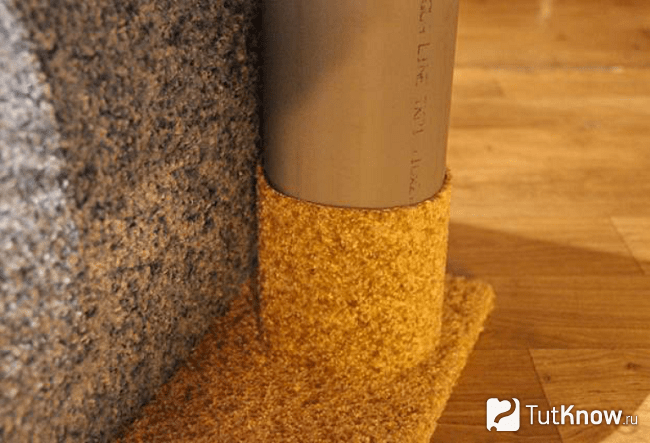
Wrap a rope around the scratching post and glue its top and bottom ends. Attach the thread with the toy with the mouse.

This is such a wonderful scratching post house.
If you want to build a whole complex for your beloved pet, then study the diagram below with structural elements and their sizes.

Such a palace is being built from plywood, which is peeled off on all sides with carpet.
Fasteners will help connect the parts. See how the individual elements are attached to the timber that connects the structure.

Plastic pipes with wooden blocks inserted at the end can also be used as connecting elements.
A building with such an openwork roof will surely please your four-legged pet and will decorate your apartment. To create such a house you will need:
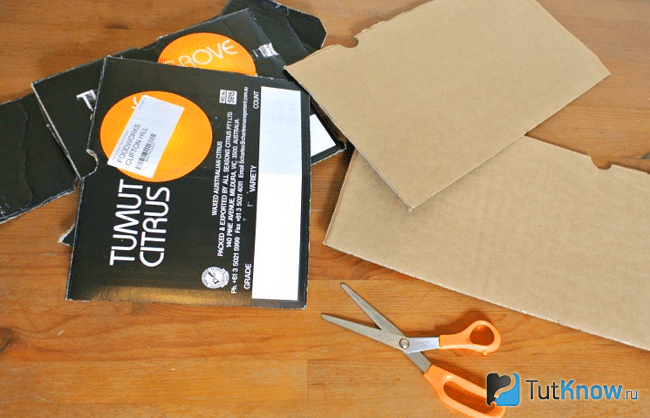
- 2 cardboard boxes;
- scissors;
- animal-friendly paint in a can;
- colored paper;
- scotch;
- glue.

For one cardboard box you need to cut off the bottom and top, leaving one frame.
Paint these pieces as well as the inside of the second box.

Place the cup against the wall of the house. Place another object of a similar shape, but larger in size, where you want to make an arch. Trace with a pencil and cut out these structural details.
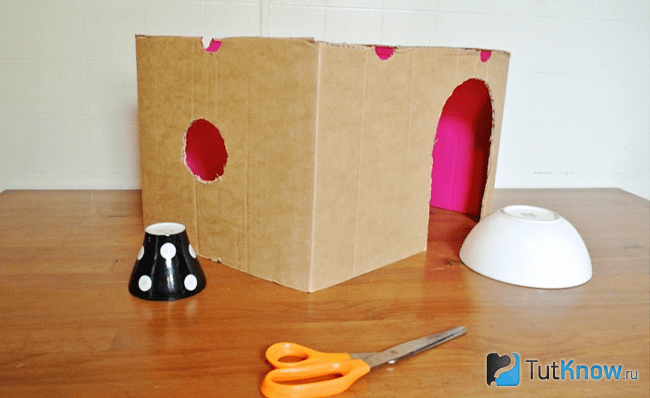
Using tape, connect the first two elements to form the roof of the house. Also, using this adhesive tape, you need to attach it in place.

To decorate the roof, cut out identical tile elements from colored paper using a template, glue them onto the roof, starting from the bottom, gradually moving up to the ridge. Arrange these parts in a checkerboard pattern.
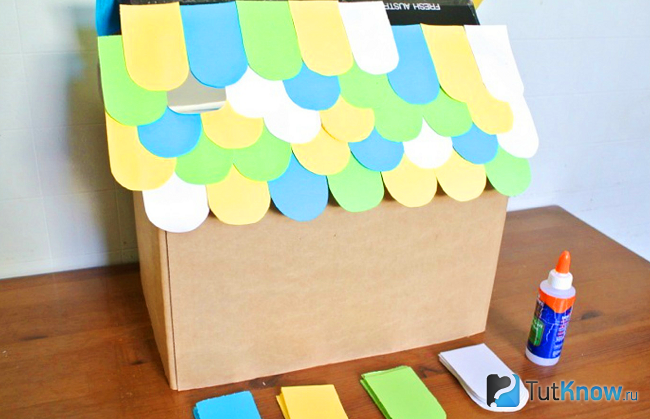
Cut out the chimney from leftover cardboard, glue this piece together, and attach it to the top of the cat house. You can move in a new resident and see how much he likes the structure.
Today you learned about houses for cats that you can make with your own hands. Of course, there are many more ideas and materials for making a cozy home. For example, the following.

Felt house? This is another fashion trend that goes deep into the past. See, our ancestors also made felt boots and various household items from wool. Now this craft is very profitable, so you can make houses for cats from felt for sale. We invite you to watch a video that tells you how to make such a home for a pet using the wet felting technique.
The next review will tell you how to make a scratching post house.


