In general, Australian laws do not have to be followed, the main thing is to communicate this in small print. Light cruisers of the Sydney type Sydney ship
However, this story was mysterious only for the average person, because in both English and German military historical literature the details of this incident were given back in the 1950s. Moreover, these books were soon translated into Russian, but are practically unknown to the general reader.
Therefore, although there have been a number of publications in popular publications, I will take the liberty, based on an analysis of several such sources and the latest data obtained during the examination of the sunken cruiser, to try to cover this truly unique case in more detail.
To disrupt British shipping, the German naval command made extensive use of auxiliary cruisers in the early stages of World War II. These ships, going out on missions, disguised themselves either as a merchant ship of a neutral country, or even as an enemy ship. Medium-caliber artillery was secretly placed on them, and sometimes the raiders were even armed with torpedo tubes and reconnaissance aircraft. All available space was taken up with supplies necessary for months of continuous voyage. The most courageous and resourceful officers were selected for the position of commanders, and the crews, as a rule, were staffed only from volunteers.

Auxiliary cruiser "Kormoran" before going on a raid
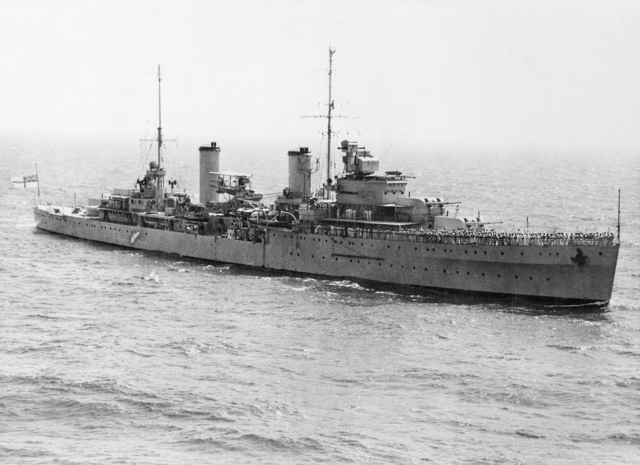
One of these raiders was the auxiliary cruiser “Kormoran” (HSK-8 “Kormoran”). In peacetime, the ship was called "Steiermark" and belonged to the "Gapag" campaign. It was a completely new diesel-electric ship with a displacement of 9,500 tons, which had a maximum speed of 18 knots and could travel 70,000 miles at 10 knots. After her conversion to an auxiliary cruiser, she was armed with six modern 150 mm and one 75 mm naval guns, four 40 mm, two 37 mm and five 20 mm anti-aircraft guns and six torpedo tubes.
In addition to supplies, the holds contained 280 anchor and 40 bottom mines, as well as two Arado Ar-196 reconnaissance aircraft (disassembled). The crew consisted of 18 officers and 391 sailors and petty officers.
On December 3, 1940, under the command of Captain 2nd Rank Theodor Anton Detmers (1902-1976), the Cormoran sailed from Kiel to sea to fight the enemy merchant fleet in the central Atlantic and southern Indian Oceans.
After he was lucky enough to break through the Denmark Strait, the raider headed to the central part of the Atlantic, where on January 6, 1941 he met his first victim - the Greek ship Antonis (3729 gross tons, 1915) of the Lemos company. Having approached to three kilometers, the Germans demanded to stop and not use the radio. The boarding crew established that the ship was carrying 4,800 tons of coal from Cardiff to Rosario (Uruguay) under British freight. 29 people, 7 sheep, food supplies and several machine guns with ammunition found on board were transported from the coal miner to the auxiliary cruiser. Then the Antonis was sent to the bottom with demolition charges.

12 days later, at night, he sank the large English tanker British Union (6987 GRT, 1927). The captain of the tanker, L. Atthill, entered the fighting and began transmitting distress signals. Then the Germans opened fire to kill. The British managed to respond with only four shots from a single cannon. The sad truth was that all of the tanker's weapons were much older than the ship itself and were maintained by crew members who had experience handling such weapons only as part of a one-day course hastily conducted while in port, so the “battle” ended quickly. When the crew began to lower the boats, the raider stopped firing, took the British on board and finished off the ship with a torpedo. The British auxiliary cruiser Arava, which was very nearby, noticed gun flashes and hurried to the battlefield, but the Germans managed to escape. On January 29, "Carmoran" sank the English ships "Afric Star" (11,900 grt, 1926), and "Eurylochus" (5,723 grt, 1912). The latter had on board the most valuable military cargo - combat aircraft, with which it went to Takaradi. Both sunken ships managed to give radiograms about the attack. The commander of the naval forces in Freetown immediately sent the heavy cruisers HMS Norfolk and HMS Devonshire to survey the area. However, this time the raider managed to escape and headed to the South Atlantic for a rendezvous with the tanker Nordmark. From it, the raider pumped 1,339 tons of fuel, and 170 prisoners proceeded in the opposite direction to the tanker.

Commander of the “Kormoran” Teodor Anton Detmers, photo taken in captivity, he already has the shoulder straps of captain 1st rank and the Knight’s Cross
On February 25, 1941, in the South Atlantic, Carmoran met with two German submarines U-37 and U-65, to which he transferred fuel and food. On March 15, a long rendezvous with U-124 took place, commander Lieutenant Commander Georg-Wilhelm Schulz (1906-1986), torpedoes, supplies and fuel were transferred to the boat. The submariners, who had been locked in a steel “box” for more than 30 days, were able to fully experience the comfort on board a large ship, not only taking a shower, but also swimming in the pool built on the deck of the “Cormoran”, and then enjoying lunch from fresh food, beer and watching movies.

"Cormoran", photograph taken from the submarine U-124
On March 22, the raider sank the small English tanker "Agnita" (3552 grt, 1931), and three days later, captured the large-capacity tanker "Canadolite" (11,309 grt, 1926) with cargo gasoline, which he sent to Bordeaux as a prize ship. Under the command of Lieutenant Henrik Blo, the tanker safely reached the mouth of the Gironde on April 13th.
In early April, the raider met with two auxiliary supply ships, replenished supplies, handed over prisoners and returned to the previous area. Here, on April 9 and 12, 1941, he came across two more victims. British bulk carrier "Craftsman" (8022 GRT, 1922) and Greek timber carrier "Nikolaos D. L." (“Nicolaos D.L.”; 5486 GRT, 1939). However, the allies really began to stir. Therefore, frightened by the increased activity of British ships, Detmers asked for a decision to end hostilities in the North Atlantic, which lasted four and a half months, during which he destroyed or captured 8 ships with a total tonnage of 58,708 tons, and head south.
Six days later the raider arrived in his new area. But luck turned against the Germans; the first four weeks of searches did not bring them success. On June 24, 1941, the Cormoran was 200 miles southeast of Madras, in front of whose port it intended to lay mines. A warship that appeared on the horizon forced us to abandon this intention and hastily retreat. And since a hurricane was raging in the Calcutta area, chosen as the second target, at that moment, Detmers decided to temporarily refuse to supply barriers and headed southeast, leaving the Bay of Bengal. The mines remained on board, subsequently playing a fatal role in the fate of the ship.
Two days later, the Germans managed to sink two more ships (Yugoslav and English) “Velebit” (“Velebit”; 4135 grt, 1911) and “Mareeba” (“Mareeba”; 3472 grt, 1921), increasing the total tonnage of their victims up to 64,333 tons. The raid undertaken on the islands of Java and Sumatra did not produce results. Therefore, the commander of the Carmoran headed to the area east of Madagascar, where three months earlier another German raider had discovered many tempting targets.

After a week-long patrol in the indicated area, the Germans were finally able to overtake one Greek ship, Stamatios G. Embiricos; 3941 GRT, 1936. In just 5 months of sailing in the Indian Ocean, the raider sank only 3 ships with a total displacement of 11,566 tons. At the end of September 1941, he met with the supply ship Kulmerland, which delivered food and fuel from Japan.
Having replenished supplies and surrendered prisoners, the Germans went to the shores of Western Australia. The commander of the auxiliary cruiser, naturally, did not know that the British Admiralty had introduced an identification system by plotting on a tablet the location of all friendly merchant ships and providing them with individual secret identification signals.
The raid in Australian waters did not bring results for the first few days. Finally, on November 19, 1941 at 16:00. The signalmen on watch reported the appearance of mast tops and light smoke on the horizon. The sea was calm, there was a slight breeze, the sky was clear, and the visibility was simply amazing. The Carmoran began to approach, and the oncoming ship did the same. A few minutes later, the commander was able to see through binoculars the characteristic silhouette of a two-pipe warship. Detmars looked at the identification guide and felt cold: the Australian light cruiser Sydney (HMAS Sydney) was approaching his ship.

Just before the war, in 1937, the cruisers Phaeton, Amphion and Appolo appeared in the British fleet, soon transferred to the Australian fleet and renamed accordingly in Sydney, Perthes and Hobart. These were quite large ships with a length of 170 m and a displacement of 6985 tons. Four steam turbines with a total power of 72,000 hp. With. allowed to reach speeds of up to 32.5 knots. The armament consisted of eight 152 mm guns in four turrets, four 102 mm universal guns in deck mounts, and also eight 40 mm anti-aircraft guns. The armor belt had a thickness of 102-52 mm, the deck was covered with 51 mm armor, and the turrets were covered with 25 mm.
From the given technical characteristics it is clear that the Sydney cruiser was not only a full-fledged, but also a very worthy representative of its class. Therefore, it is completely incomprehensible why the generally quite objective, well-known English naval historian Stephen Wentworth Roskill (Roskill Stephen Wentworth; 1903-1982) in his major 3-volume work “Fleet and War” modestly calls “Sydney” an escort ship ( vol. 1 p. 537).
Detmars understood well that in an open battle with a modern cruiser his ship would be instantly sunk, so he decided to use the small chance to try to deceive the enemy. The guns and other military items were carefully camouflaged. After each attack, the Germans, using special shields, changed the outline of the superstructures, the paint color, and sometimes even installed a fake chimney. First-class radio equipment of the most modern type made it possible not only to maintain reliable contact with Germany, but also to listen to enemy communications, as a result of which the commander of the Cormoran knew very well which Allied ships were in the area and chose the most plausible cover story. At the moment, he was posing as the Dutch merchant ship Straat Malakka. Australian waters were still practically untouched by the war, and what if the cruiser was in a hurry somewhere, so she would only get by with a superficial survey and would not waste time on a full inspection.

At the same time, the warship was inexorably approaching, at 16:30. The first command was received from him: “Give your identification signal.” The Germans complied with the order, continuing to follow the same route. Having approached at 1800 m, the Sydney set off on a parallel course, trying to establish the true nationality of the discovered vessel. The commander of the Australian cruiser, Captain 1st Rank Joseph Burnett (1899-1941), repeatedly tried to ask the “merchant ship” for his identification marks, but the German captain was stalling for time. The vigilance of the Australian team was low; it seems that the Sydney commander believed that this was the Dutch Straat Malacca and simply formally carried out the order to inspect all ships.
Then the Germans, continuing the game, filled the airwaves with calls for help: “A peaceful ship is being pursued by an enemy raider! Help whoever can! However, this did not make any impression, and the command followed: “Stop the cars.” Detmers also carried out this order, since he clearly understood that in the event of a battle it was better to deal with a stationary enemy, because only then would his torpedomen have a chance to distinguish themselves.
The ships stopped, and at that moment the Australians demanded that a secret identification signal be raised. The raider realized that the game was lost, but Detmers was stalling for time as much as possible, because his high-sided vessel, under the influence of the wind, was drifting towards the squat warship, which shortened the already small distance between them. Finally, the cruiser began to lose patience, and the order took the form of an ultimatum. The ships had already approached to 1100 meters and the Germans decided that it was time to get down to business.
An experienced naval officer (in the navy since 1921), the raider commander assessed the situation for the last time. The sight of the enemy ship gave him some hope that his situation was not so hopeless. There were few people at the combat posts, and although the two bow turrets of the main caliber “just in case” were aimed at the ship being examined, other artillery crews were not in their places, and there were many “loitering public” on the deck. Apparently, the “combat alert” was not even sounded. Detmars was feverishly wondering where to direct the first salvo, try to destroy the bow towers, or disorganize the control of the ship by knocking down the command bridge, where a large group of officers was clearly visible? Behind the folding, camouflage shields, the gun crews froze in terrible tension. They did not see the target, but the fire control devices provided all the data necessary for shooting.
Finally, the decision was made: sirens wailed, camouflage shields fell, and a Nazi flag hoisted from the mast. The first salvo brought great success to the Germans: the command bridge with the artillery fire control post on the cruiser was practically destroyed. Detmers' calculations were completely justified; the Australians' return salvo achieved a long flight (from 1100 m!). But the Germans literally demolished the bow turrets of the cruiser with their second salvo. Almost simultaneously, one of the torpedoes fired by the Cormoran created a hole in the area of the bridge of the enemy ship, and the Sydney sank sharply onto its bow. Apparently, the torpedo severely damaged the propulsion system. Another German salvo destroyed the onboard aircraft and all the ship's boats, and the cruiser burst into flames. The close distance allowed the raider's team to use automatic anti-aircraft guns, thereby preventing the Sydney from using the weapons openly installed on the superstructures.
The Australian confusion did not last too long. "Sydney" finally pulled itself together and responded for real: two six-inch shells fired from the stern turret demolished the Carmoran's tank gun along with its crew. At 17:45 The German raider lost speed, a large shell hit the vehicle, and a strong fire started. However, the position of the Australians was even worse: almost all of the starboard artillery was destroyed, the bow main gun turrets were smashed, the stern ones were jammed on the port side, and numerous fires raged on the ship. Despite this, the cruiser made a weak attempt to turn around in order to bring into action the surviving 102-mm guns on the left side, but the Carmoran again covered it with rapid fire from all the remaining guns. The Germans fired with excellent speed, and the long hours of training of their artillerymen took their toll. Then the Australians decided to leave the battle, and the Sydney, engulfed in flames, began to slowly move away. Its guns were no longer responding, the masts were missing, and the deck superstructures were destroyed. The Germans showered the helpless cruiser with shells until at 18:30. did not disappear over the horizon. By this time it was almost completely dark. A bright flash lit up the night sky at 22:00. in the direction where the stricken ship went, was apparently caused by its explosion. The details of the last hours of the unfortunate cruiser are unknown, since not a single person managed to escape from the Sydney. According to another version, the Sydney remained buoyant for four hours, but then its bow came off. The ship quickly sank.

The position of the Cormoran was also very difficult. In addition to the fact that 46 crew members were out of action and the vehicle was destroyed, severe fires continued, and there were a large number of mines on board. If not for this ill-fated cargo, the crew, who had already localized the fire to some extent, would probably have been able to cope with the fire, and the presence of an excellent workshop and qualified mechanics on the ship gave hope for repairing the engine.
But all efforts were in vain: when the temperature in the “mine holds” began to approach critical, the commander ordered the ship to be abandoned, and soon after midnight it took off into the air with a terrible roar. A whole flotilla of lifeboats under sail moved towards the Australian coast. Soon, the mayor of a small town in western Australia received alarming news: the Germans were landing on the coast. Moreover, not a couple of dozen people from a sunken submarine, but hundreds of military sailors. Panic began in the city. However, the Germans, maintaining perfect discipline, meekly surrendered, without showing the slightest desire to conquer Australia. Another part of the crew was caught at sea from life rafts by Australian ships.
These were 315 sailors and 3 Chinese laundresses out of more than 400 who set out almost a year ago on the Cormoran from the other end of the globe on a difficult and dangerous raid to disrupt British merchant shipping. Only 16 people from the prize party returned home on the captured tanker. 80 people died - 2 officers and 78 sailors (34 of them on an overturned life raft), the rest were captured for a long time. On December 4, 1941, T. Detmers, while in captivity, became a holder of the Knight's Cross, and on April 1, 1943, he received the rank of captain 1st rank. The raider's team was released only at the very beginning of 1947. During their stay in the camp, despite the more than tolerable conditions of detention, one of the sailors died of illness, the rest returned home safely.
As for the reasons why this completely unique incident in naval history occurred, the blame for the defeat, of course, lies entirely with the commander of the Australian cruiser. Those few seconds by which the raider forestalled him in opening fire, and most importantly managed to launch torpedoes at point-blank range, turned out to be decisive. Having shown criminal carelessness and complete disregard for basic safety measures when meeting an unfamiliar ship at sea, the commander actually destroyed a mighty warship and 645 human lives. The most amazing thing is that the Sydney received messages twice a day about the position of all merchant ships of friendly countries, and should have known that not a single one of them was in the area closer than 200 miles. Some historians believe that Barnett was confused by conflicting instructions from his superiors. For raiders were supposed to be shot from a distance, and enemy merchant ships were supposed to be boarded and then replenished with them to the Allied fleet. However, we must also give credit to captain 2nd rank Detmers, he took advantage of all his opponent’s mistakes 100%.
For Australia, the death of the Sydney became a true national tragedy - all 645 members of its crew were killed, which is the largest loss of the Australian fleet in its history, amounting to 35% of the total losses of Australian fleet personnel during all the years of the Second World War. Moreover, the cruiser also became the largest allied ship to be lost during World War II with its entire crew.

For a long time, the place of death of both ships was known only approximately. The cruisers were found only in March 2008 after the Australian government allocated funds for a search program. They were discovered at a depth of two and a half kilometers, approximately 100 nautical miles off the west coast of Australia. Interestingly, the Sydney was found less than a day after the sunken Cormoran, with which Australian sailors fought in November 1941, was found in the same area. The discovery of the wreckage allowed experts to examine the damage done to both ships and compare them with official records and evidence taken from the surviving crew of the Cormoran, making it possible to determine what happened to the cruiser Sydney. In total, during the hour-long battle, the Kormoran fired about 550 150-mm shells and, according to German data, achieved more than fifty hits (underwater research showed at least 87 hits from 150-mm shells). The reconstruction of the battle made it possible to obtain evidence that 70% of the Sydney crew were immediately killed by shells and torpedoes. Many crew members were injured or trapped in compartments of the ship filled with smoke from combustion products and toxic substances. Those who were not injured and were able to get on deck had no chance of surviving on the open sea without rescue boats.
The expert who led the study, Terence Cole, in his report of one and a half thousand pages, also concluded that Captain 1st Rank Joseph Burnett made an unforgivable mistake by not ordering his crew to take up combat positions when approaching an unfamiliar ship, which turned out to be a German auxiliary cruiser . As a result, according to the expert, the Sydney approached the Cormoran at a dangerous distance, where all its tactical advantages were negated, and the German ship was able to attack using the effect of surprise.
I, of course, sincerely feel sorry for the Australians - and not only humanly, but also because they fought hand in hand with my ancestors against our common enemy. But this story should once again emphasize the idea that many commanders of all levels repeated and repeated to any military man from the first days of service: “Study the Charter to the last letter, learn combat manuals, learn instructions, for their pages are written with the blood of distant and unknown people, teach , so that their death and injury will not be in vain, teach!”
Found a typo? Select a fragment and press Ctrl+Enter.
Sp-force-hide ( display: none;).sp-form ( display: block; background: #ffffff; padding: 15px; width: 960px; max-width: 100%; border-radius: 5px; -moz-border -radius: 5px; -webkit-border-radius: 5px; border-style: solid-width: font-family: "Helvetica Neue", sans-serif; repeat: no-repeat; background-position: center; background-size: auto;).sp-form input ( display: inline-block; opacity: 1; visibility: visible;).sp-form .sp-form-fields -wrapper ( margin: 0 auto; width: 930px;).sp-form .sp-form-control ( background: #ffffff; border-color: #cccccc; border-style: solid; border-width: 1px; font- size: 15px; padding-right: 8.75px; -moz-border-radius: 4px; ;).sp-form .sp-field label ( color: #444444; font-size: 13px; font-style: normal; font-weight: bold;).sp-form .sp-button ( border-radius: 4px ; -moz-border-radius: 4px; -webkit-border-radius: 4px; background-color: #0089bf; color: #ffffff; width: auto; font-weight: 700; font-style: normal; font-family: Arial, sans-serif;).sp-form .sp-button-container ( text-align: left;)
Fight between Sydney and Cormoran
Opponents
Commanders of the forces of the parties
Strengths of the parties
The battle between the Australian light cruiser Sydney, commanded by Captain Joseph Barnett, and the German auxiliary cruiser (raider) Kormoran, commanded by frigate Captain Theodor Dittmers, took place on November 19, 1941 during World War II. The two ships met approximately 196 km from Derk Hartog Island off the coast of Western Australia. During the half-hour battle, both ships inflicted devastating damage on each other and sank.
General information
In the first half of 1941, the losses of British ships from raiders remained significant. They fell noticeably only at the end of March and never again reached a high level. The measures taken by the Admiralty against enemy raiders finally began to bear fruit. Intercepting raiders remained a difficult task until the number of cruisers on the ocean was increased. And the destruction of supply ships greatly hampered the active activities of the raiders.
In 1941, during five months of sailing in the Indian Ocean, Kormoran destroyed only three ships with a total tonnage of 11,566 GRT. At the end of September, he headed to the shores of Western Australia to lay minefields. The Australian light cruiser Sydney was mainly engaged in escorting ships with valuable cargo in the Indian Ocean. In November, he was supposed to meet the Sjaelland liner at sea, transporting troops to Singapore, and escort it to the place where another cruiser was on duty. On November 15, the cruiser Sydney reported that the escort of Sjaelland had gone well and the ship would return to Australia on November 20. However, on November 19, 1941, Kormoran and Sydney met 196 km from Derk Hartog Island, off the west coast of Australia.
Characteristics of the parties involved
Kormoran
The bulk carrier Steinmark, built in Kiel in 1938, was converted into an auxiliary cruiser at the Deutsche Werft shipyard in Hamburg in 1940 and received the name Kormoran (German operational designation Schiff 4, British - Raider G). The commander of the frigate captain Theodor Detmers was one of the youngest commanders of auxiliary cruisers - born in 1902. The auxiliary cruiser had a displacement of 19,900 tons, with a length/width/draft of 164/20.2/8.5 meters, respectively. There was no reservation. Propulsion was provided by a two-shaft diesel-electric unit with a power of 19,000 hp, and a maximum speed of 19 knots. The crew numbered 399 people. The raider's artillery armament consisted of 6 and 150 mm guns, 1 75 mm. Anti-aircraft weapons were represented by 4 40 mm guns, 2 37 mm and 5 20 mm. The raider was equipped with 6 torpedo tubes. The aviation group consisted of 2 Arado Ar 196 reconnaissance aircraft.
HMAS Sydney

light cruiser HMAS Sydney
The Royal Australian Navy light cruiser Sydney was a Linder class and was built by Swan Hunter & Wigham Richardson Limited on 22 September 1934 and was commanded by Captain Joseph Barnett. The cruiser had a displacement of 6830 tons, with a length/width/draft of 171.3/17.1/5.8 meters, respectively. Belt armor – 76 mm, traverses and deck – 32 mm. The speed was provided by 4 steam turbines with a power of 72,000 hp, the maximum speed was 32.5 knots. The crew numbered 645 people. The cruiser's artillery armament consisted of 8 and 152 mm guns. Anti-aircraft weapons were represented by 4 102 mm guns and 12 12.7 mm guns. The cruiser was equipped with 8 torpedo tubes. The aviation group consisted of the 1st Supermarine Walrus reconnaissance aircraft.
Progress of the battle
Identification
10/19/1941, at approximately 15.50 Kormoran was located 280 km southwest of Carnarvon, Western Australia. The raider had a speed of 11 knots.
15.55
Masts were spotted on the port side and the crew quickly determined that these were the masts of a warship. The raider's commander, Theodor Detmers, decided to avoid the meeting and ordered to turn towards the sun and increase speed to the maximum available. However, due to technical problems with the engine, the speed could only be increased to 14 knots. The raider declared an emergency. At the same time, an unidentified ship was also noticed from Sydney and Captain Joseph Barnet ordered to increase speed to 25 knots and intercept.
Approaching, Sundey laid down on a parallel course with the raider, and, without slowing down, demanded that Kormoran identify himself. The message "NNJ" (You should prepare your signal letters) was transmitted by a signal searchlight. But the raider's team was unaware of this signal, which was rarely used and Kormoran remained silent. Sydney continued to signal for about 30 minutes before signaling "VH" (You should hoist your signal letters) with flags.
16.20
Kormoran raised the signal “PKQI” on the boom, the signal-name of the Dutch transport Straat Malakka and raised the Dutch flag. At this moment, Sydney approached 15 km from the rear side of the starboard side and the signal name “PKQI” was hidden by the raider’s smokestack. Sydney requested: "Show your signal letter more clearly." The signalman from Kormoran stretched the flags on the halyard along the starboard side.
16.35
The Kormoran team was able to fix the engine problem, but Dittmers decided not to increase speed yet.
16.40
, Sydney: “Where are you going?”
16.45
, Kormoran: "Batavia"
16.50
, Sydney: "What are the destination port and cargo?"
16.55
, Kormoran: "Fremantle"
16.55
, Kormoran: "Fabrics"
During the exchange of messages, Sydney completely caught up with Kormoran, caught up with him and slowed down to the speed of the raider. The ships were only 1.3 km apart. Dittmers did not know if the Sydney was ready for battle, as its main guns were trained on the Kormoran, the seaplane was ready for takeoff, but the Syndey's 102 mm guns were unmanned, and most of the crew were on the upper deck looking at the Kormoran. Dittmers ordered to prepare for battle.
17.00
Captain Kormoran Dittmers ordered the transmission of a false distress call "QQQQ", indicating the distress signal of a merchant ship stopped by a military raider. However, in addition to the distress signal itself, the name of the ship, latitude and longitude, local time is also transmitted. But Dittmers transmitted Greenwich Mean Time (GMT) instead of local time, which was a secret signal to the Kriegsmarine, meaning that the raider was in mortal danger.
17.03
the signal was repeated. The signal was partially received by the Uco tug (“QQQQ [inaudible] 1000 GMT”) and a ground station in Geraldton, Western Australia (“[inaudible] 7C 11115E 1000 GMT”).
17.15
Sydney raised the "IK" signal (an abbreviated form of the signal "You should be prepared for a cyclone, hurricane or typhoon") to which the raider did not respond because, from the German point of view, the signal had no meaning. Unknown to Dittmers, the "IK" signal was the middle of the real Straat Malakka's secret call sign: "IIKP". Thus, by removing the outer letters, Syndey decided to identify the raider.
17.30 , 15 minutes after the raider failed to respond to "IK", Syndey signaled "Show your secret signal."
Fight
In response to the cruiser's signal, Dittmers gave the order to drop the disguise, raise the Kriegsmarine flag instead of the Dutch flag and open fire. Almost immediately Syndey responded with a salvo of 152 mm guns.
Kormoran fired the first salvo of 2 150 mm guns - forward starboard and stern starboard, since the 2 central guns were not ready to fire due to a delay in unmasking. This salvo did not cause significant damage. Simultaneously with the salvo, Kormoran launched a simultaneous launch of torpedoes from the starboard tubes. Also, due to the close distance, the Kormoran crew successfully used anti-aircraft artillery, preventing the Syndey team from using additional weapons.

Scheme of the battle between a cruiser and a raider
Syndey's first salvo from 2 bow turrets passed partially over the raider and partially pierced the chimney and superstructure. By the second salvo on Kormoran, 3 out of 4 guns were already ready to fire. With this salvo, Kormoran completely destroyed the cruiser’s bridge and damaged the fire control tower and radio room. By the third salvo, the raider's fourth gun was ready for battle. With the third and fourth salvos, Kormoran disabled Sydney's bow turrets. Kormoran fired the fifth and sixth salvos at the waterline and superstructure of the cruiser. Syndey then opened fire from the rear turrets. Multiple hits caused a fire on the raider and damaged the engine room. During the raider's eighth salvo, one of the torpedoes fired at Syndey at the beginning of the battle hit the cruiser in the sonar area. A torpedo hit left Syndey with a hole in her port side. Syndey began to fall on the bow and turn to the left, passing astern of Kormoran.
As of 17.35, Syndey's main caliber turrets were all taken out of combat, and the superstructures and engine room were on fire. Kormoran's engine room was damaged and one of its oil tanks was on fire. Kormoran followed the same course without changing speed, Syndey found himself to the left of the raider, the ships began to move away from each other. At 17.45 Syndey fired a salvo of two torpedoes from the starboard tubes, but did not achieve a hit, as Kormoran lost power due to engine damage. Syndey continued to move away from the raider at low speed. Kormoran continued to fire at the cruiser, but due to the increase in the distance to the target, almost all the shells flew past the target. The raider fired the last shot at 17.50, being at a distance of 6 km from the cruiser; at 18.00 a torpedo was launched, but it did not hit the cruiser.
Losses and results
By the end of the 30-minute battle, both ships were badly damaged and on fire, they were 10 km apart. Kormoran scored 87 hits on the cruiser versus Syndey's 8 hits on the raider. Survivors from the raider claimed that they saw the glow of the fire on the horizon until 22.00. As it turned out later, the team was able to maintain control of the cruiser, Syndey went south, towards Geraldton, at a speed of 1.5 knots. For 4 hours the ship remained buoyant, but then, probably, the list to the left side reached a critical point and Sydney sank. None of the Syndey crew survived.
Kormoran completely lost momentum and remained in place. At 18.25, Dittmers gave the order to abandon ship, as the fire in the oil tank was approaching the mine cellars, and the fire extinguishing system was not functioning. At 21.00 the preparation and launching of the boats began. By 00.00 on November 20, 1941, Kormoran was abandoned, at 00.30 the mine cellar exploded and the raider slowly sank. During the battle, the Kormoran team lost 81 people.
The Royal Australian Navy received its baptism of fire on November 9, 1914. In the battle of Cocos Island, the cruiser Sydney sank the German raider Emden, forever leaving her name in naval history.
In this battle, the Australians paid for the death of Russian sailors from the cruiser Zhemchug, sunk by Emden on October 28, 1914. At the beginning of the First World War, a German squadron consisting of two armored and four light cruisers operated in the Pacific Ocean, among which was the Emden, built in 1908, a light armored cruiser with a displacement of 3,592 tons, armed with 10 4.1-inch caliber guns. Being the last of the German cruisers to have steam engines, it developed a relatively low speed (24.1 knots). This raider's combat career, which lasted only a little over three months, was so successful that he forever reserved his place in naval history. Painting by artist A. Burgess - Burning "Emden" On the thirty-first of July 1914, the "Emden" left the port of Qingdao, a German naval base in China. It was obvious that only a few days remained before the largest European states entered the war, and the captain of the German cruiser Von Muller chose to meet her on the high seas. On August 2, the Emden crew learned that Germany had declared war on Russia and the very next day, having learned that France had joined Russia, the captain of the German cruiser Von Muller began hunting for the ships of the Allied powers. Cruiser "Emden" On the Fourth of August, near the island of Tsushima, "Emden" met the Russian steamer "Ryazan" with a displacement of 3,500 tons, heading to Nagasaki. The Ryazan, which had about 80 passengers and some cargo on board, tried to evade pursuit into the waters of neutral Japan, sending radio signals for help to Vladivostok. Having jammed the radio signals of the Russian steamer, the Emden, after an hour-long chase, overtook it and forced it to stop with a series of 12 warning shots. When prize crew officer Julius Lauterbach boarded the Ryazan, the Russian captain tried to feign complete ignorance of the German language, but Lauterbach, laughing, reminded him that just a month ago they had a lively conversation in one of the bars in Qingdao... Von Muller, while impressed by the speed of the new Russian steamship (ironically, built in Germany), he decided to keep it for later use as an auxiliary raider. Subsequently, the Germans installed eight 4-inch guns on the Ryazan, removed from the old gunboat Kormoran, and equipped the newly-made raider with a crew from the same ship. On August 27, 1914, he was included in the Pacific squadron of Count von Spee under the name “Cormoran II” *. Having failed to achieve any results, the newly minted raider was interned in December of the same year in the port of Guam. On August 12, the Russian cruisers Askold and Zhemchug, which at one time took part in the naval battles of the Russo-Japanese War, were attached to the Anglo-French squadron under the command of Admiral Gerram, whose main task was to search for and destroy German cruisers. Russian ships took part in the hunt for coal miners of von Spee's squadron and escorting English and French transports... Meanwhile, the Emden captured and sank one transport after another. On September 22, the raider managed to shell the Indian port of Madras and cause serious damage to its oil storage facilities. As a result of the shelling, 5 port workers were killed and 12 were injured. On October 26, 1914, the Pearl arrived in Penang (an island off the northwestern coast of Malaya) for a boiler cleaning stop. Contrary to the advice of Admiral Gerram, who warned of the need to take increased precautions, the captain of the Zhemchug, Cherkasov, left the cruiser on October 27 to spend the night on the shore. The cruiser's torpedo tubes were unloaded, and only 12 shells were stored near the guns. The number of sailors on watch was no more than usual... Cruiser "Pearl" The captain of "Emden", meanwhile, correctly calculated that the cruisers of the allied squadron would have to call at ports from time to time for repairs and replenishment of water and coal. The most convenient place to anchor was Penang Bay, and von Muller decided to try his luck. On the morning of October 28, 1914, the Emden, carrying a false funnel and disguised as the British cruiser Yarmouth, entered Penang Bay. The only large warship at anchor was the "Pearl", turned to port towards the entrance to the bay. At 5.13, the Emden raised the German flag and opened fire, and at 5.18, from a distance of about 360 meters, it fired the first torpedo, which exploded in the stern of the Russian cruiser’s hull. Half of the Zhemchug's shells were stored near the stern gun, which was disabled when a lifeboat, torn off by an enemy shell, fell on it. Another six shells were stacked at the N2 gun on the starboard side. The gun crew dragged the shells to the bow gun and returned fire, but to no avail - one of the shells flew over the Emden and hit an anchored cargo ship. At 5.28, having turned 180 degrees, the German cruiser fired another torpedo from the port side from about 700 meters. The hit of this torpedo turned out to be fatal for the Pearl - the cruiser exploded, broke in half and sank. Eighty-nine Russian sailors were killed and 143 were injured. The death of the "Pearl" was costly for two of its officers - Captain Cherkasov and Senior Lieutenant Kulibin. For criminal negligence they were sentenced to imprisonment (3.5 and 1.5 years, respectively) and stripped of their officer ranks, awards and titles of nobility. The French gunboat D'lberville was also in the bay. She began to fire at the Emden, but it avoided combat because its signalmen saw a warship a few kilometers from the entrance to the harbor, which they initially mistook for a cruiser. Deciding that the small gunboat would not get away from him, von Müller concentrated his attention on the larger enemy ship. It was the French destroyer Mousqet, rather carelessly approaching the entrance to the bay. When the distance between him and the Emden decreased to about two miles, the Emden fired a broadside salvo. Only now did the destroyer realize who they had to meet. "Mousqet" turned sharply to the left and went full speed, trying to get away, but it was too late. According to the recollections of the senior officer of the Emden, H. Mücke, already on the third salvo, German sailors noticed 5 hits on the hull of the enemy ship. Then there was a terrible explosion, apparently from the detonation of one of the magazines, and a thick cloud of smoke and coal dust enveloped the entire rear half of the destroyer. The French sailors managed to fire two torpedoes and several shells at the Emden, but it was too late - ten minutes after the start of the battle, the Mousqet sank. The fate of his ship was shared by the captain, who was severally wounded... When rescue boats from the Emden approached the place of the destruction of the destroyer, the French sailors, frightened by stories about the cruel treatment of prisoners of war by the Germans, tried to escape by swimming, although there was no hope of getting to the shore. The Germans managed to pick up 36 French sailors. Meanwhile, Emden's signalmen noticed another destroyer leaving the bay. He tried to chase the German cruiser, but it left him behind behind a wall of tropical rain. Among the rescued French sailors there were many wounded. The Germans provided medical assistance, but three of the wounded died aboard the German cruiser and were buried at sea with full military honors. The funeral ceremony was attended by a platoon of the Emden team in full dress, a rifle guard and all the officers. Von Müller made a short speech in French - the chivalrous attitude of the warring parties towards each other during the First World War was common... Later, after the Germans landed the prisoners ashore in the port of Saban, another wounded French officer died in a coastal hospital . On the Askold they learned about the tragedy of the Pearl in Bombay, where on October 31 he brought the next transports from Colombo. The cruiser's sailors were deeply affected by the death of their comrades, with whom they had served together for many years in the Siberian Military Flotilla. But “Askold” was not destined to avenge the death of his comrades, although he more than once went to sea in search of the German raider. After the sinking of the Pearl and Mousqet, the Emden cruised in the waters of the Indian Ocean for about two more weeks. In total, he chalked up 22 sunk and captured ships. The passengers and crews of the merchant ships were not harmed; they were treated exceptionally generously and transported ashore as soon as possible. The raiding activity of the Emden became a serious problem for the fleets of the Allied powers. In addition to material damage, it also undermined the prestige of British, French and Russian sailors, who for two months could not catch the annoying German raider. However, the Emden was soon destroyed by an inevitable accident... Early in the morning of November 9, 1914, the captain of the Emden, Von Muller, landed a sabotage party on Cocos Island with the aim of destroying the local radio station. The island's military contingent recorded the coded radio signals of the German raider and soon noticed an approaching unfamiliar ship. The radio operator managed to transmit an alarm signal, after which the island's radio station went silent... Von Muller did not know that two weeks earlier, a convoy with soldiers of the ANZAC Corps departed from the coast of Western Australia, heading under the guard of a British, Japanese and two Australian cruisers to Alexandria. The SOS signal transmitted by the Cocos Island radio operator was received by the convoy ships. The commander of the Japanese cruiser Ibuki asked for the honor of going to the aid of the island's garrison, but the captain of the British cruiser Silver, leading the convoy, did not risk leaving the convoy without this powerful armored cruiser. He radioed the order to the Australian cruiser Sydney, which was closest to the other allied ships to the island (about 80 km), to go towards it at full speed. "Sydney" is the newest cruiser with a displacement of 5,700 tons, was built in 1913 in Scotland and transferred by the British fleet to the Australian. Most of its experienced sailors were British, and, in addition, the crew included about 60 Australians who were undergoing combat training on the ship... Cruiser Sydney At 9.15 am, the signalman reported to Von Muller that a four-pipe ship had appeared on the horizon. The captain of the Emden realized that he would have to fight with one of the Allied cruisers. There was so little time left that he had to leave the sabotage group on the shore and go out to sea to meet the approaching enemy ship. Von Müller felt quite confident, as he initially mistook the Sydney for the British light cruiser Newcastle. In fact, the Australian cruiser was superior to her German opponent in speed (27 knots), armor protection and armament: she carried eight six-inch guns firing 100-pound shells. The Emden's fast-firing 4.1-inch guns weighed only 38 pounds. Sydney's captain Glossop decided to open fire from a distance of approximately 8.5 kilometers, since, based on the technical information available to him, he believed that at such a distance he would be out of range of the Emden's guns. However, the first shells of the German cruiser fell into the water just 180 meters from the Sydney, already when the distance to the Emden was about 9.5 kilometers. So at 9.40 am the battle began between the two cruisers. At first, luck favored the gunners of the Emden: their shells damaged the deck superstructures of the Sydney, several sailors were killed and wounded. However, only a few minutes passed, and Sydney’s heavy shells began to cause one serious damage to the German cruiser after another: the radio station was destroyed, the steering and rangefinders were disabled. The forward funnel and mast were blown away by the explosions and fell overboard, taking with them the fire control tower. There were many killed and wounded in the crew, and there was no one to replace them, since three officers and forty sailors from the sabotage group remained on the shore. 40 minutes after the start of the battle, both fire control stations on the Emden were destroyed. The ship was burning, but continued to return fire to fire. By 11 o'clock, only one gun was operational on the German cruiser. Von Müller decided to disengage from the battle and throw the ship onto the reefs to save the surviving crew members. "Sydney" tried to cut off the "Emden's" path to salvation and fired the last salvo from a distance of about 5 kilometers, but it was too late - after 15 minutes the burning ship landed on the reefs. Glossop left the helpless Emden alone and headed towards the coal carrier Buresk, which was located near the battle site - a British ship that had previously been captured by the Emden on its way from Australia to the UK. However, when the prize crew boarded the transport, it was already too late - the German sailors opened the seams and the ship quickly sank. At 4 o'clock in the afternoon "Sydney" returned to "Emden". He had to fire two more salvos at the helpless German cruiser before a white flag appeared on her mast. The victory cost the Sydney team 4 killed and 12 (according to other sources, 8) wounded team members. The losses of the Emden crew were much heavier - 8 officers and 126 sailors were killed, 65 were wounded (according to other sources, 8, 111 and 52, respectively). Thus ended the dizzying career of the German raider (in the photo on the right - the ruins of Emden). In his report to the British Admiralty, Captain Glossop praised the behavior and actions of the 60 young Australian sailors who were training on his cruiser. In this battle, the Royal Australian Navy received a baptism of fire, and the cruiser Sydney paid for the dead Russian and French sailors and for the ships sunk by the Emden.Material from Wikipedia - the free encyclopedia
| Sydney-class light cruisers | |
|---|---|
Light cruiser Hobart |
|
| Project | |
| Country | |
| Main Features | |
| Displacement | 6830…7105 (standard), 8815…9090 t (full) |
| Length | 161.5/171.4 m |
| Width | 17.3 m |
| Draft | 5.6-5.8 m |
| Booking | Belt - 76 mm; traverses - 32 mm; deck - 32 mm; cellars - up to 89 mm; towers - 25 mm; barbettes - 25 mm |
| Engines | 4 TZA Parsons |
| Power | 72,500 l. With. (53.3 MW) |
| Travel speed | 32.5 knots (60.19 km/h) |
| Cruising range | 7000 nautical miles at 15 knots |
| Crew | 570 people |
| Armament | |
| Artillery | 4 × 2 - 152 mm/50, 4 × 2 - 102 mm/45 ("Sydney" - 4×1) |
| Flak | 3 × 4 - 12.7 mm machine guns |
| Mine and torpedo weapons | Two four-tube 533 mm torpedo tubes |
| Aviation group | 1 catapult, 1 seaplane (Perth had no aviation weapons) |
Sydney-class light cruisers- a type of light cruiser of the Australian Navy during the Second World War. A total of 3 ships were built: "Sydney" ( Sydney), "Hobart" ( Hobart), "Perth" ( Perth). They were an improved version of the British Linder-class light cruisers. During construction, the Phaeton was transferred to the Royal Australian Navy and renamed Sydney. Unlike sisterships, it was built by a private enterprise and was manned first, which is why the ships of the Improved Linder project are called the Sydney class.
The only modern light cruisers of the Australian Navy in World War II.
History of creation
At the suggestion of the chief mechanic of the fleet, an echelon arrangement of the power plant was introduced. The alternation of engine and boiler rooms made it possible to get rid of the danger of simultaneous failure of all machines or all boilers when adjacent compartments were flooded, which automatically deprived the ship of its speed. This arrangement was implemented in most foreign fleets. It was used on Arethusa-class cruisers, and at the beginning of 1932 the Admiralty ordered the Lindera project to be reworked accordingly.
Design
Light cruiser Sydney
The project was a reworking of the Lindera project. The sketch was ready in July 1932. With the same basic parameters (armament, armor, speed and cruising range), the displacement increased to 7250 tons. The main ones were the composition and placement of the power plant. The number, type and power of turbines have not changed, but instead of six boilers, four with increased steam capacity remain. They were located in two boiler rooms and as a result, the new ships became two-pipe. In the bow boiler, the boilers stood side by side, and in the stern, in tandem, to free up space for the corridors of the external propeller shafts. Each group of boilers operated its own turbines. Compared to the Linder, the power plant has become 110 tons lighter, and thanks to the improved design of cruising turbines, efficiency has improved, the fuel supply has also increased - all this has increased the cruising range.
Like the Linders, the standard displacement of all cruisers turned out to be less than the design displacement (Emphion - 7040 tons, Apollo - 7003 tons, Sydney - 7198 tons).
Power plant
The main power plant consisted of four Parsons turbo-gear units and four Admiralty-type three-collector steam boilers. All boilers had steam superheaters, fuel and air heaters. The scheme is echelon; the boilers are located in pairs in two boiler rooms, in the bow boiler room the boilers were located side by side, in the stern in tandem to free up space for the corridors of the external propeller shafts, and the TZA - in two engine rooms. The operating steam pressure in the boilers is 24.61 kg/cm² (24.29 atm), temperature - 343°C. Each group of boilers operated its own turbines. Compared to Linder, the power plant has become 110 tons lighter. The total length of the machine and boiler rooms increased by 2.7 m and reached 57.3 m. As a result, the length of the hull between perpendiculars and the greatest length increased by 2.36 m. In July 1935, Sydney entered testing. In preliminary tests, she showed 32.137 knots with a displacement of 8138 tons, and then developed 33.05 knots at the measured mile off Cape St. Abbs. with a displacement of 7105 tons and a machine power of 72,340 hp. With.
Representatives
Modernization
"Sydney". Until her death, the cruiser did not undergo any major upgrades.
"Hobart". In October 1942, the catapult was dismantled; two four-barreled “pom-poms”, eleven single “Oerlikons”, radar types 279, 272, 282, 283, 284 and 285 are installed.
During the repair of battle damage (August 1943 - January 1945), nine single Oerlikons were removed (the remaining two were moved to a new location) and replaced with three twin 40-mm Hasemeyer/Bofors Mk.IV installations (two on the bow superstructure and one on the poop), five 40-mm Bofors in single Mk.HI mounts and two twin Oerlikons. In total, the light anti-aircraft weapons consisted of eight 40 mm/40, eleven 40 mm/56 and four 20 mm/65 machine guns. The front 102 mm turrets were moved from the aft superstructure to the forecastle section. Instead of the previous anti-aircraft director, two new ones were installed on the lower tier of the bow superstructure. Radars of types 279, 272 and 284 were removed, new types 281 B, 276, 277 and American SG-1 and FC-1 were installed. To maintain stability, in May 1943, 175 tons of ballast were placed in the hold, of which only 75 tons were later left.
After the war, the “X” turret was removed from the cruiser, and two quad 40-mm Bofors were mounted in its place. Between 1953 and 1956, Hobart underwent conversion into a training ship.
"Perth". In April 1940, during repairs in Sydney, a 53-foot catapult was installed, which was removed in February 1941 in Alexandria, and a four-barreled 40-mm pom-pom from the damaged cruiser Liverpool was mounted in its place. At the same time, or a little later, a type 286 radar antenna appeared on the top of the main mast.
On July 19, 1941, before the ship returned to Australia, the pom-pom was dismantled and replaced with a 53-foot catapult from Agex. At the same time, four 20-mm Oerlikons were installed (two on turrets “B” and “X”; two more replaced the anti-aircraft machine guns on the bow superstructure, while the aft machine gun was preserved).
Notes
Literature
- Nenakhov Yu. Yu. Encyclopedia of cruisers 1910-2005. - Minsk, Harvest, 2007.
- Patyanin S.V. Dashyan A.V. et al. Cruisers of World War II. Hunters and Defenders - M.: Collection, Yauza, EKSMO, 2007.
- Conway's All the World's Fighting Ships, 1922-1946.- Annapolis, Maryland, U.S.A. : Naval Institute Press, 1996.
- M. J. Whitley. Cruisers of World War Two. An international encyclopedia. - London, Arms & Armour, 1995.
- Smith P.C. Dominy J.R.. Cruisers in Action 1939-1945. - London: William Kimber, 1981.
Links
 |
This is a preliminary article about classes and types of ships and ships. You can help the project by adding to it. |
THE MYSTERIOUS DEATH OF THE CRUISER "SYDNEY"
On November 19, 1941, at sunset off the coast of Western Australia, the famous Australian cruiser Sydney and the German raider Cormoran were killed in a short but bloody battle. But if the crew of the latter survived almost entirely, then 645 members of the Sydney crew failed to escape.
How could it happen that no one survived from the Sydney? - asked journalist V. Luknitsky. - How was the Cormoran, converted from a merchant ship into a warship, able to sink such a large cruiser? Why did the authorities of Great Britain, Australia and the USA classify all documents related to the incident?
These questions have worried many historians before. The British government refused to make public the telegrams exchanged between Churchill and Roosevelt on November 26, 1941 in connection with the sinking of the Sydney. These documents could be the finishing touches to the picture carefully assembled from small historical scraps by the English writer Montgomery. His father, the navigator of the Sydney, died in that battle. In 1973, Montgomery had the opportunity to read the official British Admiralty report on this event. It contained so many absurd questions that he decided to undertake his own investigation.
The writer gained access to declassified documents, including interrogation reports of the surviving members of the Cormoran crew, who reached Australia and were then held in a prisoner of war camp. He found and questioned many of them living in Germany at that time. He was struck by the fact that many were afraid to speak with him frankly and avoided many questions.
Thus, the official channels for obtaining information were closed to Montgomery, and he came to the conclusion that a veil of the strictest secrecy had been erected over all this. And the writer found out why.
The Cormoran spotted the cruiser Sydney at 5 p.m. The first message from the acoustics on that ill-fated November day was: this is a large ship. Then the commander of the German raider, Detmer, was given more accurate information: this is a cruiser. The position of the Cormoran turned out to be hopeless. The range of the Sydney's main caliber guns was over 100 cables (more than 18.5 kilometers), which allowed it to be out of reach of German fire. Detmer saw the only salvation in “camouflage and unexpected fire from all guns at close range.” This is what is written in his report. But although the Cormoran was sailing under the Norwegian flag, this ruse could be instantly exposed as soon as the list of ships in the area was checked on the Sydney. Detmer ordered the radio operator to broadcast a signal warning of the appearance of a suspicious vessel in the area. These distorted data should have convinced the Sydney commander Barnett that the enemy was somewhere off to the side, and not nearby. Then the Kormoran crew simulated a fire on their ship. At 17:30, the Sydney still believed that in front of them was an ordinary merchant ship flying the Norwegian flag. It could barely move and, in all likelihood, was in distress, as it was transmitting an SOS signal.
Barnett ordered the Walrus seaplane to be prepared for flight to search for an imaginary enemy. Then he changed his mind when he saw a growing cloud of smoke from a German raider. The Kormoran was given the signal to approach. Half an hour later, "Sydney" began to drift, stopped the cars and began to prepare boats for assistance. The commander decided that the “Norwegians” could provide information about the enemy ship.
He was the perfect target. The cruiser stood with its side turned towards the Cormoran, at a distance of only 1100 meters. Barnett was so confident that this was a damaged ship that he even allowed the cooks to go on deck. This is exactly what was expected at Cormoran. The German raider fired two torpedoes that hit the target, then fired several salvos from all guns and machine guns. The shells demolished the wheelhouse, caused fires in the aft compartment and tore the Walrus aircraft to pieces. When the cruiser saw that at the stern of the enemy, shrouded in clouds of smoke, a German flag had risen to replace the Norwegian flag, they launched the main caliber guns. "Sydney" fired several salvos. As a result of direct hits in the engine room, the Cormoran burned like a paper warehouse, and its guns were disabled. The raider's team signaled that they were surrendering. The overloaded boats, fighting off the fire, began to move towards the Australian ship in the hope that they would be picked up.
And then someone dealt a sudden and terrible blow to the Sydney; a torpedo hit it. The ship broke and disappeared into the abyss. Who fired this torpedo? Montgomery states quite definitely: a Japanese submarine that went on this voyage specifically to meet with the Cormoran. In other words, Japan was closely associated with the Nazis long before the attack on Pearl Harbor. Not a single member of the Sydney crew was saved, as everyone was mercilessly shot from the submarine so that no one could report her participation in the battle. This fact, according to Montgomery, may explain why the members of the German raider’s team gave confusing, ambiguous answers during interrogations. Some of them admitted that they were afraid to reveal the whole background of those events.
But why is London shrouding this story in secrecy? Because, Montgomery believes, Churchill and Roosevelt are also involved in it. The Australian navy suspected from the very beginning that the Sydney had been sunk by a Japanese submarine, and sent this information to the British Admiralty. Churchill found out about this. The news came at a critical moment for him. The British and Americans at that time were conducting secret negotiations with Tokyo, during which they sought to conclude a temporary neutrality pact with Japan.


